This rich and creamy homemade tonkotsu ramen recipe delivers actual restaurant-quality results right in your own kitchen. While authentic tonkotsu ramen broth requires patience (6-12+ hours of simmering), this deeply satisfying, umami-packed, lip-smacking ramen broth is loaded with complex flavors and slurpy deliciousness.
Plus, it freezes really well, which qualifies it as a made-from-scratch, quick homemade ramen recipe you can enjoy any night of the week in minutes! This is a comprehensive tonkotsu recipe tutorial, so feel free to skip down to the "Jump to" links below to head straight to your preferred section!
Ramen is one of our all-time favorite meals, both to eat and cook at home. When I lived in NYC's East Village - in the heart of Little Tokyo where legendary spots like Ippudo, Momofuku Noodle Bar, and Rai Rai Ken perfected their craft - I became intent (if not a little obsessed) with learning how to make the perfect bowl of ramen.
I was intent on making everything from scratch, just like these ramen ya's, because we truly love this dish that much, and I knew I could make it more economically at home.
These East Village ramen shops (among countless others in the neighborhood) became my testing ground, teaching me what makes truly exceptional ramen, including tonkotsu, chicken ramen (aka Tori Paitan or chicken paitan), and miso ramen.
In this post, you'll find everything you need to know about making authentic tonkotsu, including six different ramen tare recipes, and how to customize them all to help you create your own perfect bowl.
If you enjoy this recipe, you might also want to try these easy homemade ramen noodles recipe or these jammy perfect ramen eggs. Then dive into making homemade braised pork belly and homemade chashu pork!
Jump to:
- Why You'll Love This Homemade Ramen Recipe
- 4 Key Components of Great Homemade Ramen
- Here are the 4 Key Components of Ramen:
- What Does Tonkotsu Mean?
- What is Tonkotsu Ramen (Tonkotsu Ramen Broth)?
- Tonkotsu Broth Cooking Stages Photos (at 2, 3, 6, and 8 hours intervals)
- Can You Make Tonkotsu Broth in an Instant Pot or Pressure Cooker?
- Ingredients for Homemade Tonkotsu Broth
- How to Make Tonkotsu Ramen Broth
- In-Depth Step-by-Step Recipe Photos (at a glance)
- Types of Ramen Broth (Most Common Varieties)
- Substitutions
- Variations
- Essential Ramen Toppings
- How to Assemble a Bowl of Ramen
- Equipment for Making Ramen Broth
- Storage and Make-Ahead Tips
- How to Serve Ramen
- Top Tips for Perfect Tonkotsu Broth
- Why Is My Tonkotsu Broth Not White?
- What is Ramen Tare? Essential Ramen Seasoning Guide
- Ramen Tare Recipes (Shoyu, Shio & Miso)
- How to Store Ramen Tare
- How to Reheat Tonkotsu Ramen Broth
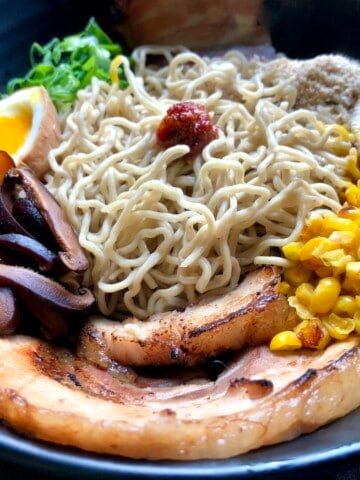
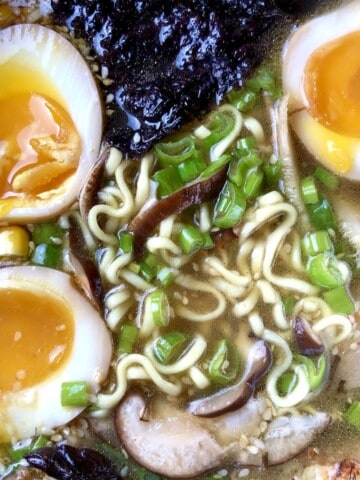
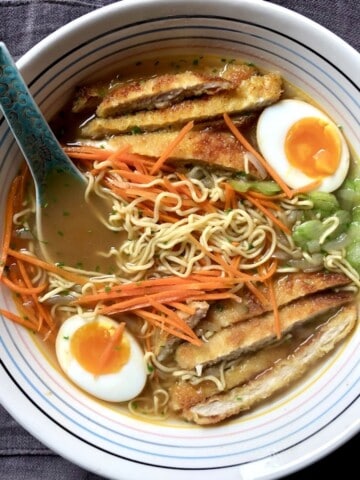
- Homemade Ramen Photos
- Authentic Japanese Restaurant Ramen Around the World (in Real Photos)
- FAQ
- More Easy Ramen Recipes
- 📖 Recipe
- Regional Ramen Styles
- The History of Ramen
- Nutritional Information
- Cost Analysis: Homemade vs Restaurant
- Food Safety
Why You'll Love This Homemade Ramen Recipe
- Restaurant-quality results without the reservation: This authentic tonkotsu broth rivals the best ramen shops, with that signature creamy, milky-white appearance
- Incredibly rich and flavorful: Hours of slow simmering extract maximum collagen from pork bones, creating an intensely slurpy satisfying broth
- Make-ahead friendly: The broth can be made 2-3 days in advance and refrigerated or frozen for up to 1 year without any change in quality (believe me, I've tested it!😍)
- Completely customizable: Build your perfect ramen bowl with homemade toppings like fresh ramen noodles, chashu pork, ramen eggs, and more
- Way more affordable than takeout: One batch makes multiple servings of gourmet-quality Japanese ramen without the cost
4 Key Components of Great Homemade Ramen

If you've been following along for Biting at the Bits Ramen Month, you know that a great bowl of Japanese ramen is not only possible to make at home, but it's incredibly easy. Noodles are a very important component, but the broth is equally important.
And ramen just wouldn't be ramen without all the delicious toppings and tare which allows you to play around with both flavor and texture.
Here are the 4 Key Components of Ramen:
1. Ramen broth - This tonkotsu broth uses collagen-rich pig trotters (I like to add chicken backs for extra flavor, though it's not an authentic ingredient) and aromatics that transform into a rich, silky broth.
While I've made it in as little as 6 hours and cooked it for as long as 13 hours, 8 hours hits the perfect sweet spot for flavor, color, and texture. You'll know you've succeeded when the chilled broth gels like Jell-O - that's all that extracted collagen working its magic.
2. Chewy alkaline ramen noodles, which can be made with or without the addition of eggs.
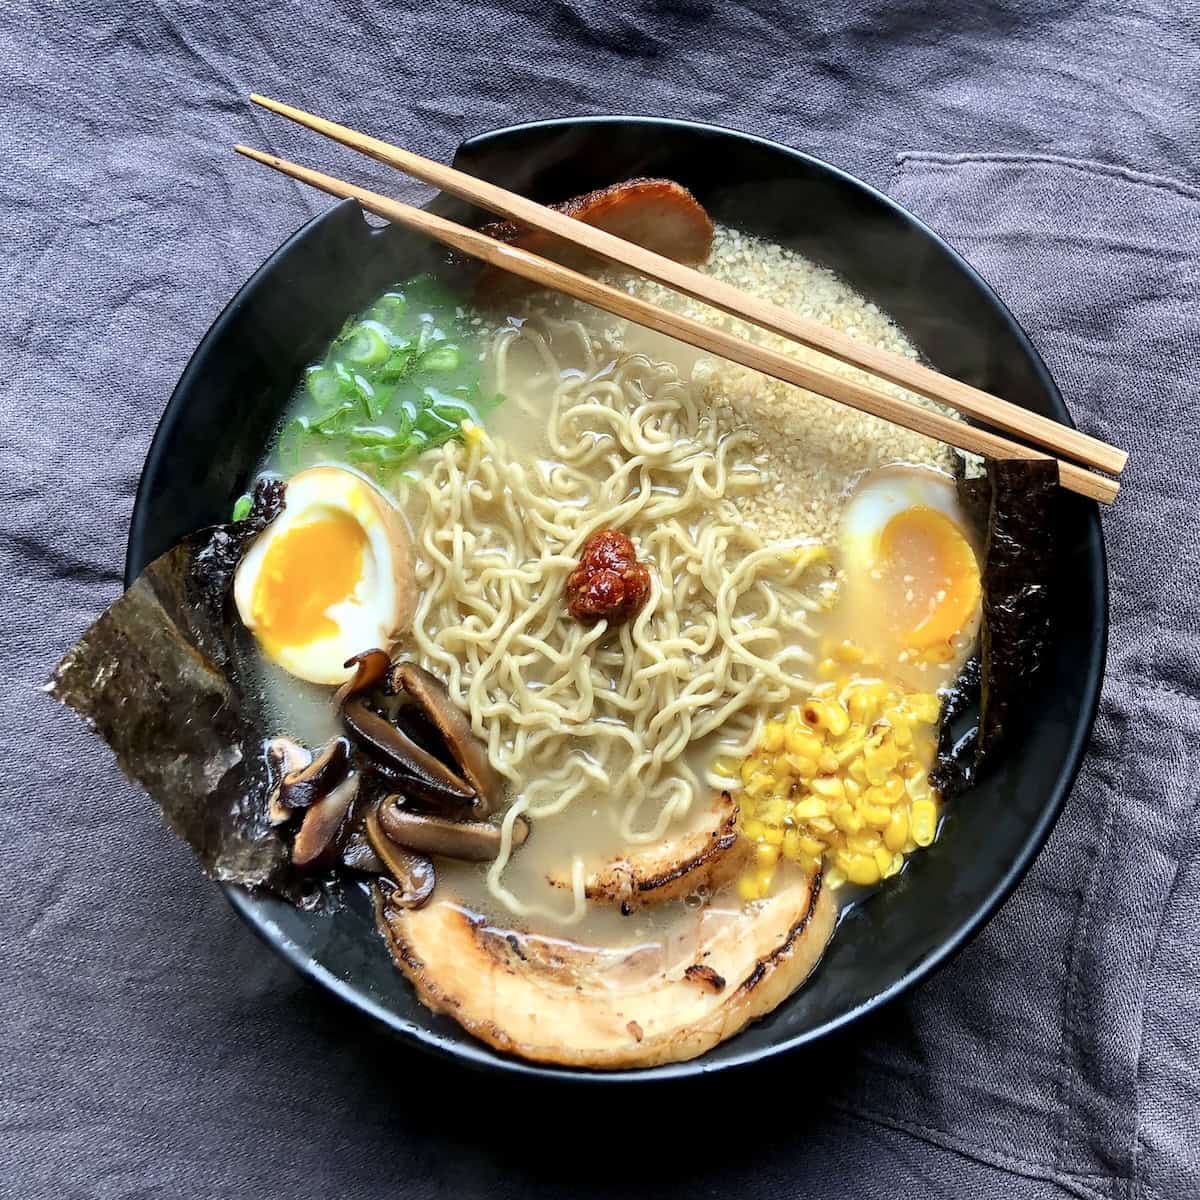
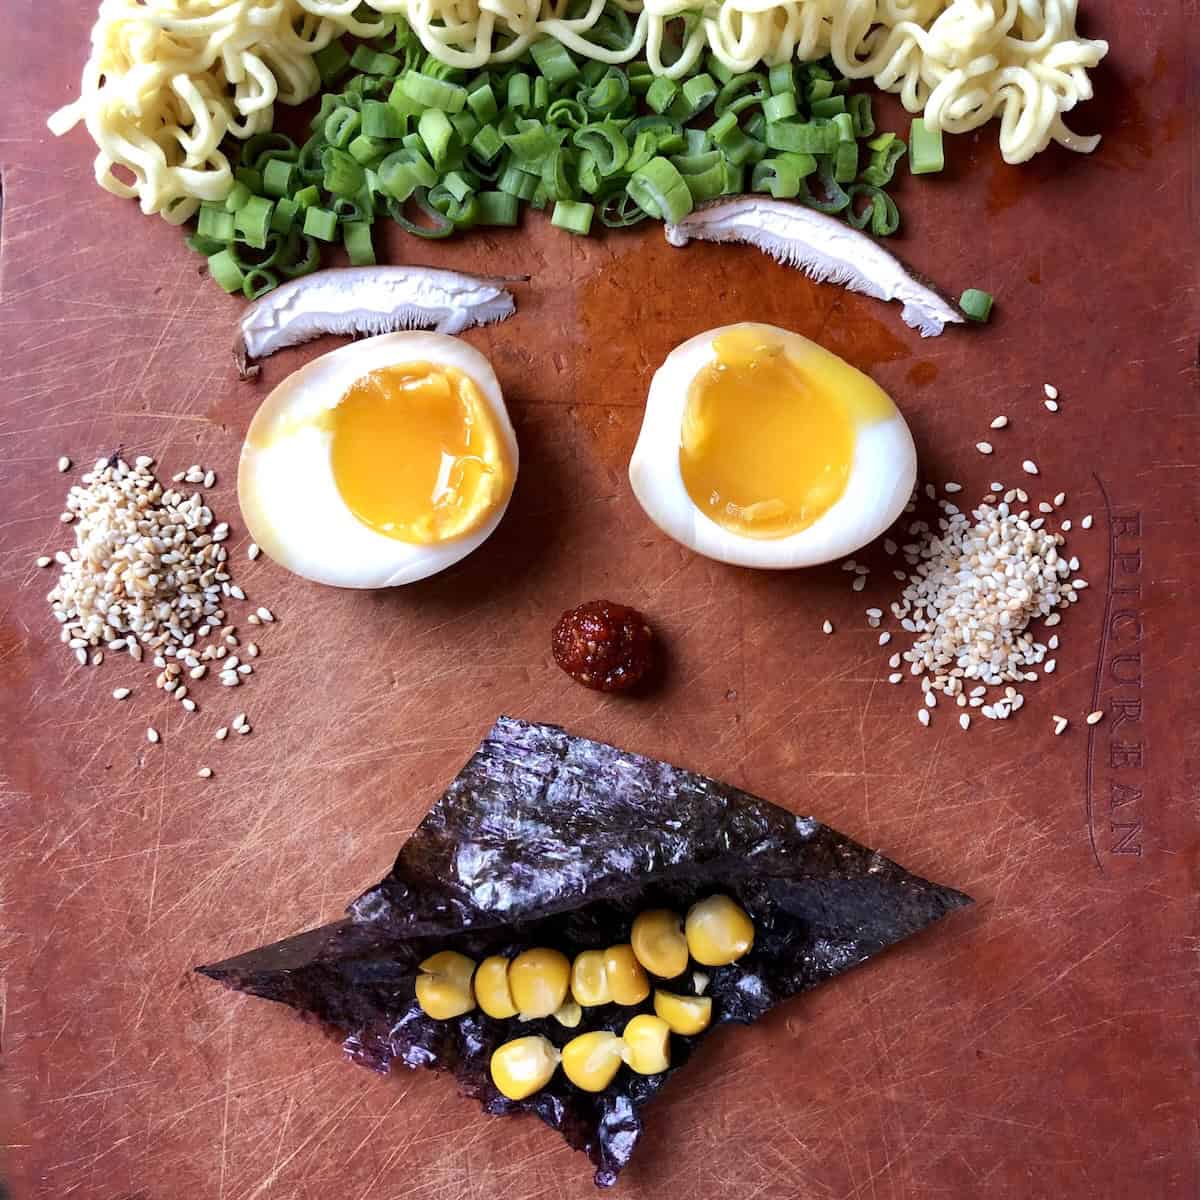
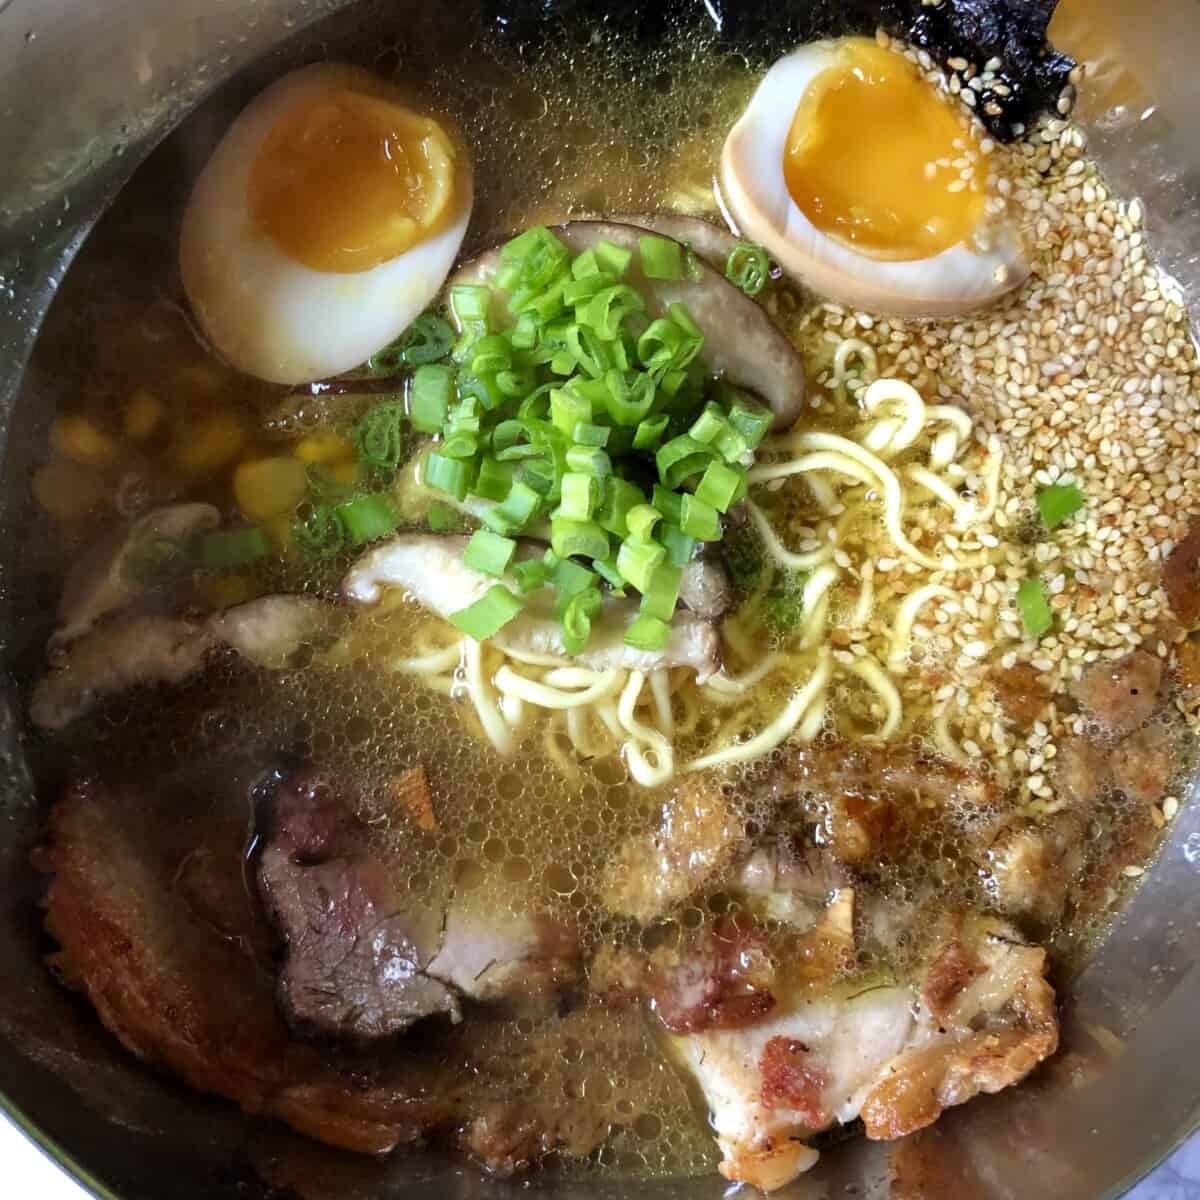
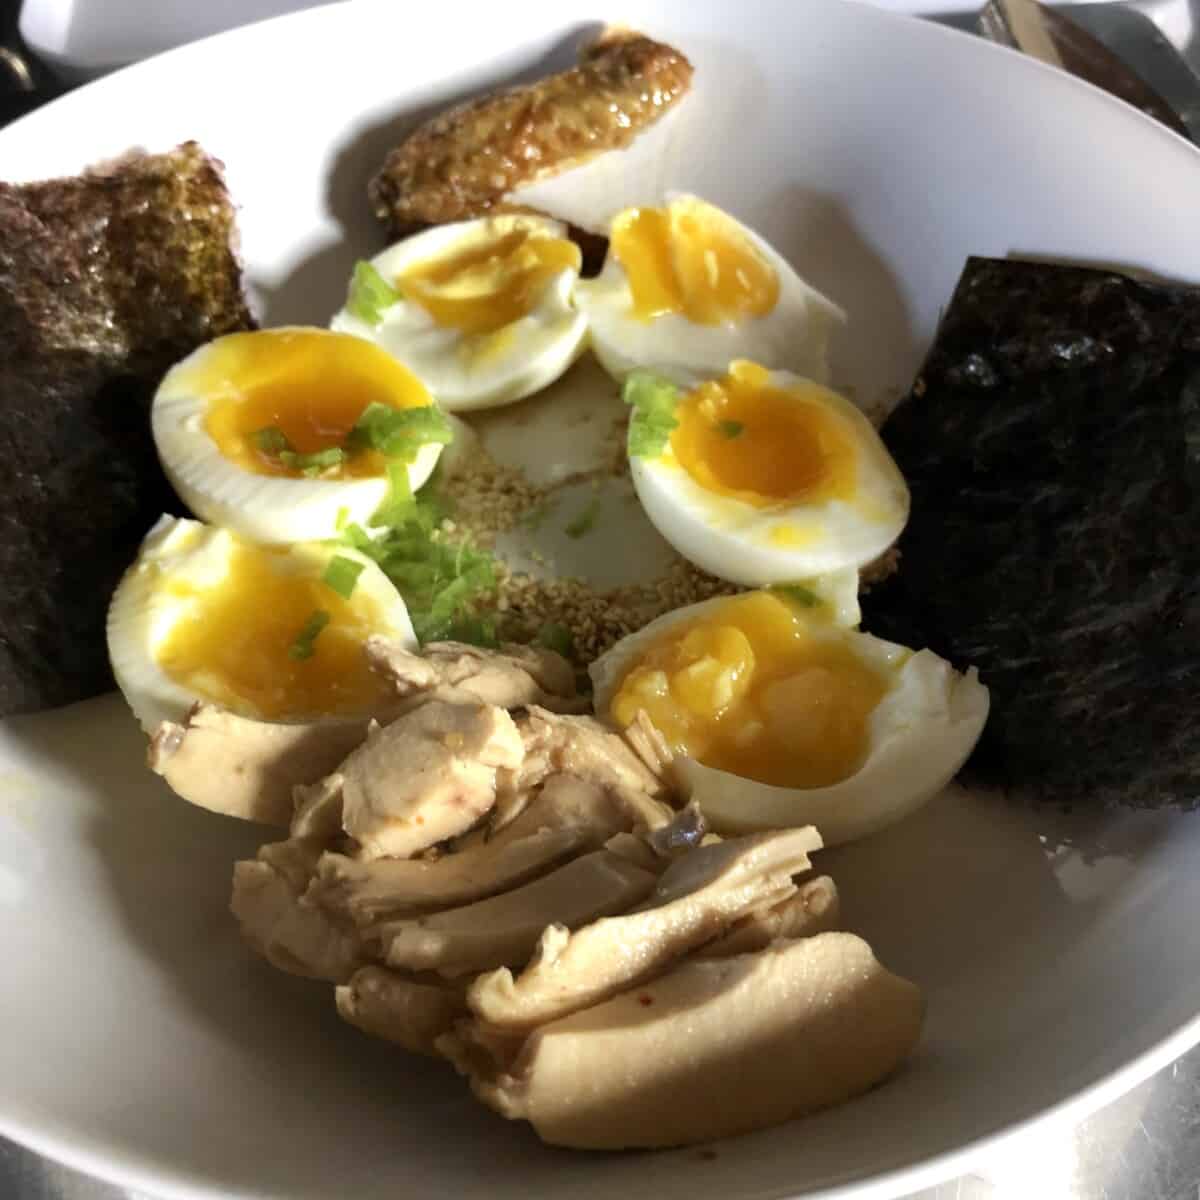
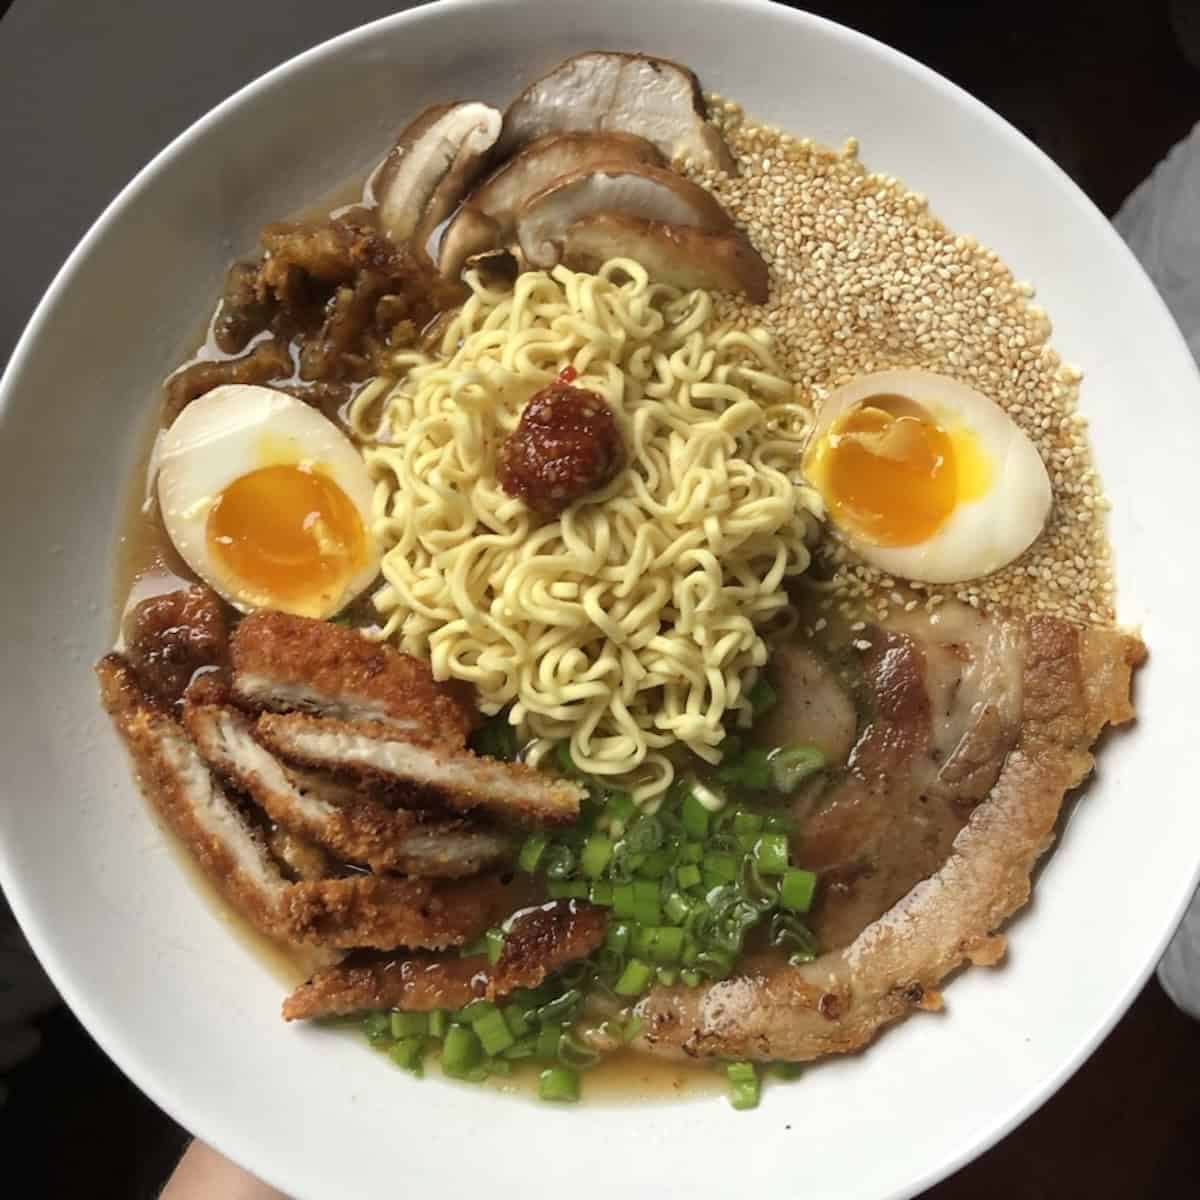
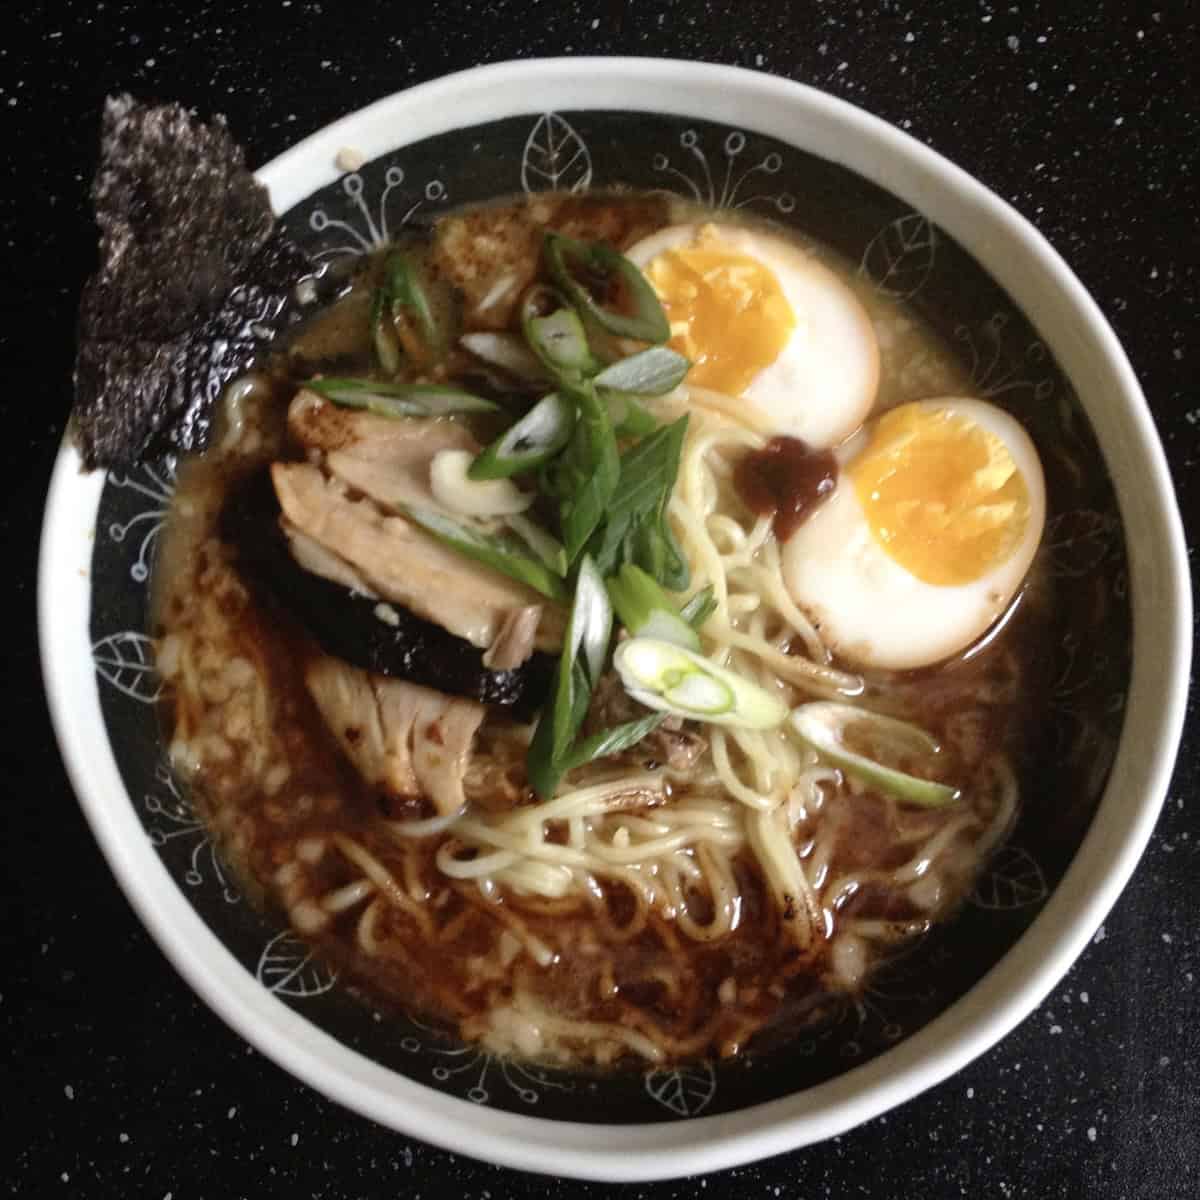
3. Ramen toppings of your choice like traditional braised pork chashu (チャーシュー), ramen eggs (ajitsuke tamago), sliced scallions, braised pork belly, toasted sesame seeds, nori, bok choy, menma (fermented bamboo shoots), pickled ginger, bean sprouts, narutomake (sliced fish cake), corn, spicy Japanese chili paste, mayu, and shitake mushrooms, just to name a few.
4. Tare (tah-reh) are seasonings usually added to ramen toward the end of cooking or directly to individual bowls of assembled ramen (our preference). The addition of tare means you can use one stock, but create multiple different-flavored ramen.
Three common Japanese ramen tare seasonings are: miso (fermented bean paste), shoyu (soy sauce), and shio (salt). Keep reading to find out more about tares and see the recipes for how to make them below.
What Does Tonkotsu Mean?
Tonkotsu (豚骨/とんこつ) literally translates to "pork bones" in Japanese, with "ton" (豚) meaning pig, and "kotsu" (骨) meaning bone. This rich, creamy ramen style originated in Fukuoka Prefecture on Japan's Kyushu Island in the 1940s.
Here in southern Japan, particularly in Hakata and Nagahama, resourceful cooks discovered that boiling pork bones for extended periods created an intensely flavorful, milky-white broth.
What is Tonkotsu Ramen (Tonkotsu Ramen Broth)?
Tonkotsu ramen is a rich, creamy Japanese noodle soup featuring a pork bone broth that's been simmered for 6 to 12+ hours until it becomes milky white and deeply flavorful.
Unlike clear broths that require a gentle simmer, authentic tonkotsu requires an aggressive rolling boil. This process extracts collagen, fat, protein, and minerals from the pork bones, suspending and emulsifying them into a silky, milky-white broth with that signature lip-smacking consistency.
The broth is cooked on a low, rolling boil for anywhere from 6 to 48 hours (8 hours is our preferred sweet spot). And although not an authentic ingredient in tonkotsu, chicken backs or wings are often added to balance the flavor, as is the case with this recipe.

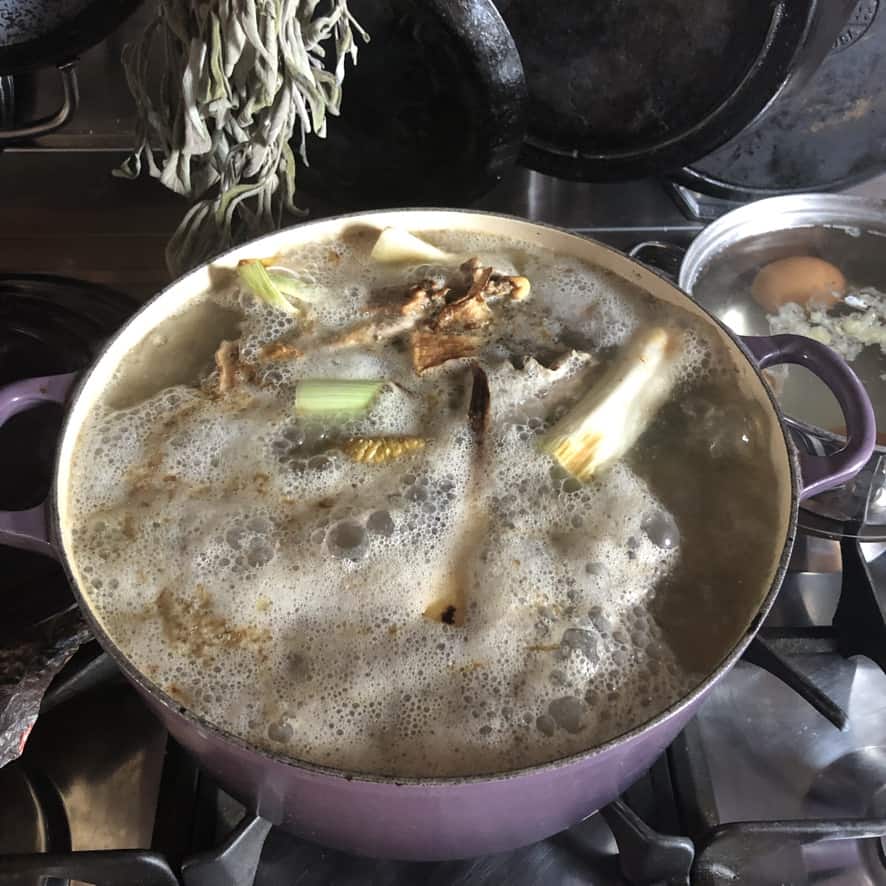
Tonkotsu Broth Cooking Stages Photos (at 2, 3, 6, and 8 hours intervals)
The magic of this tonkotsu broth happens gradually over 8 hours of simmering. Understanding what to expect at each stage helps you know you're on the right track and builds confidence throughout the long cooking process.
Here's what your tonkotsu broth will look like as it transforms from a clear to a simple cloudy liquid into that signature creamy, restaurant-quality broth:
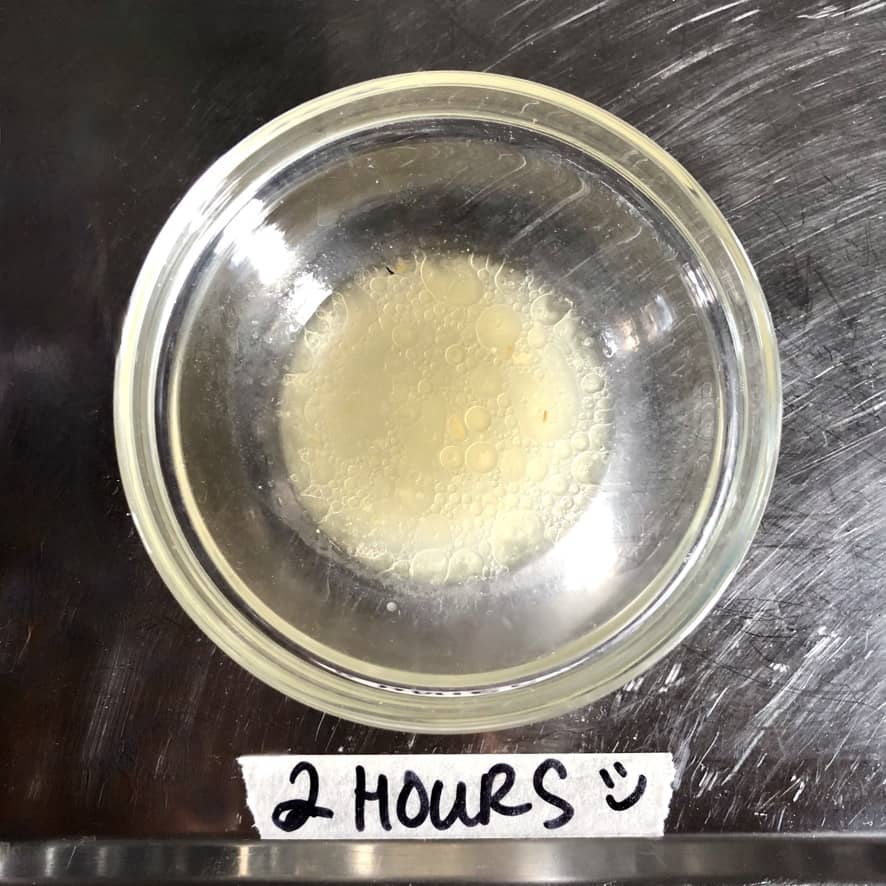
2 Hours: Your broth will look beige and somewhat like typical chicken soup, but cloudier. The fats are still floating on the top, not yet emulsified into the broth. The bones are just beginning to release their collagen.
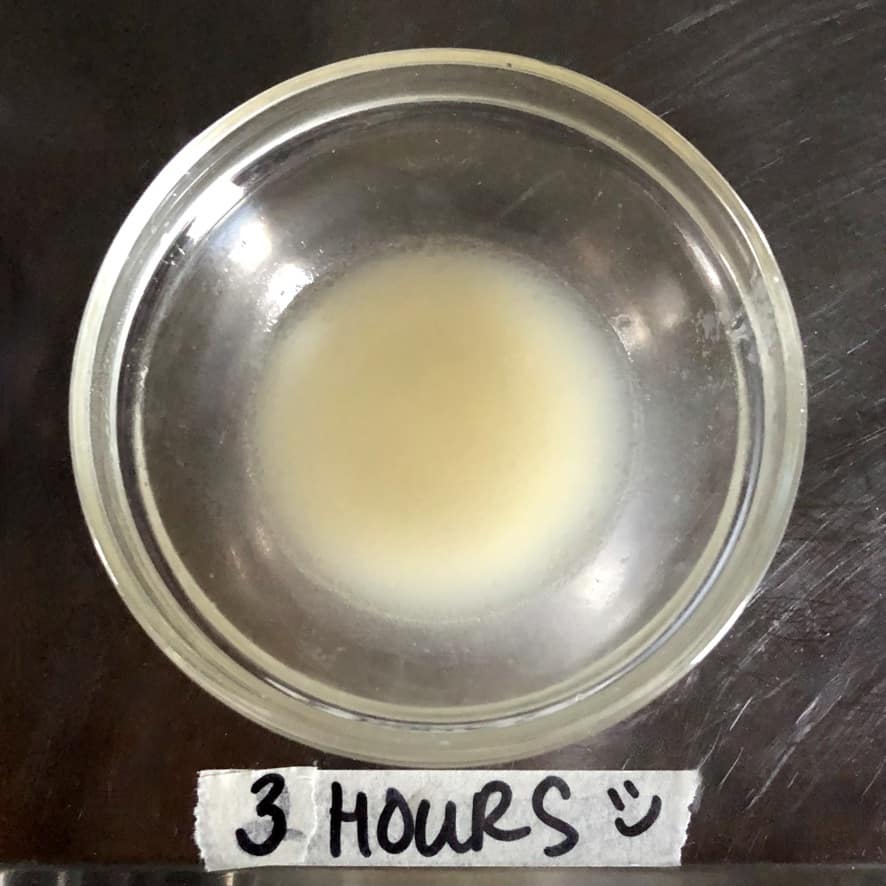
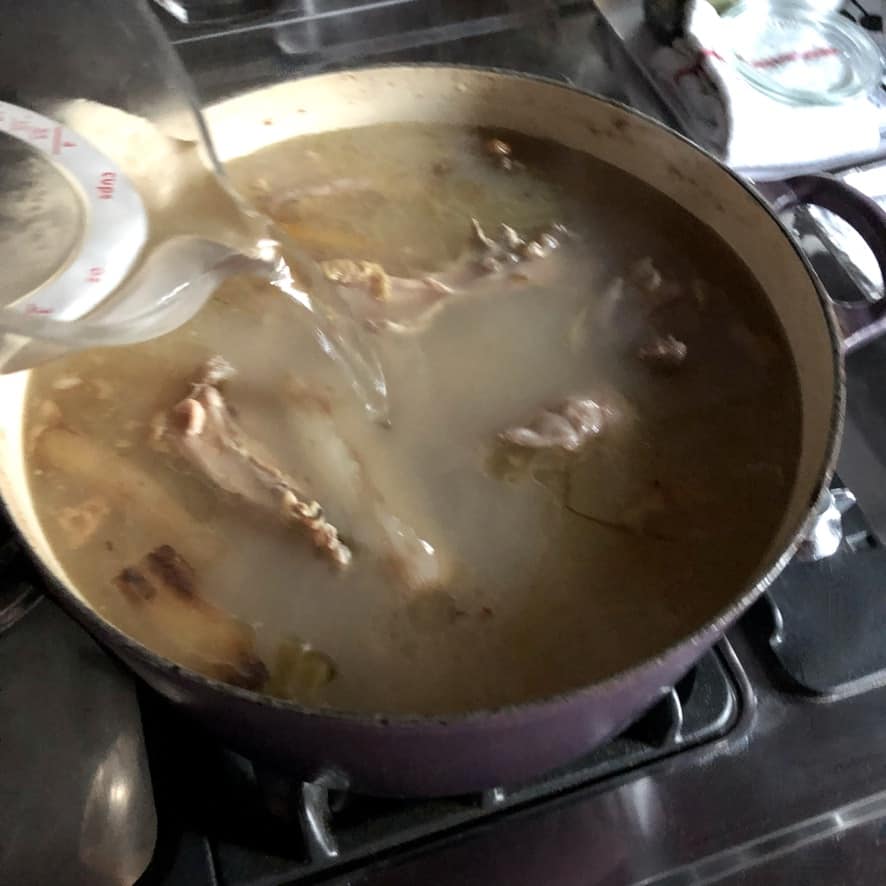
3 Hours: You'll notice the broth becoming cloudier and more opaque and the fats are now no longer suspended on the top. Instead they're emulsified into the broth. At around the 3-hour 30-minute cooking mark, I typically add a bit more water to the broth.

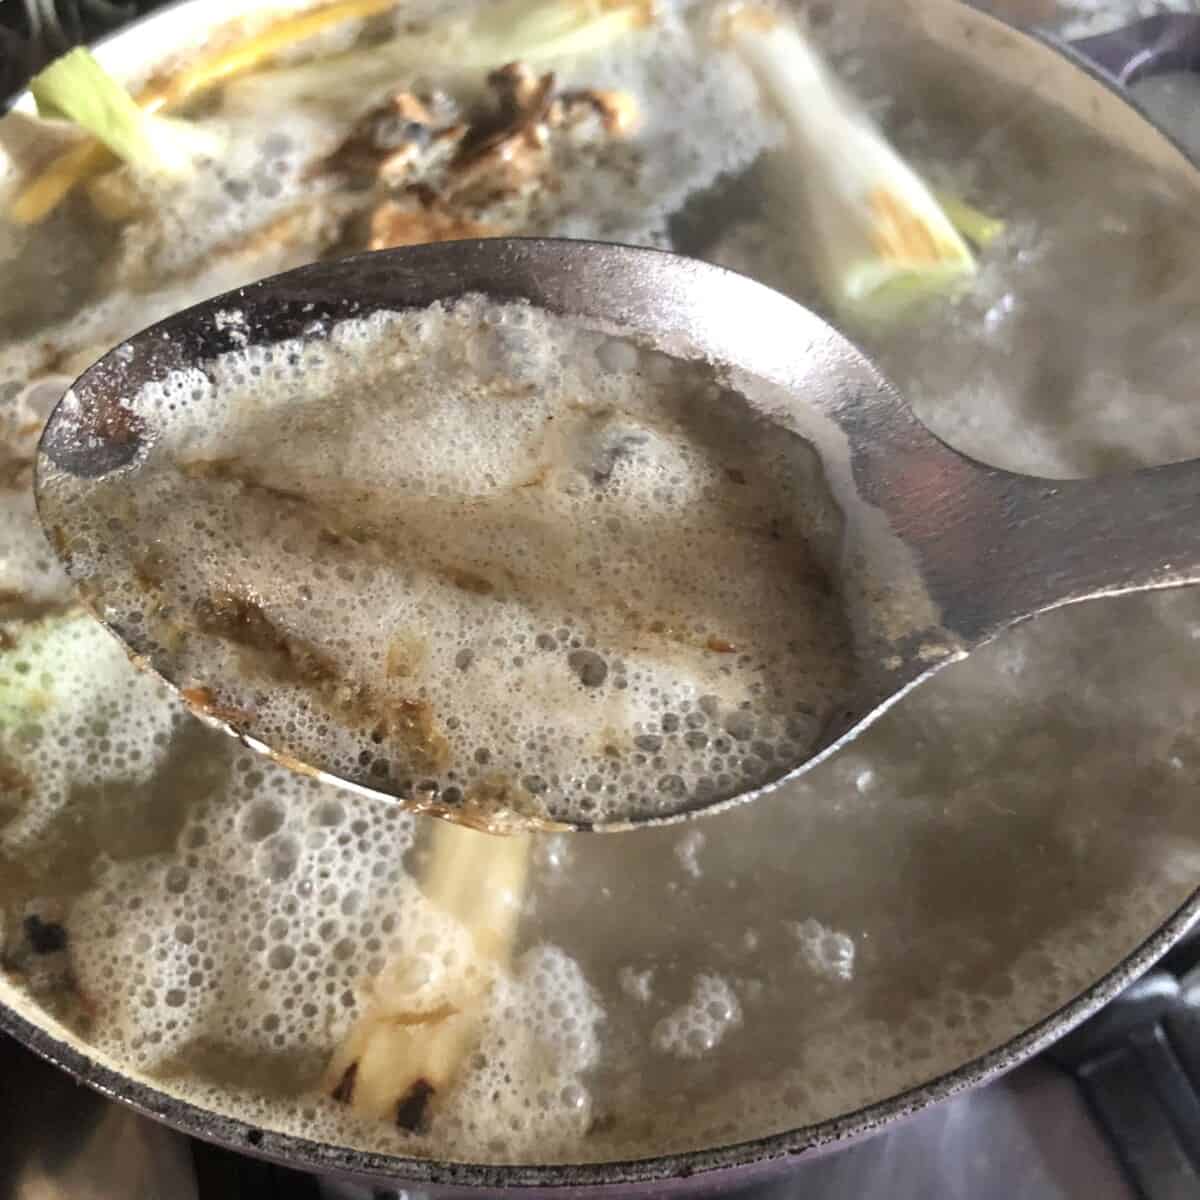
6 Hours: Now we're getting somewhere! The broth transforms to a more opaque, whitish color as the fats begin really emulsifying. It should coat a spoon lightly and have a noticeably richer mouthfeel when tasted.
It's delicious to eat at this stage, but giving it 2 more hours changes everything!


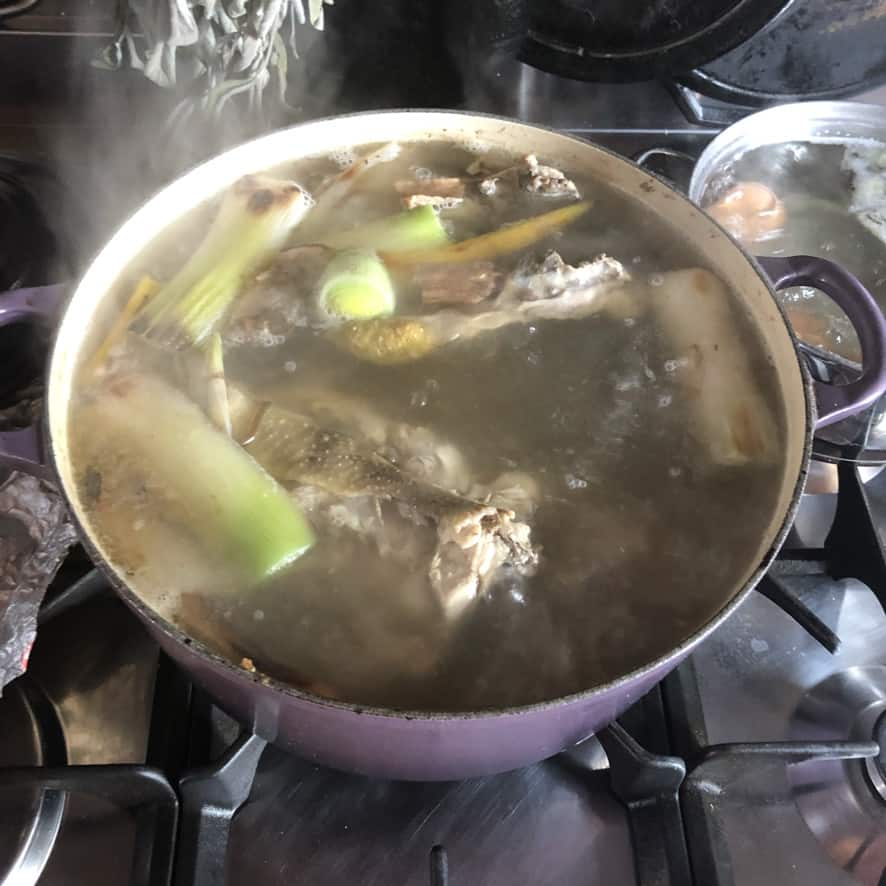
8 Hours: Perfect tonkotsu broth (not yet strained in left photo)! The liquid should be completely opaque and milky white, with a creamy, lip-smacking consistency.
When strained and chilled, it will gel like Jell-O (right photo) due to all the extracted collagen - this is exactly what you want for authentic restaurant-quality results.

Can You Make Tonkotsu Broth in an Instant Pot or Pressure Cooker?
Yes, you can make tonkotsu broth in an Instant Pot or pressure cooker, though there are some trade-offs to consider. The biggest limitation is batch size. Unless you have an exceptionally large pressure cooker, you'll only be able to make a fraction of what you could produce on the stovetop using a large pot.
Most average home pressure cookers max out at 5-8 quarts, which significantly limits how many bones you can use and how much broth you'll yield.
I prefer making tonkotsu broth on the stovetop in large batches for a few reasons: the energy efficiency of making one big batch that I can freeze into portions makes more sense than running multiple pressure cooker cycles. Plus, the traditional stovetop method allows me to visually monitor the broth as it transforms from clear to that signature milky white.
That said, if you're short on time or stove space, a pressure cooker can reduce the cooking time from 8-12 hours down to about 4 hours. Just know that some ramen purists argue the texture and depth of flavor aren't quite the same as the slow-cooked version. But I've done it, and I can tell you that it's still very delicious!
Ingredients for Homemade Tonkotsu Broth
This tonkotsu broth is delicious on its own, but I love customizing it with pantry extras - trimmed prosciutto fat, a Grana Padano or Parmigiano-Reggiano rind, or a slice of bacon, pancetta affumicata (smoked pancetta), or speck for subtle smokiness.
Feel free to swap ingredients based on what you have: substitute onions for leeks, chicken feet for chicken backs, or add extra shiitake mushrooms. No bonito flakes? Skip them. Want even richer flavor? Toss in a chunk of uncured pork belly or fatback.
The beauty of this homemade ramen broth is its versatility - it's practically foolproof and adapts to whatever you have on hand.
For the Tonkotsu Broth:
- Pork bones pig trotters (pig's feet) - the foundation of authentic tonkotsu broth
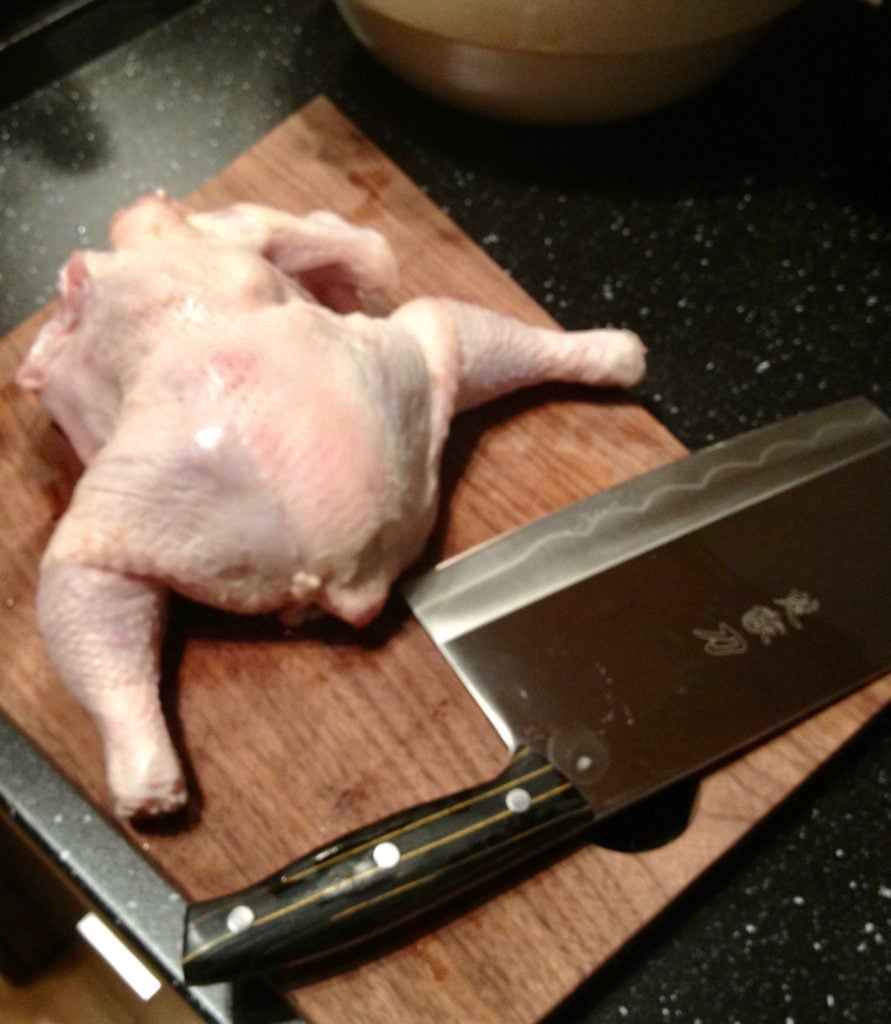
- Chicken Backs or Wings - (not authentic, but a SUPER tasty addition)
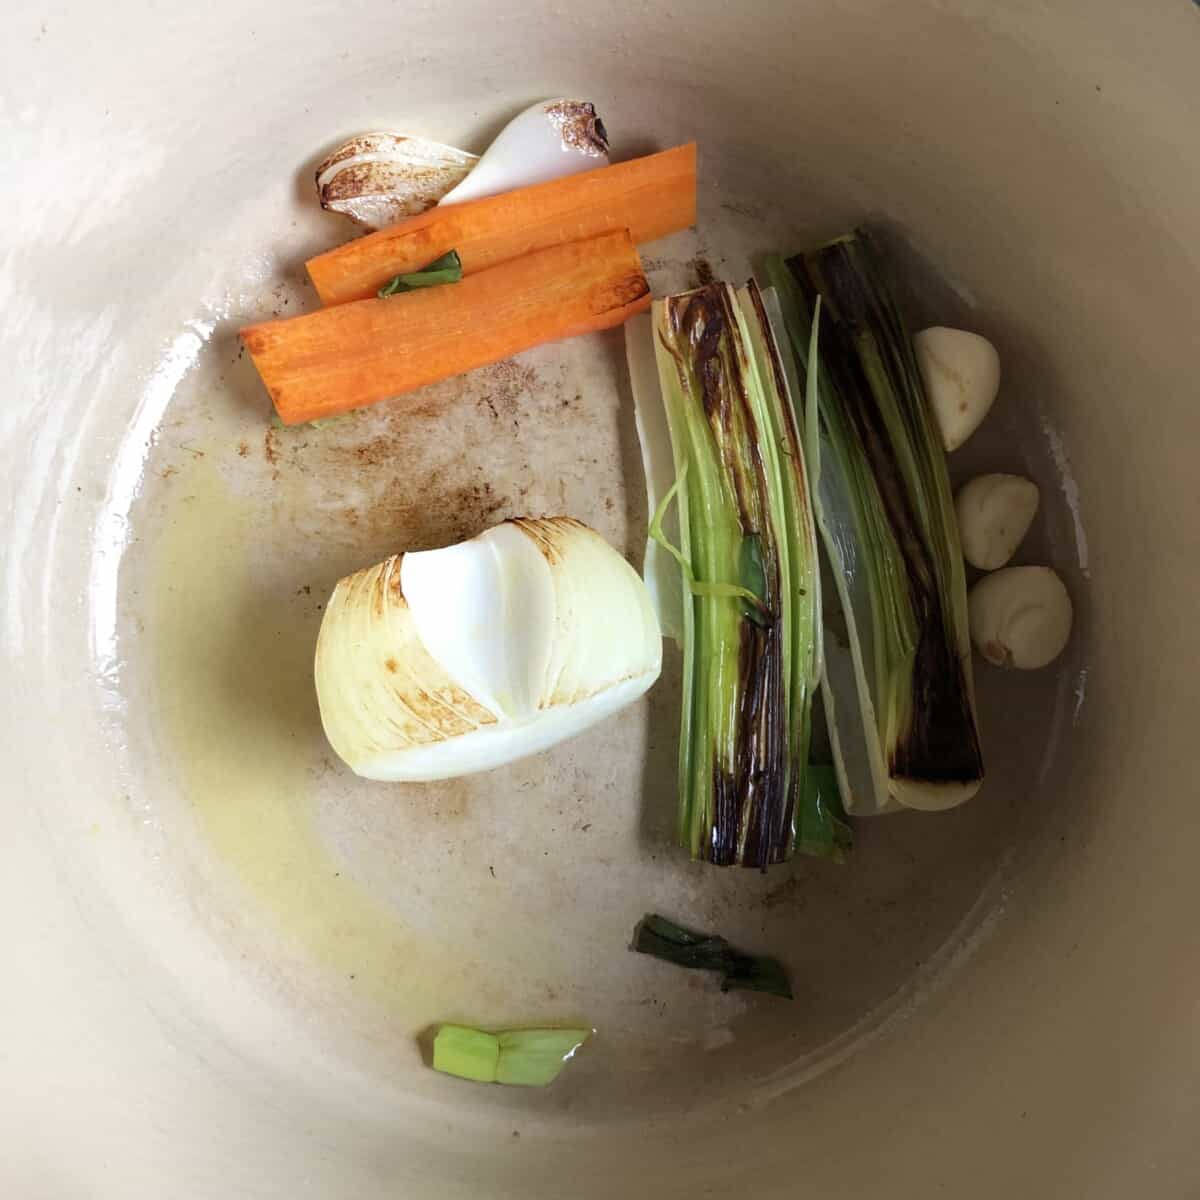
- Aromatics (onion, scallions, leeks, garlic, ginger, shiitake mushrooms, carrot, bonito flakes ) - for added depth of flavor and totally customizable depending on what you have (or don't) in your pantry
- Water - filtered water produces the cleanest-tasting broth
- Time and patience - 8 hours of simmering creates that signature creamy texture
See recipe card for exact quantities.
For Assembly:
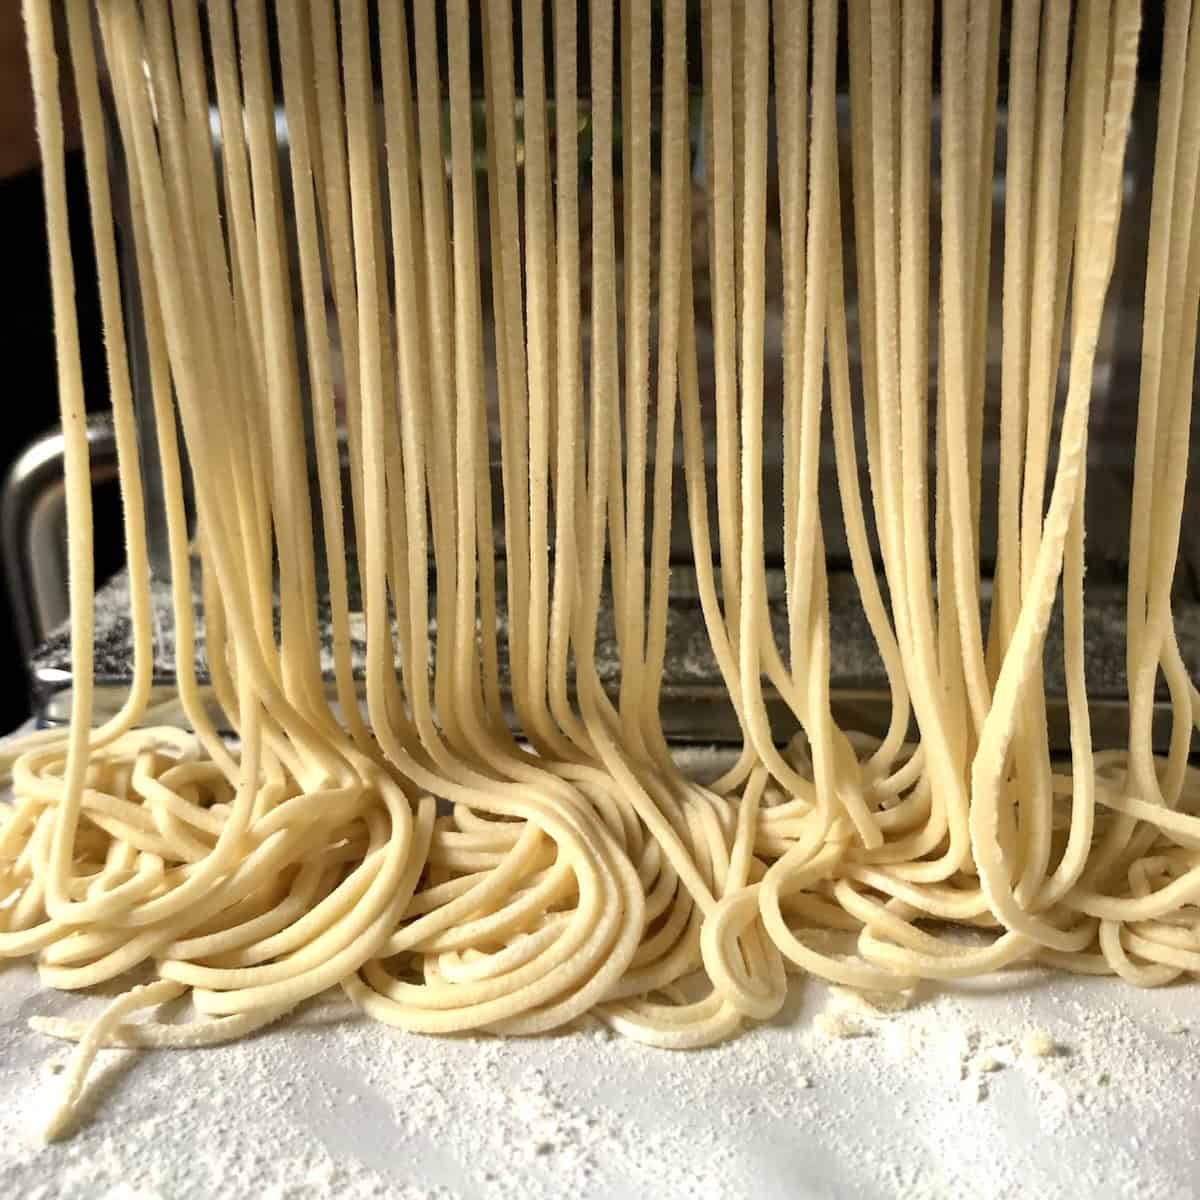
- Fresh ramen noodles - Alkaline noodles are essential for authentic texture. I make homemade ramen noodles because they're easy and delicious, but you can buy them at your local Japanese market, or use high-quality dried ramen (not from the little packets of instant ramen though!).
- Shoyu tare - This soy sauce-based ramen seasoning is our go-to tare, but you can shio tare or miso tare found in the recipes down below.
- Ramen toppings of choice (i.e. chicken katsu, turkey katsu, chashu pork, ramen eggs, scallions, nori, braised pork belly, shiitake mushrooms, fish cakes, toasted sesame seeds, mayu, and togarashi for extra spice).
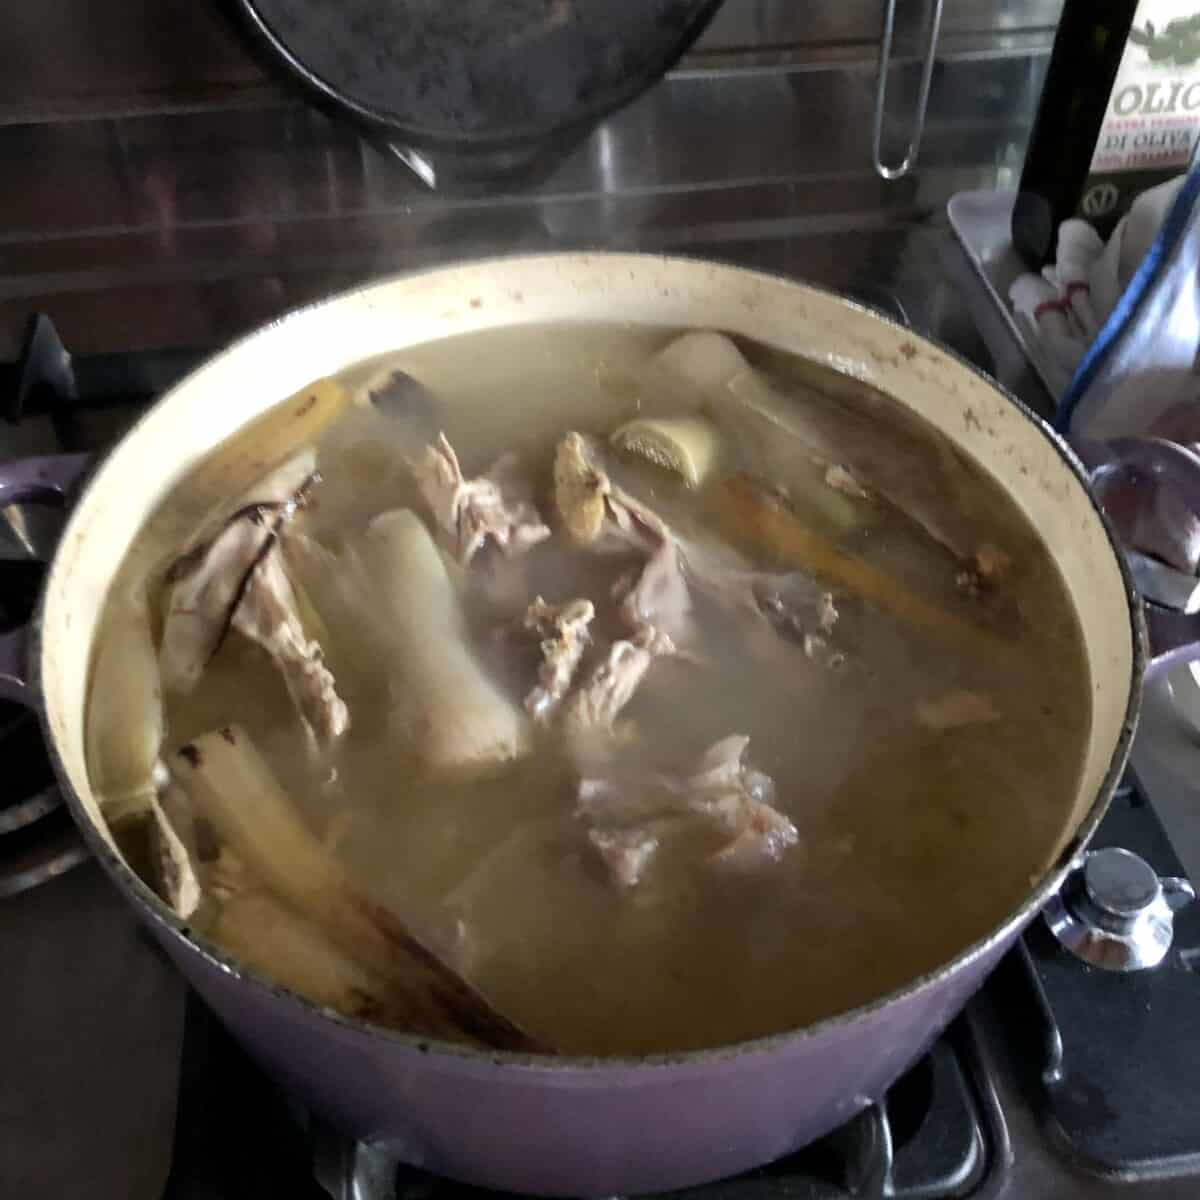
How to Make Tonkotsu Ramen Broth
For a quicker option, you can skip cleaning the bones after blanching (the broth will be darker instead of milky white and still taste great, but not as clean-tasting).
You may also choose to sear the vegetables and meat first for extra flavor, though it's not traditional and will also darken the broth slightly.
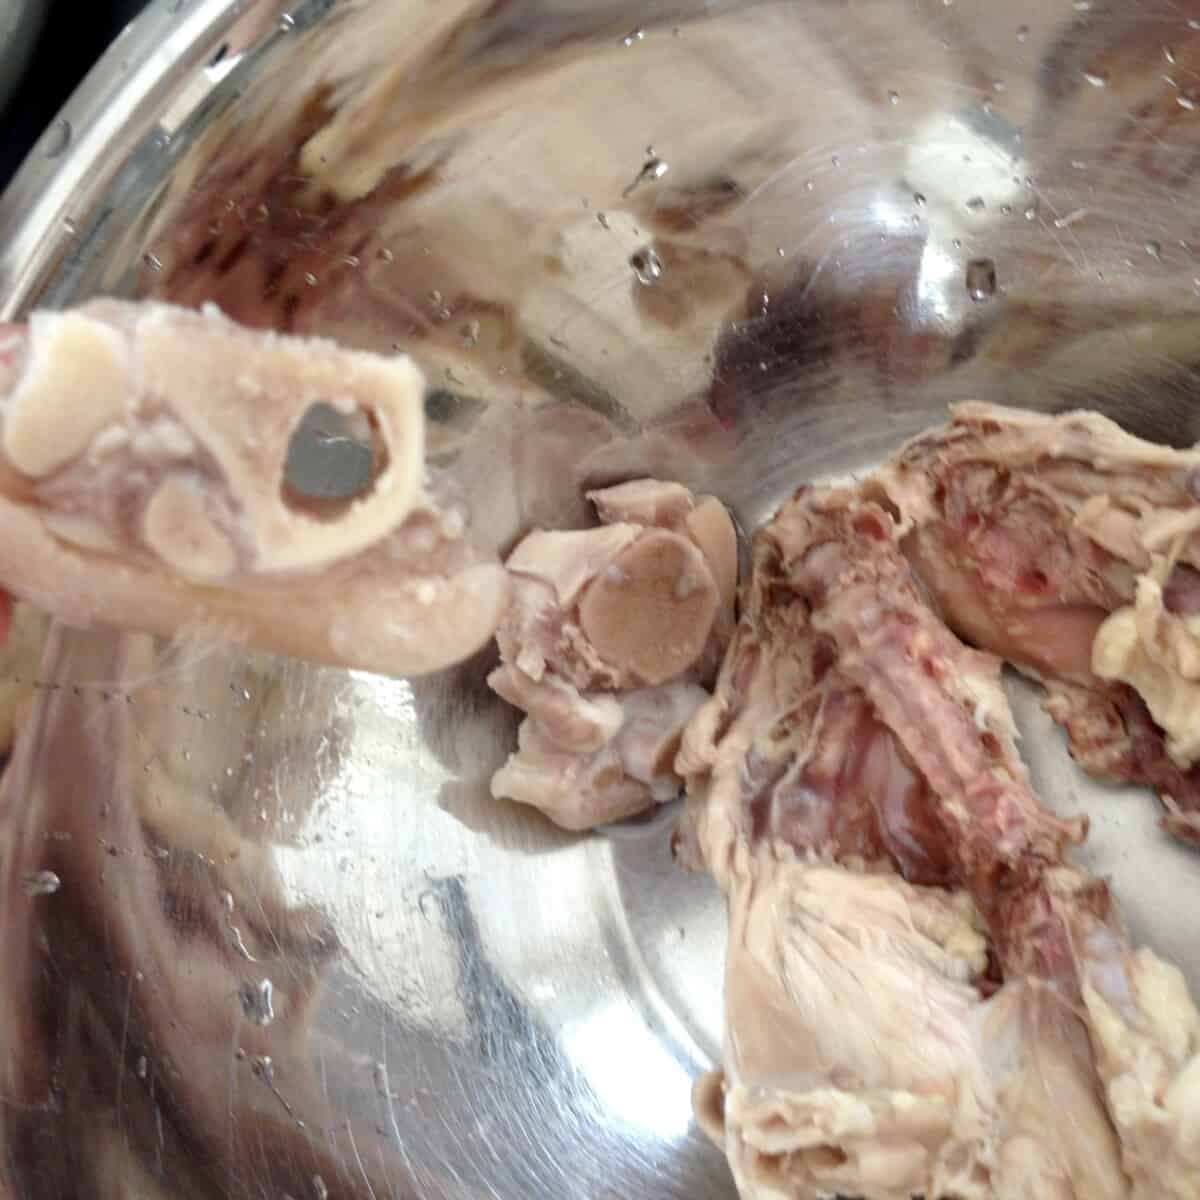
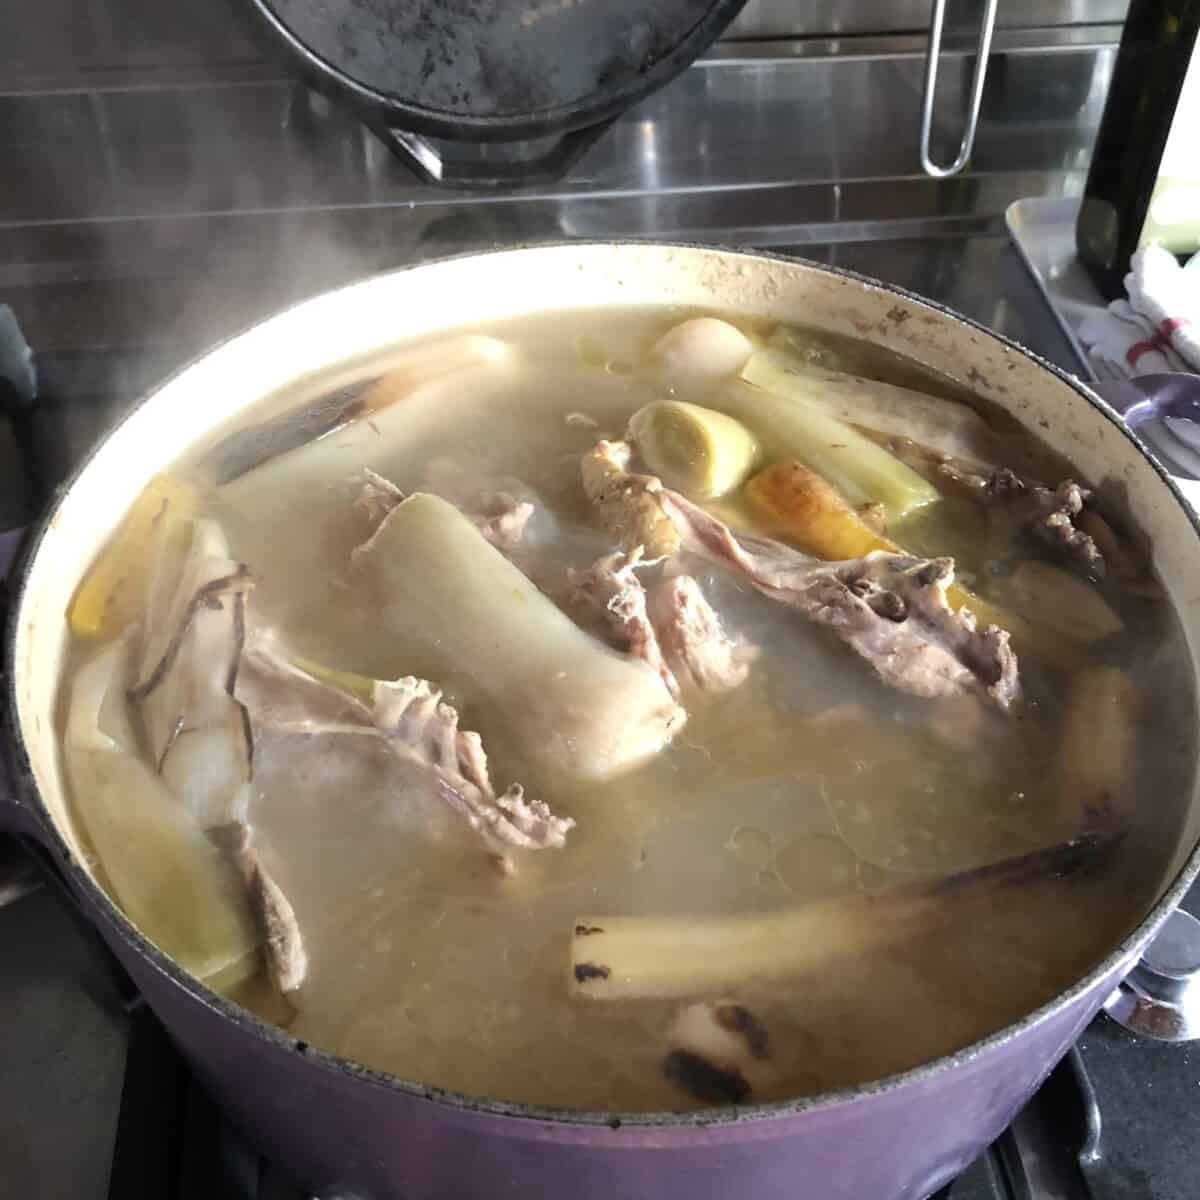
Step 1: Blanch the pork bones in boiling water for 5-10 minutes, then rinse and scrub them clean to remove impurities. This creates a cleaner, whiter, more appetizing final broth.
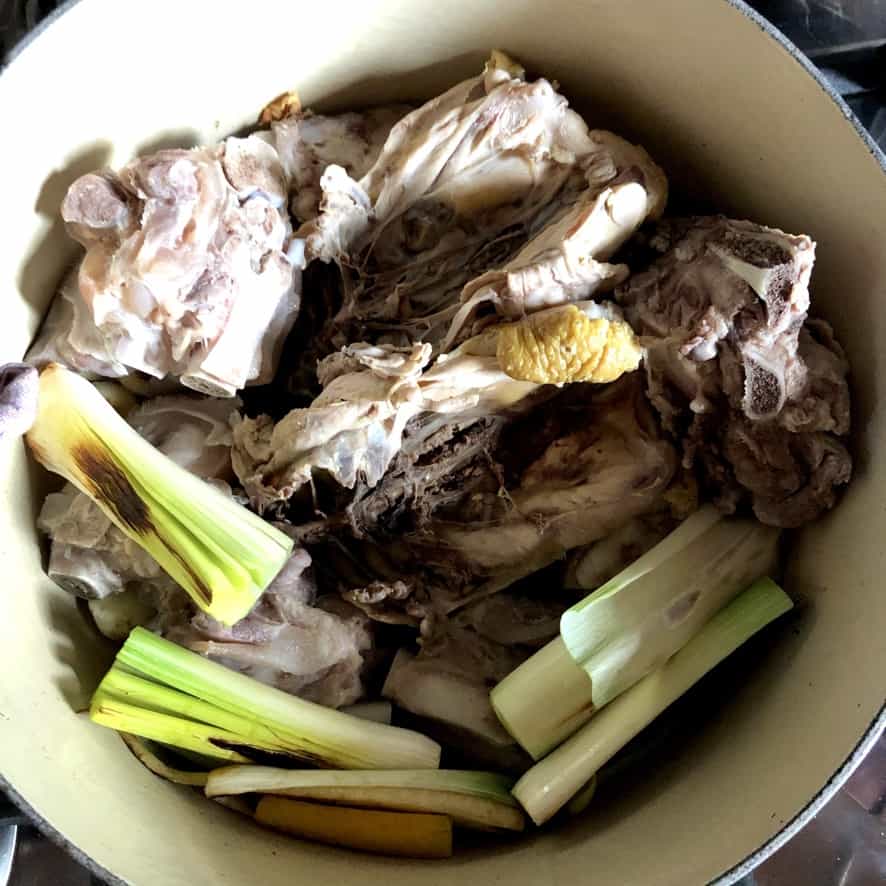
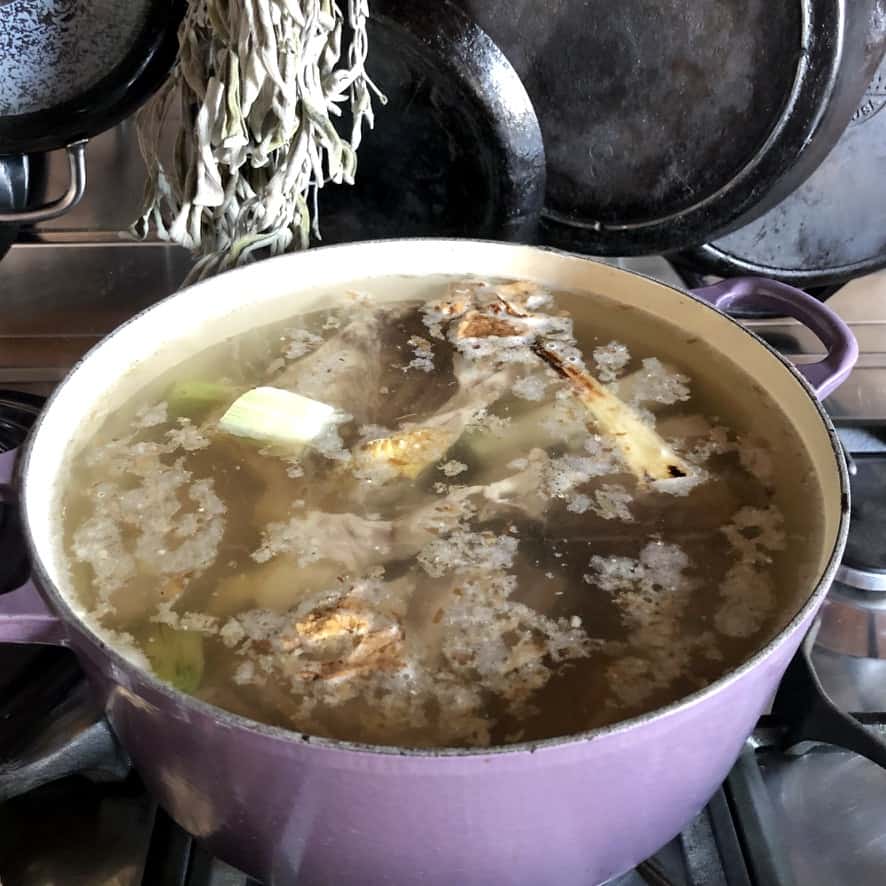
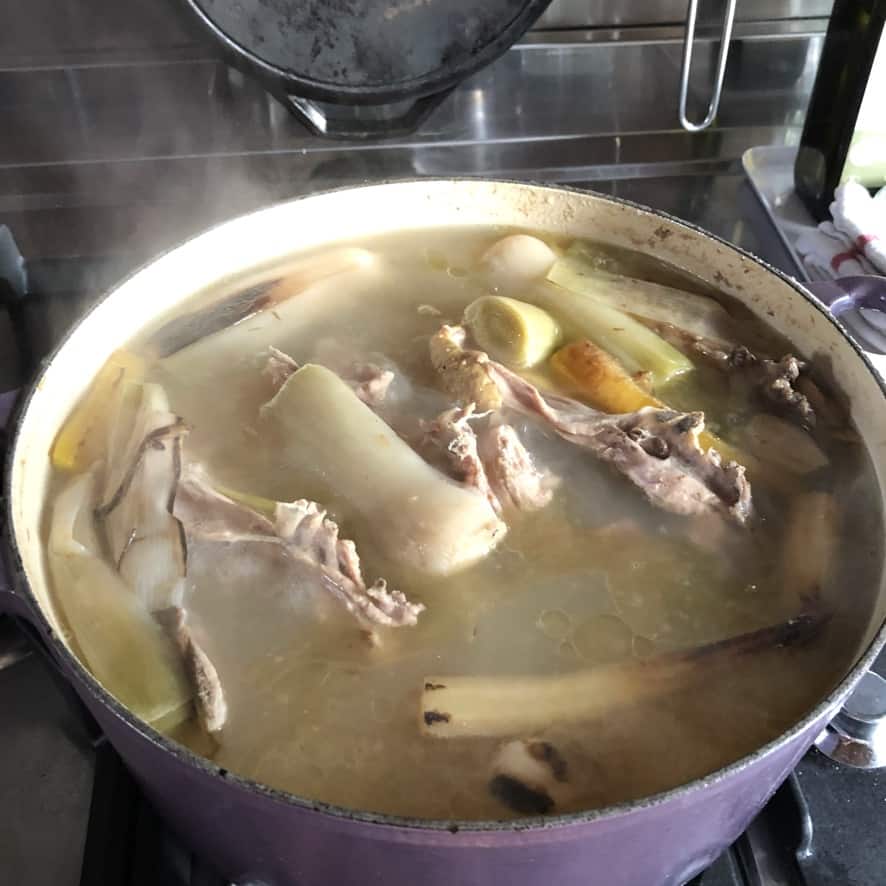
Step 2: Add cleaned bones to a large pot with fresh water and aromatics. Bring to a rolling boil, reduce the heat to medium to maintain a low-simmering boil.

Step 3: Skim foam and impurities regularly until no more remains. This helps achieve that beautiful milky-white color and clean flavor. Cover with a lid and continue cooking for 6 to 8 hours.
Check the broth every 2 hours and top it up with extra water as needed.
Step 4: When the broth is fully cooked, strain it through a fine mesh sieve. The finished tonkotsu broth should coat a spoon and gel-up like Jell-O when chilled.
Place it back into the pot and reduce it as little or as much as you want to get the desired consistency. Build the bowl of ramen and season with shoyu tare (or your favorite tare) before using it, and Enjoy!
NOTE: If you added pork fatback or a slice of pork belly (a great trick I took from Serious Eats!), remove these pieces after about 4 hours of total cooking time (about halfway through) to a cutting board and chop finely once cool enough to handle. Store in the fridge until ready to add it back to the strained tonkotsu broth at the end of cooking.
Hint
The key to perfect tonkotsu broth is maintaining a consistent rolling boil throughout the entire cooking process. This vigorous bubbling emulsifies the fats and creates that signature creamy, opaque appearance.
Find detailed instructions in the recipe card.
In-Depth Step-by-Step Recipe Photos (at a glance)
In photos, here's how to make Tonkotsu ramen broth from start to finish.


Types of Ramen Broth (Most Common Varieties)
Understanding different ramen broth styles helps you appreciate what makes tonkotsu special. Japanese ramen features four main broth types (aka the Big 4), each with distinct characteristics and regional origins:
- Tonkotsu: Rich, creamy-tasting pork bone broth with a milky-white appearance (our recipe focus)
- Shoyu: Clear, light soy sauce-based broth - the oldest style of ramen
- Miso: Hearty, nutty, slightly sweet broth made with fermented soybean paste
- Shio: Delicate, clear salt-based broth that highlights ingredients' natural flavors
You can also find authentic ramen made from chicken bones, seafood, or dashi (a broth made from kombu seaweed), depending on the type of ramen you're making.
Substitutions
- Pork bones: Mix pig trotters with neck bones, or use chicken bones (necks, backs, feet) for a lighter paitan-style broth
- Aromatics: Char onions and garlic before adding for extra depth of flavor

Variations
- Spicy tonkotsu: Top with togarashi seasoning, or add rayu (chili oil), Sichuan chili oil, or miso tare with gochujang for extra heat
- Black garlic tonkotsu: Include mayu (black garlic oil) for a deep, smoky flavor
- Hakata-style: Keep broth thinner and serve with extra-firm noodles and kae-dama (noodle refills)
- Gluten-free ramen: Use gluten-free rice noodles and substitute tamari or coconut aminos for any soy sauce called for in the ramen toppings ingredients (i.e. chashu pork, ramen egg marinade, etc.), including for the shoyu tare or shio tare.
- Pressure cooker ramen: Using a pressure cooker reduces the cooking time to 3-4 hours, though traditional simmering yields superior results and allows you to make larger (normal sized) batches at once
- Miso Tonkotsu: Use a miso tare to season the tonkotsu instead of shoyu or shio
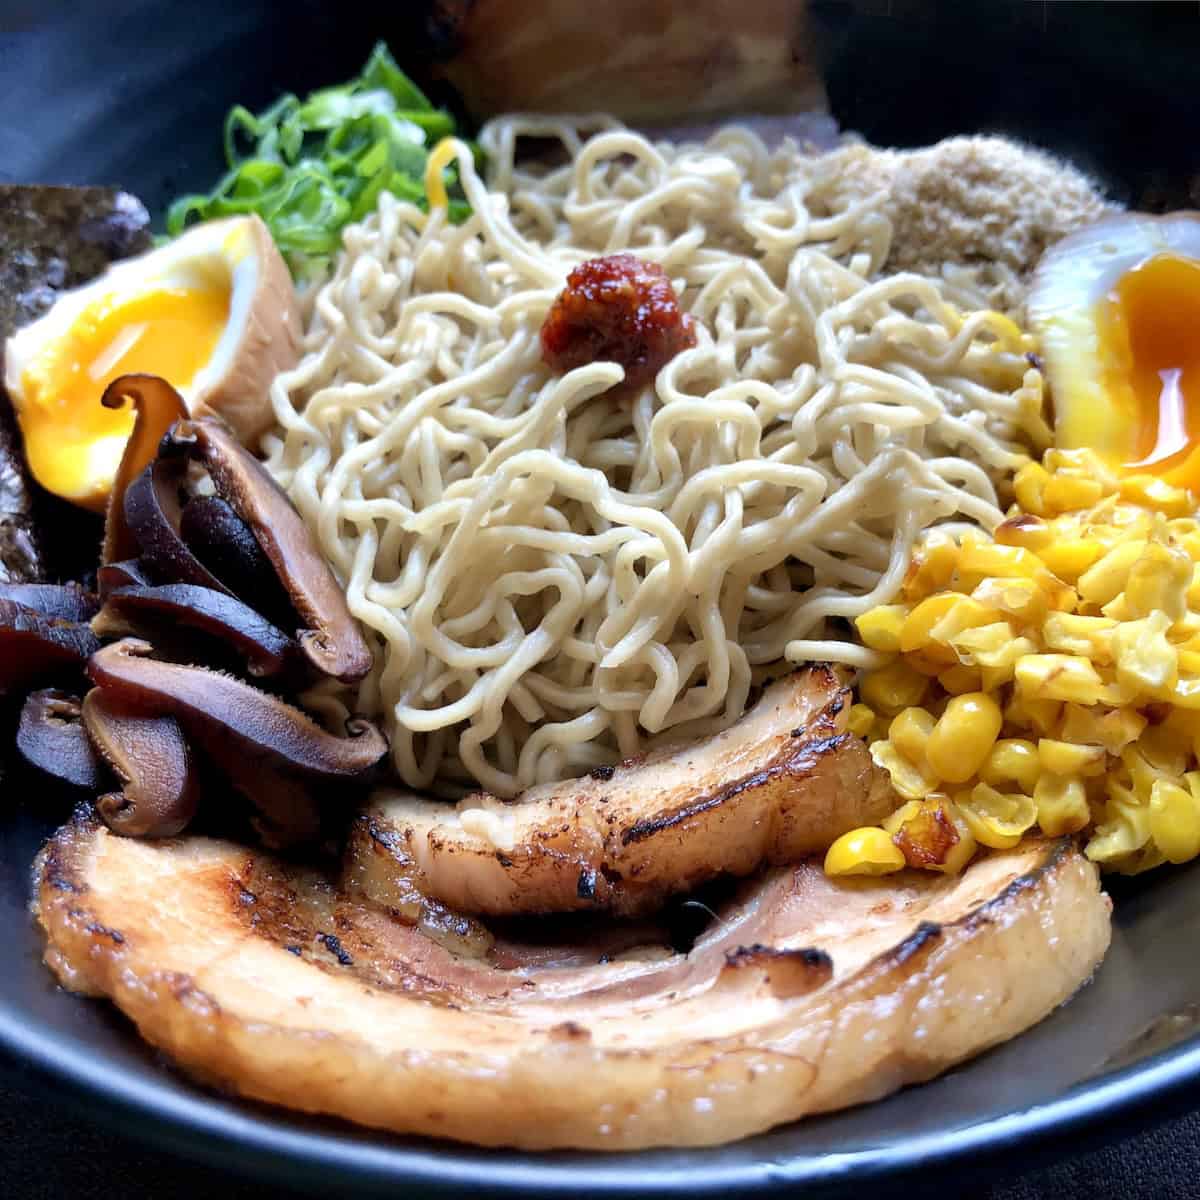
Essential Ramen Toppings
Traditional ramen toppings elevate your homemade bowl from good to restaurant-quality. Here are the most popular additions as well as what you might find in a bowl of ramen in Japan, NYC or any good ramen-ya:
MEAT TOPPINGS:

- Chashu pork/Yakibuta: Tender braised pork belly (or pork loin), the most iconic ramen topping
- Ramen eggs (ajitsuke tamago): Soft-boiled eggs marinated in soy-based sauce
- Japanese braised pork belly: Rich, melt-in-your-mouth pork braised in aromatic seasonings
- Asian ginger spare ribs: Tender pork ribs braised in aromatic ginger and soy sauce with sweet-savory glaze
- Chicken Katsu: Panko-crusted chicken breast, crispy contrast with lots of flavor
- Turkey Katsu: Alternative to chicken katsu
- Spicy ground pork: Seasoned ground pork with chili heat
- Spicy ground chicken: Flavorful minced chicken with spicy kick
- Spicy fried chicken: Crispy chicken pieces with bold seasoning
SEAFOOD:
- Naruto: Fish cake with distinctive pink swirl design
- Bonito flakes: Dried fish shavings that provide smoky umami
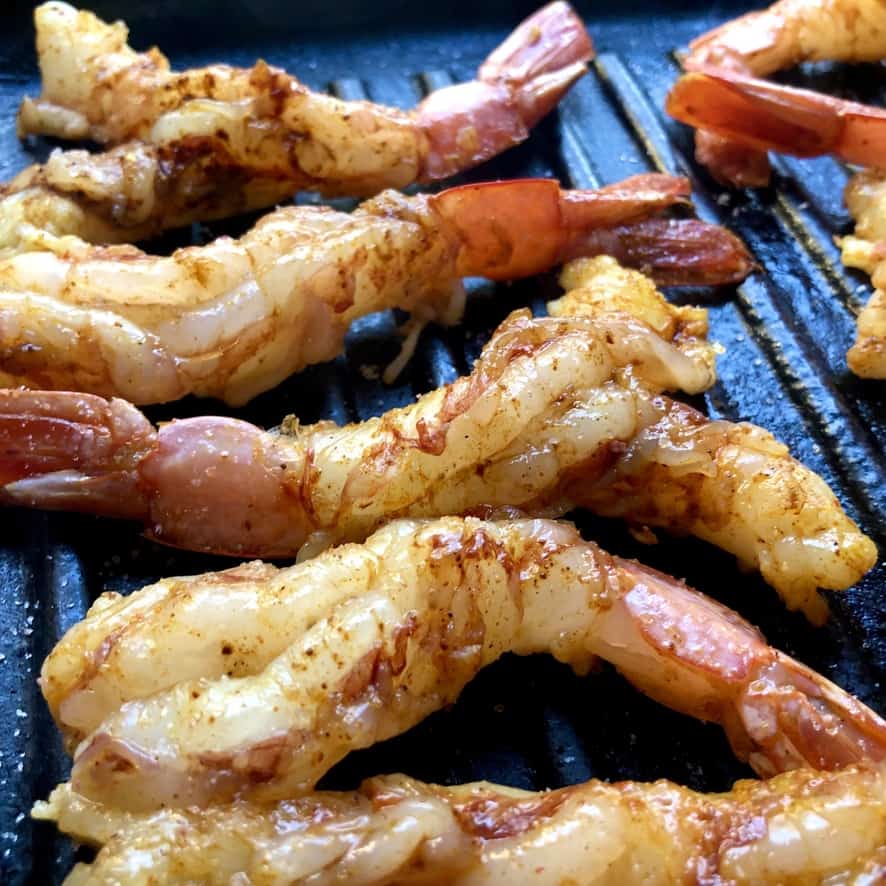
- Shrimp/prawns: Sweet, tender shellfish that add oceanic flavor
- Scallops: Sweet, buttery, delicate mollusks with subtle sea taste
- Mussels: Briny shellfish that enhance broth richness
- Squid: Chewy, mild seafood with clean flavor
VEGETABLES & GREENS:

- Scallions: Fresh, finely sliced green onions for brightness
- Bok choy: Crisp Chinese cabbage with mild, sweet flavor
- Baby spinach: Tender leafy greens that wilt perfectly in hot broth
- Yu choy shoots: Delicate Asian greens with subtle bitter note
- Leeks: Mild onion-family vegetable with sweet, earthy taste
- Bean sprouts: Crunchy, fresh sprouts that add textural contrast
- Roasted or pan-seared corn: Sweet kernels with caramelized edges
- Fried carrots: Julienned pieces add sweetness and color
- Cabbage: Crisp, sweet vegetable that softens in broth
- Roasted tomato halves: Caramelized tomatoes with concentrated sweetness
- Red onions: Sharp, pungent bulbs that mellow when cooked
MUSHROOMS & FUNGI:

- Grilled oyster mushrooms: Meaty mushrooms with earthy, umami-rich taste
- Kikurage (wood ear mushrooms): Gelatinous fungi with unique chewy texture
- Shiitake mushrooms: Meaty Japanese mushrooms with rich, earthy umami and satisfying chewy texture
- Enoki mushrooms: Fresh or sautéed, these sweet, mild, delicate mushrooms are some of my favorite to add to ramen or Sichuan hot pot
- Pioppini mushrooms: fairytale-like tasty mushrooms
PICKLED & FERMENTED:
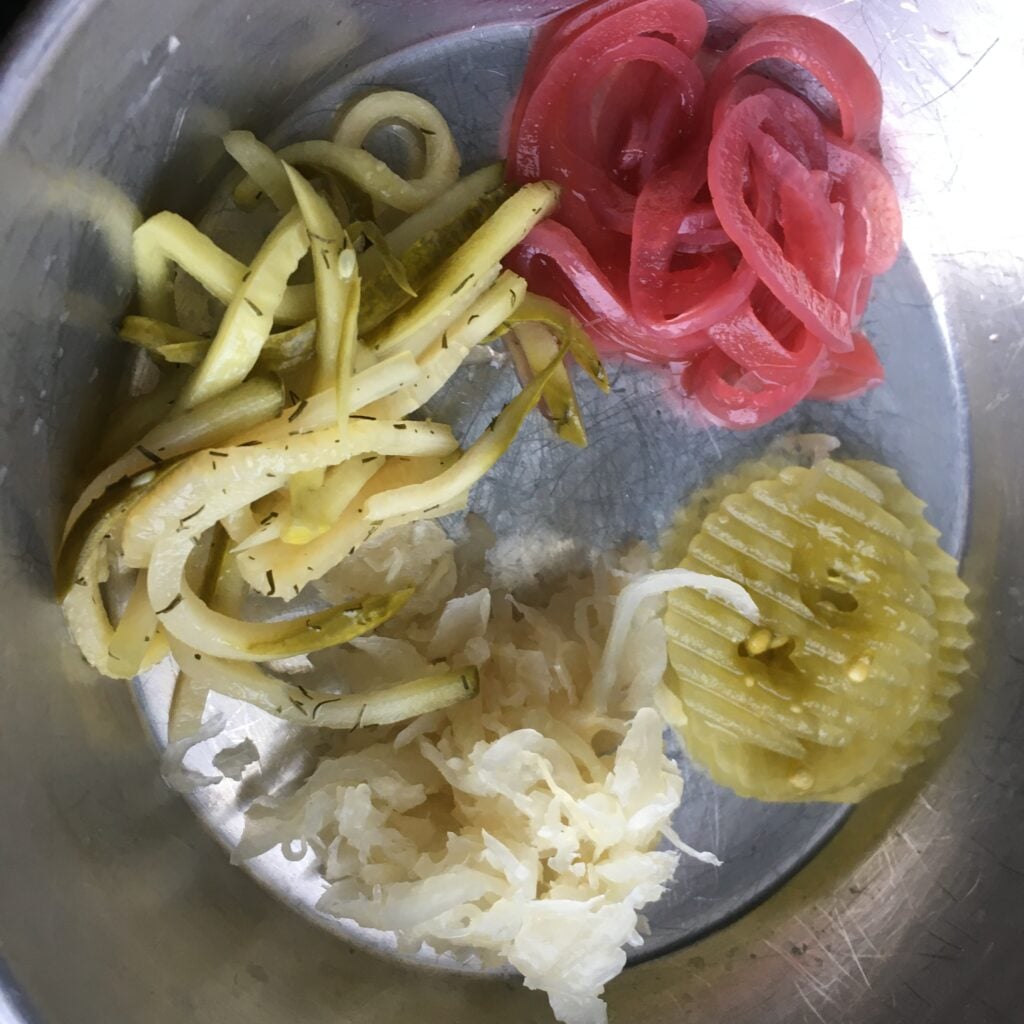
- Benishouga: Red pickled ginger cuts through rich broth and adds natural heat
- Menma: Seasoned bamboo shoots provide textural contrast
- Pickled takana: Spicy pickled mustard greens add a tangy bite
- Koji tofu: Fermented tofu with complex, nutty flavor
AROMATICS & SEASONINGS:
- Nori: Sheets of dried seaweed add oceanic umami
- Mayu: Blackened garlic oil with deep, smoky flavor
- Raw garlic: Pungent, sharp bulbs for intense flavor
- Garlic oil: Fragrant oil infused with roasted garlic
- Fried shallots: Crispy, golden aromatics with sweet onion flavor
- Garlic chives: Flat chives with a mild garlic taste
- Chives: Delicate herbs with subtle onion flavor
- Toasted sesame seeds: Nutty seeds that add crunch and aroma
- Sichuan flower pepper (ground): Numbing spice with citrusy heat
- Saffron: Luxurious spice with floral aroma and golden color


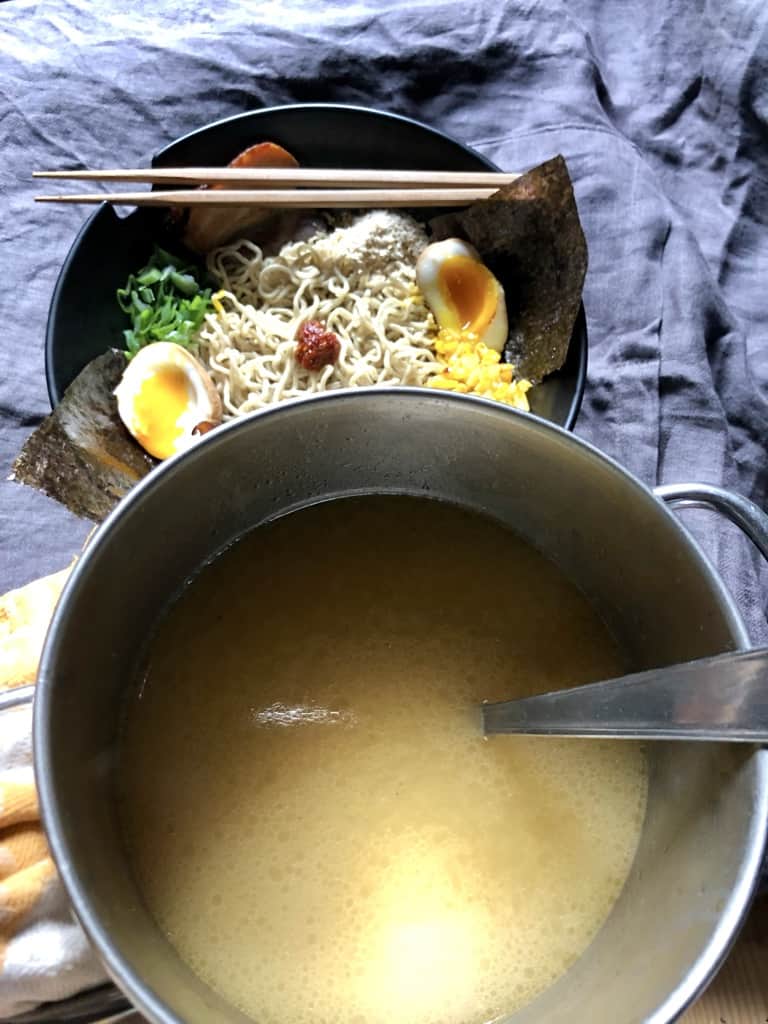
How to Assemble a Bowl of Ramen
Add cooked hot ramen noodles to the center of a large bowl, add ramen toppings around the perimeter of the noodles, tuck in a sheet of nori, and use a ramen egg to hold it in place.
Get creative and add any traditional or non-traditional ramen toppings you like.

Equipment for Making Ramen Broth
- Large stock pot or Dutch oven 7+ quarts): Essential for proper bone coverage and circulation
- Fine mesh skimmer or spoon: For removing scum and foam during cooking
- Fine mesh strainer: To strain finished broth smooth
- Ladle: For serving and tasting during cooking
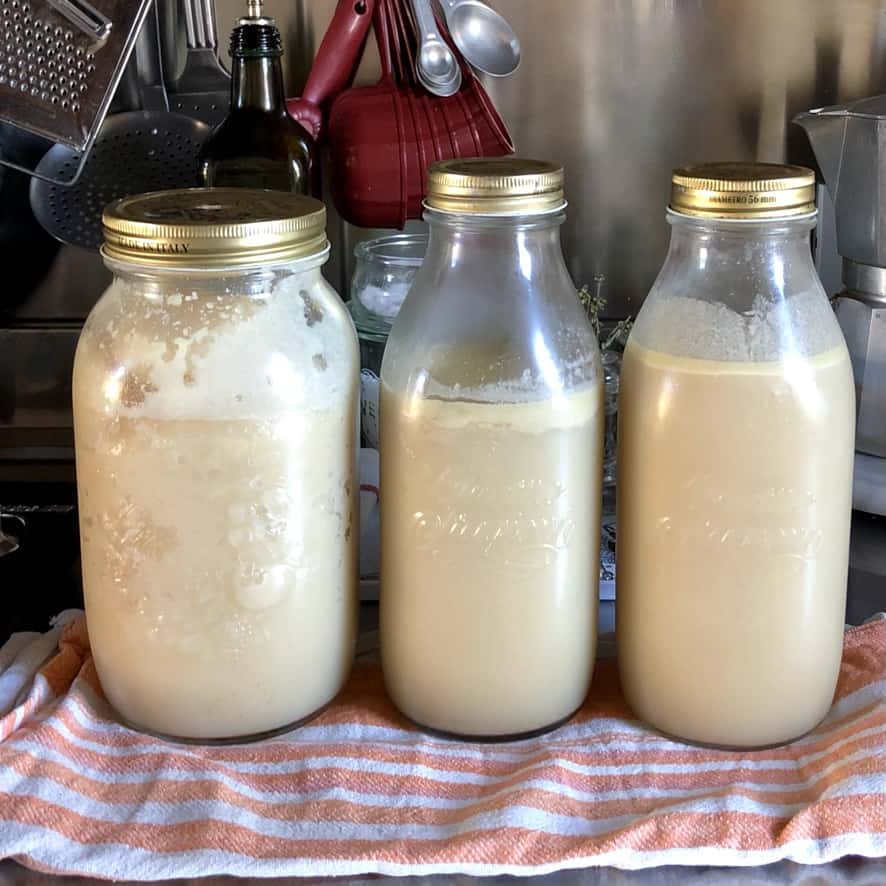
- Storage containers: Glass jars (my preference) or containers for freezing portions
Storage and Make-Ahead Tips
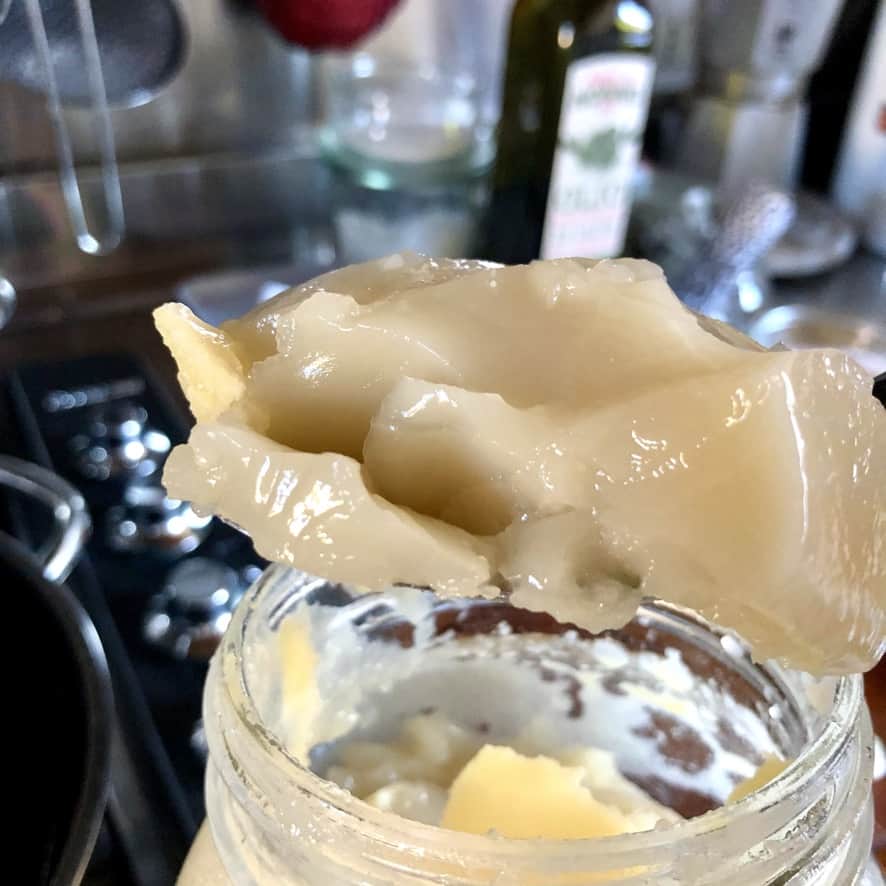
Tonkotsu ramen broth can be made 2-3 days in advance and stored in the refrigerator, where it will gel up like Jell-O due to all that extracted collagen - this is exactly what you want! The broth also freezes beautifully for up to one year.
I've actually kept tonkotsu broth in the freezer for a full year in tempered glass canning jars, and it was just as delicious (truly) as the day I made it.
When ready to serve, simply reheat gently and thin with a little water (only if needed). Just be sure to leave at least 3-4 inches of headspace in the freezing containers to allow for expansion.
If you don't, the glass will crack and you will definitely cry😭!
How to Serve Ramen
Proper ramen assembly and serving technique makes all the difference. Warm your ramen bowls with hot water, then add 1 tablespoon of tare seasoning sauce (or more or less to taste) to each bowl.
Cook fresh ramen noodles in unsalted boiling water just until al dente (they'll continue to soften in the hot broth).
Drain noodles well and add to bowls, add your choice of ramen toppings, then immediately ladle hot broth over the noodles and serve - authentic ramen should be enjoyed steaming hot.
For dinner parties: Prep bowls in advance with tare and toppings, cook noodles until al dente, then rinse with cold water to stop cooking. Add noodles to prepared bowls, pour hot tonkotsu broth over everything, and serve multiple guests simultaneously for the perfect ramen dinner party experience.
Top Tips for Perfect Tonkotsu Broth
The cooking tips and techniques below will virtually guarantee that your tonkotsu ramen broth is milky, opaque, and super gelatinous, much like our favorite Momofuku, Ippudo, or Ivan ramen in NYC. Here are my favorite tips for making the best homemade pork tonkotsu broth from scratch:
- Use enough bones: A proper ratio of bones to water ensures maximum collagen extraction
- Choose collagen-rich bones: Pig's feet, chicken backs, chicken feet, or chicken wings for maximum gelatin extraction
- Blanch and clean thoroughly: Remove coagulated blood and dark marrow pieces for a cleaner, milky-white tonkotsu broth
- Maintain a steady low rolling boil: This simmering is crucial for extracting and emulsifying fats and achieving that creamy, opaque broth
- Skim religiously: Remove foam and impurities regularly during the first part of cooking for a cleaner flavor and appearance (wipe down the sides of the pot with a damp rag to remove anything that sticks there as well)
- Give it time: Simmering ramen broth long enough is the only way to naturally give the finished broth a milky white color (see photos), have a slippery mouth feel, and gel-like Jello when chilled
- Char aromatics for extra flavor: Intensely char onions, garlic, and ginger before adding, or use them raw - both methods work beautifully
- Maintain consistent rolling boil: Vigorous bubbling throughout cooking emulsifies fats for that signature creamy texture
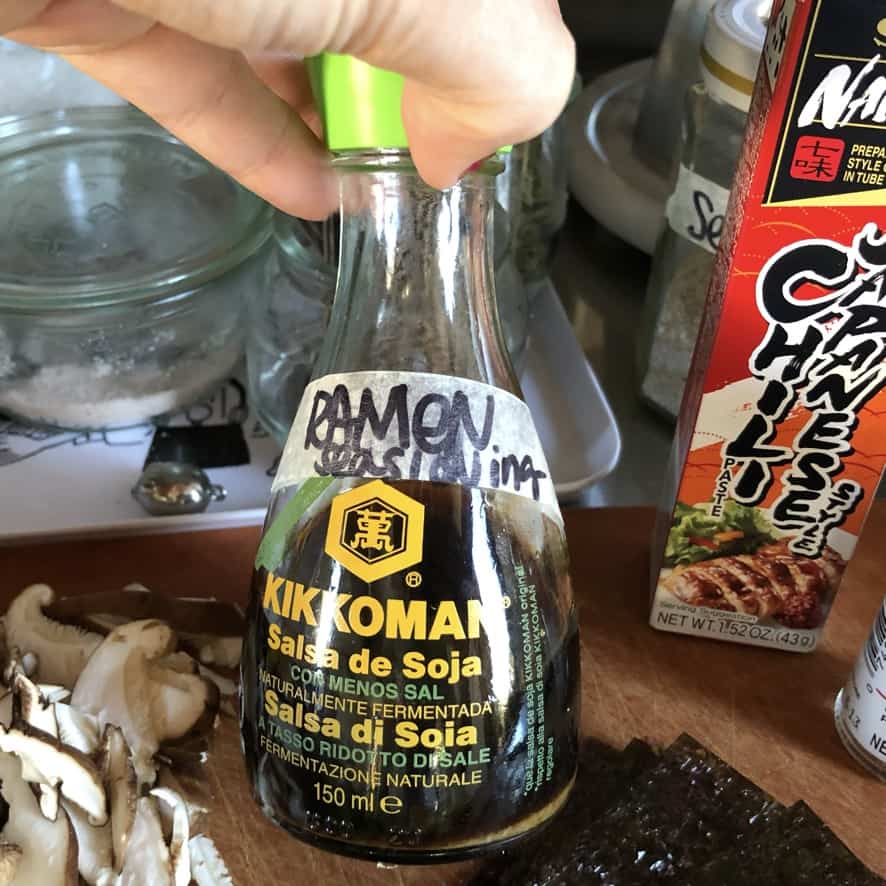
- Repurpose glass soy sauce bottles for storing and serving homemade ramen tare: It's cheap and allows everyone at the table to add more tare to their broth if they want
*For a quicker option, skip cleaning bones after blanching - the broth tastes great but will be darker brown instead of milky white.
Why Is My Tonkotsu Broth Not White?
If your tonkotsu broth is brown, gray, or translucent instead of that signature creamy white, here are the most common causes and fixes:
- Skipped the blanching step: Always blanch your bones first by boiling them for 10-15 minutes, then discarding that water and scrubbing the bones clean. This removes impurities that cause grayish, murky broth.
- Not boiling hard enough: Tonkotsu requires a consistent rolling boil, not a gentle simmer. The vigorous boiling action is what emulsifies the fat and collagen into the water, creating that milky appearance.
- Not enough cooking time: Tonkotsu broth needs at least 6-8 hours (I prefer 8) of boiling. The collagen takes time to fully break down and emulsify.
- Wrong bone-to-water ratio: Too much water dilutes the broth. Use just enough water to cover the bones, adding more only as needed during cooking.
- Wrong type of bones: Pig trotters (feet) are essential because they're loaded with collagen. Femur bones alone won't create the same creamy result.
What is Ramen Tare? Essential Ramen Seasoning Guide
Tare (pronounced "tah-reh"), ramen tare is the concentrated seasoning sauce that defines authentic Japanese ramen.
A great ramen sauce recipe is the secret behind every great bowl - transforming simple tonkotsu broth (or any other ramen broth) into restaurant-quality ramen with complex, layered flavors and distinct regional styles.
How to Make Ramen Seasoning Work:
Traditional ramen shops add 1-2 tablespoons of homemade ramen seasoning directly to each bowl before ladling hot broth.
This ramen tare recipe technique allows one tonkotsu broth to create multiple different ramen styles, from rich shoyu ramen and delicate shio ramen to earthy miso ramen.
Three Types of Ramen (According to Tare):
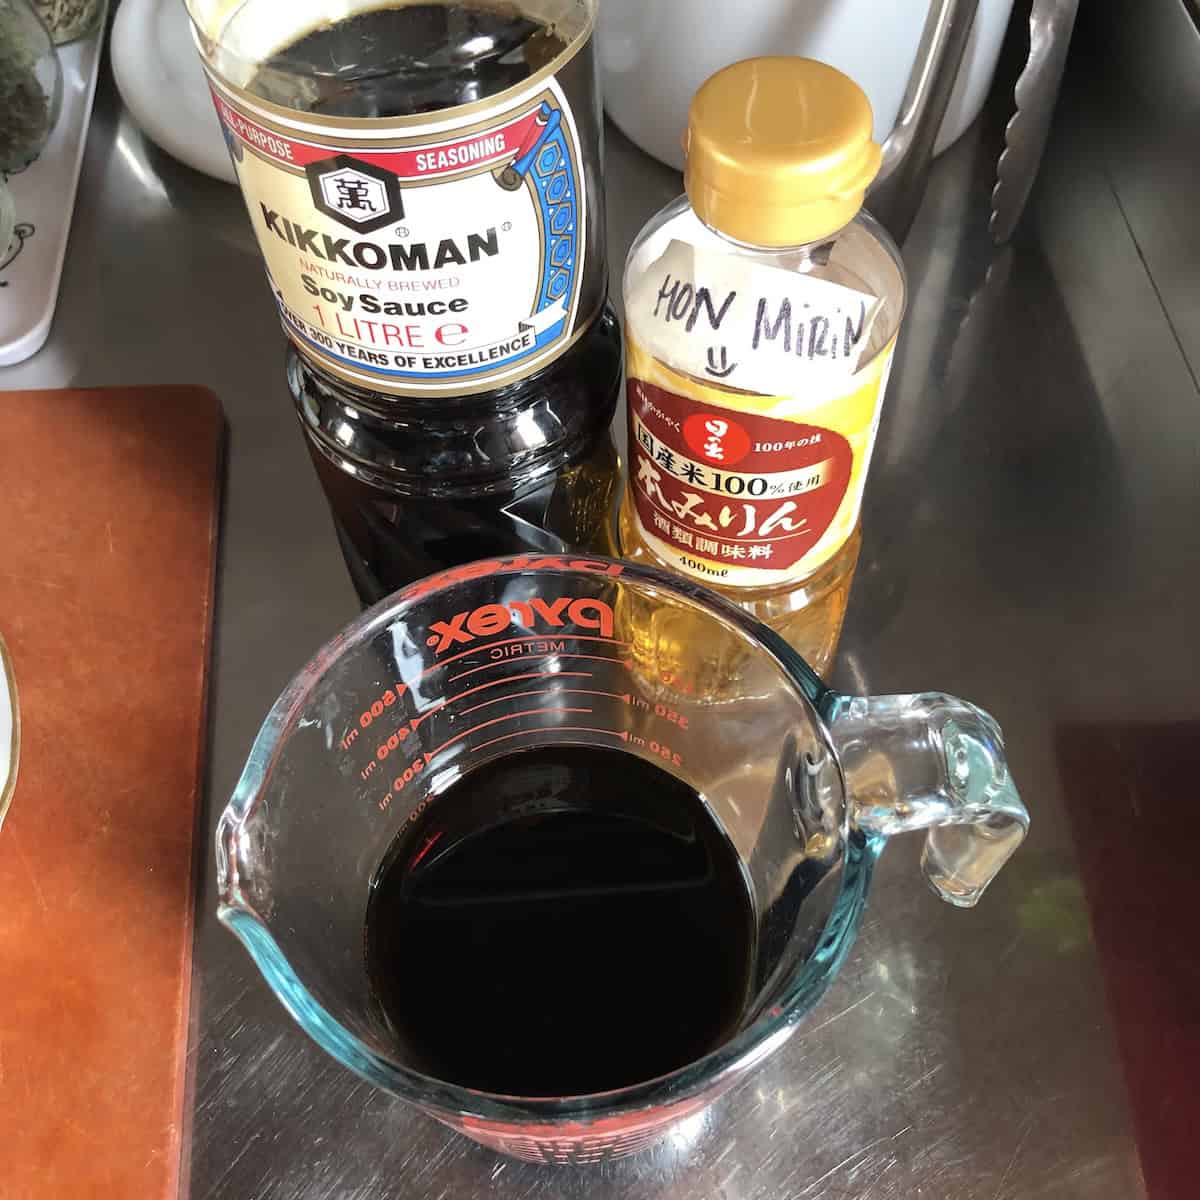
Shoyu ramen tare - This ramen seasoning combines soy sauce, mirin, sugar, and often sake, plus aromatics like scallions, garlic, and ginger for enhanced salty-sweet flavor. Shoyu tare adds saltiness and complex umami to tonkotsu broth.
Shio Ramen Tare - Salt-based tare produces the lightest, most delicate ramen that showcases the pure ramen broth flavor. Often enhanced with dashi (kombu and bonito flake stock) for subtle ocean notes.
Miso ramen tare (for miso ramen). This popular ramen seasoning is perfect for making vegetarian ramen and vegan ramen, but it's enjoyed widely by anyone who loves authentic ramen.
Miso tare is often combined with dashi stock to add nutty, umami-rich heartiness to homemade ramen broth (or any soup you're making).
Ramen Tare Recipes (Shoyu, Shio & Miso)
Making homemade ramen seasoning is a very personal thing! And it allows complete customization of your ramen experience. These recipes serve as guidelines, so feel free to adjust them to your taste preferences:
Basic Shoyu Tare #1
Ingredients:
- 1 cup (235ml) soy sauce
- 2 tablespoons (30g) mirin
- 1½ tablespoons (18.5g) brown or granulated sugar
Instructions: Heat the ingredients over low heat to dissolve the salt and feel free to add aromatics like 1 scallion, 1 garlic clove, and a slice of ginger for extra flavor. Allow the aromatics to steep for at least 30 minutes or overnight. Strain the solids before using.
Basic Shoyu Tare #2
Ingredients:
- 3 tablespoons (45g) soy sauce
- 3 tablespoons (45g) mirin
- 1 tablespoon (15g) kosher salt
Instructions: Stir the ingredients together. You may add extra umami by adding one dried shiitake or porcini mushroom and 1 teaspoon of bonito flakes (or more to taste), bring the mixture to a boil, turn off the heat, and steep aromatics for 30 minutes or overnight. Strain the solids before using.
Cheater's Shoyu Tare
Use leftover strained chashu pork braising liquid as is, or for a thicker chashu tare, reheat it in a small pot over medium heat until it's reduced by about half. This is a perfect way to use up the umami-rich chashu braising liquid.
Shio Tare (for Shio ramen)
Ingredients:
- ½ cup (118ml) dashi stock
- ¼ cup (60ml) sake
- 2 tablespoons (30g) mirin
- 2 tablespoons (15g) kosher salt
Instructions: Combine all of the ingredients in a pot and bring them to a boil. Turn off the heat and use immediately or allow the flavors to develop overnight. Boost umami by adding 2 teaspoons soy sauce, 1 teaspoon fish sauce, and 2 dried shiitake mushrooms (or more or less to taste) if desired.
Miso Tare (for Miso ramen)
Ingredients:
- ½ cup (145g) white miso paste
- 2 tablespoons (30g) mirin
- 2 tablespoons (30g) Japanese sesame paste (sub tahini, or all-natural unsweetened peanut butter)
- 1 tablespoon (15g) sake (sub Shaoxing wine if that's all you've got)
- 2 teaspoons (8g) Japanese chili paste or Sriracha, or more to taste
- Optional: ¼ cup (60g) of dashi stock *find dashi recipe below
Instructions: Mix together and refrigerate up to 2 months. I prefer the delicate flavor of white miso, but you can use red miso or - use ½ white + ½ red.
Miso Tare with Aromatics (for Miso ramen)
Ingredients:
- ½ cup (145g) white miso paste (sub red miso or use ½ white & ½ red)
- 2 tablespoons (30g) mirin
- 2 tablespoons (30g) Japanese sesame paste (sub tahini, or all-natural unsweetened peanut butter)
- 1 tablespoon (15g) sake (sub Shaoxing wine if that's all you've got)
- 2 teaspoons (8g) Japanese chili paste or Sriracha, or more to taste
- 1 white scallion sliced
- 1 garlic clove minced
- 1 teaspoon freshly grated ginger, or more to taste
Instructions: Blend all ingredients except miso in a food processor until smooth. Cook in a small pot 2-3 minutes, stirring constantly to prevent scorching, until fragrant.
Add the mixture to a bowl, whisk in miso paste. Refrigerate for a few days or freeze up to 3 months in an airtight container with parchment or wax paper in direct contact with the tare to prevent crystals.
*Never boil miso paste, as cooking miso at high temperatures kills off the good bacteria and probiotics, and it turns the flavor bitter while losing that rich, earthy aroma.
Overnight Dashi Stock (for Shio & Miso tare)
Ingredients:
- 2 cups (470ml) water
- One 2x2 inch (5x5 cm) piece of kombu kelp
- 1 cup (8g) bonito flakes
Instructions: Rinse the kombu and add all of the ingredients to an airtight container with lid and refrigerate overnight. Strain it through a fine mesh strainer before using it.
FYI, this makes approximately 1½ cups more than what you'll need for the shio tare, and about ¾ cups more than what you'll need for the miso tare.
Use any leftover dashi stock for a tasty miso soup by heating it up and adding the desired amount of miso paste to it.
Use dashi stock within 2 to 3 days, or freeze it for up to 3 months.
How to Store Ramen Tare
Basic Tare Storage: Traditional shoyu and shio tare keep 3 months refrigerated or 3+ months frozen. Allow frozen tare to thaw overnight before gently reheating.
Miso Tare: Stores up to 2 months refrigerated in airtight containers. For freezing, place parchment directly on surface to prevent ice crystal formation.
Shoyu Cheater Tare/Fresh Ingredient Tare: Tare containing fresh garlic, fresh vegetables, meat, or meat byproducts (like the Chashu Pork braising liquid - aka cheater's shoyu tare) keeps only 2-3 days refrigerated due to perishable ingredients.
If not using right away, freeze the tare for up to 3 months.
Pro Storage Tips:
- Repurpose old glass soy sauce bottles for easy tare dispensing
- Label with date and type for easy identification
- Freeze in small portions for single-use convenience
How to Reheat Tonkotsu Ramen Broth
Reheat the gelatinous pork stock in a pan slowly at first over medium heat until boiling hot. Season it with your chosen tare, and serve.
Or add it your ramen bowls and then season each bowl individually with your chosen tare (my favorite method).
Homemade Ramen Photos


Authentic Japanese Restaurant Ramen Around the World (in Real Photos)
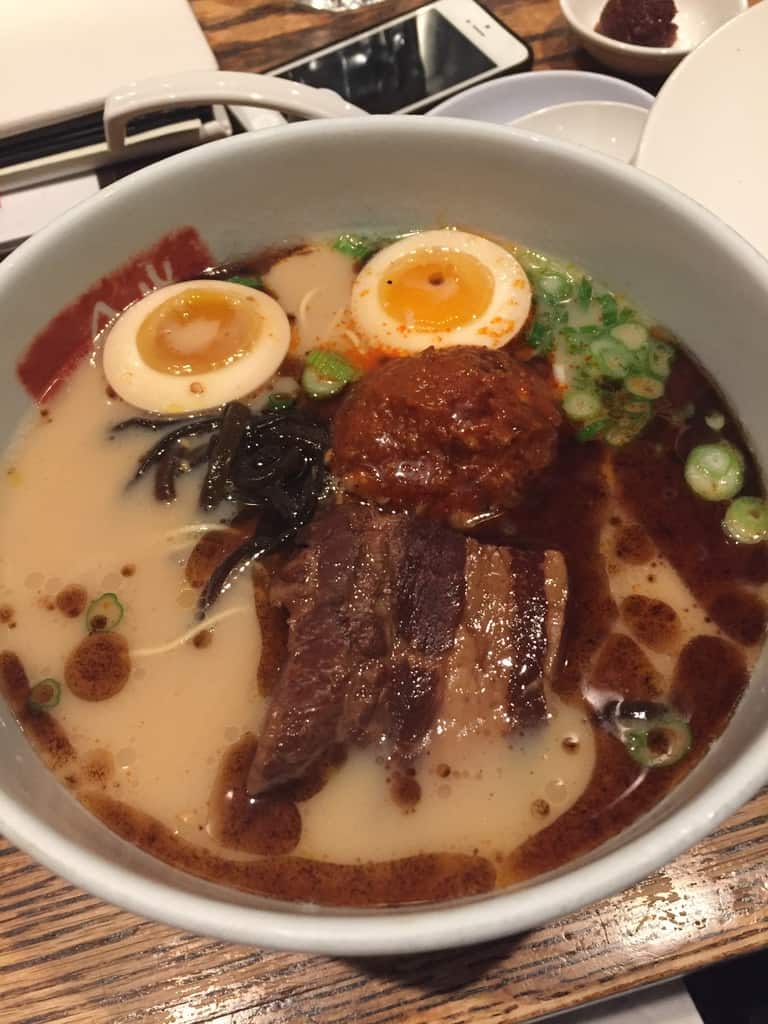
From the bustling ramen shops of NYC's East Village to hidden gems in Chengdu and ramen-ya's in Northern Italy, here are some of the most memorable bowls of authentic ramen I've experienced.
These are not Google stock images of ramen! Every bowl pictured here represents a real dining experience that shaped my understanding of authentic ramen, ranging from excellent to I-can-make-better-ramen-at-home.
Real ramen photos (below) from my travels - these authentic bowls show the incredible diversity that inspires my homemade ramen recipes:


FAQ
Tonkotsu ramen is a rich, creamy Japanese noodle soup featuring a pork bone broth that's been simmered for 6-12+ hours until it becomes milky white and deeply flavorful.
The name "tonkotsu" literally means "pork bones" in Japanese.
According to urban legend, this style originated in Kyushu (southern Japan) by accident after a ramen stall owner left a pot of boiling pork bones alone for hours and came back to find the milky, cloudy delicious tonkotsu.
Tonkotsu is known for its incredibly rich, almost sauce-like consistency that coats the noodles beautifully.
Unlike other ramen broths that might be clear, tonkotsu gets its signature creamy appearance and slippery mouth feel from the collagen and fat extracted from pork bones during the long cooking process.
And it's our favorite ramen style to eat and make at home!
To make authentic ramen broth, you'll need bones (pork bones for tonkotsu, chicken for paitan), aromatics (onion, garlic, ginger, shiitake mushrooms, etc.), and time.
First, blanch the bones in boiling water for 5-10 minutes, then rinse and scrub them clean (or if you're being lazy, just discard the blanching water and start with fresh water).
Add the cleaned bones to a large pot with fresh water and aromatics, then simmer at a rolling boil for 6-12 hours (8 hours is our preferred sweet spot), skimming foam regularly.
The key is maintaining a consistent boil to emulsify the fats and create that creamy texture. For tonkotsu specifically, you'll want to use pig trotters and pork or chicken neck and back bones for maximum collagen extraction.
Authentic ramen noodles are made with high-gluten flour, water, salt, and kansui (alkaline mineral water) or baked baking soda, which gives them their characteristic chewy texture and yellow color.
The alkaline environment is crucial - it's what makes ramen noodles completely different from regular pasta. And instead of buying kansui, you can make my Easy Baked Baking Soda as a substitute which literally costs pennies and is just as effective.
Then use it to make my easy homemade ramen noodles recipe.
Chashu is traditional Japanese braised pork belly that's a classic ramen topping. It's made by slowly braising pork belly in a mixture of soy sauce, mirin, sake, sugar, and aromatics until it becomes incredibly tender and flavorful. The pork develops a beautiful mahogany color and almost melts in your mouth.
Unlike Chinese char siu, which is often roasted and has a slightly sweet glaze, Japanese chashu is all about that melt-in-your-mouth texture from low, slow braising.
You can find my complete Easy Chashu Pork チャーシュー recipe here.
To elevate your ramen game: 1) Always warm your bowls before serving, 2) Cook noodles separately and add to hot broth just before serving, 3) Layer your toppings thoughtfully - soft-boiled eggs, chashu, scallions, nori, french fried scallions, corn, shiitake mushrooms, fish cake, etc.
4) Make your own ramen eggs (ajitsuke tamago), 5) Use high-quality miso or soy sauce for your tare, 6) Add aromatic oil on top (mayu, rayu, or garlic oil), and 7) Don't rush the broth - good ramen broth takes time to develop those deep, complex flavors.
Authentic tonkotsu ramen broth takes at least 6-12 hours of active simmering and can be cooked for up to 48 hours.
I recommend 8 hours (it's our preferred sweet spot) for the perfect balance of flavor and richness.
The long cooking time is essential to extract collagen from the bones and create that signature creamy, milky-white broth with its addictive slippery mouth feel.
You can make it in as little as 6 hours if you're short on time, or go up to 13 hours for an even richer result (but you'll need to keep topping it up with water to keep it from becoming too thick).
The key is maintaining a rolling boil throughout the entire process - this emulsifies the fats and creates the creamy texture that tonkotsu is famous for.
Shoyu ramen is a soy sauce-based ramen that's actually the oldest and most traditional style of ramen in Japan. "Shoyu" means soy sauce in Japanese.
The broth is typically clear and lighter than tonkotsu, made with chicken, pork, or seafood stock and seasoned with a special soy sauce mixture called "tare."
Shoyu ramen has a clean, savory flavor that lets you taste all the individual components - the noodles, toppings, and aromatics.
It's less rich than tonkotsu but incredibly satisfying, and often considered the most balanced of all ramen styles.
Fresh ramen noodles cook much faster than dried - typically just 1-3 minutes in a large pot of boiling water.
The key is not to overcook them since they'll continue to soften slightly when added to the hot broth.
Cook them until they're just al dente, then immediately drain and rinse briefly with cool water to stop the cooking process.
Cook your ramen noodles to your preferred doneness level - in authentic Hakata ramen shops, diners can customize their noodle firmness from 'harigane' (extra firm and chewy) to 'futsu' (normal texture).
I recommend cooking fresh ramen noodles just until al dente since they'll continue to soften slightly when added to the hot broth.
Add them directly to your prepared ramen bowl with hot broth. Fresh noodles have a springier, chewier texture than dried ones and really make a difference in the final bowl quality.
Yes! Ramen broth actually improves with time and can be made 2-3 days in advance.
Store it in the refrigerator where it will gel like Jell-O due to all that extracted collagen (aka natural gelatin) - this is exactly what you want!
The broth also freezes beautifully for up to 1 year. I know this, because I've kept this tonkotsu broth in the freezer for a full year and it was just as delicious as the day I made it.
When ready to serve, simply reheat gently and thin with a little water if needed. Making broth ahead actually makes ramen night much more manageable.
Fresh ramen noodles can be found at Asian grocery stores, Japanese markets, and some well-stocked regular supermarkets in the refrigerated section.
Look for brands like Sun Noodle or Hakubaku. Many Asian markets also make fresh noodles daily. If you can't find them locally, you can order them online from specialty retailers.
As a last resort, good-quality dried ramen noodles work too - just avoid the instant packet kind. You can also make your own fresh ramen noodles at home with just a few ingredients.
Tonkotsu literally means "pork bones" in Japanese. The word combines "ton" for pig and "kotsu" for bone. It refers to the rich, creamy broth made by boiling pork bones for many hours until the collagen and fat emulsify into a milky white soup.
Authentic tonkotsu broth takes 6-12 hours of active boiling, with 8 hours being the sweet spot for optimal flavor and texture. You'll also need about 30 minutes of prep time for blanching and cleaning the bones before the main cooking begins. Some Ramen-ya's cook the bones for 24 to 36 hours.
Yes! Tonkotsu broth freezes exceptionally well for up to 1 year without any noticeable change in quality whatsoever. This is my favorite way to meal prep homemade ramen broth. I recommend freezing it in portion-sized glass canning jars or other airtight containers so you can thaw only what you need. Simply reheat to use.
Despite sounding almost identical, these are completely different dishes. Tonkotsu means "pork bones" and refers to the creamy ramen broth. Tonkatsu means "pork cutlet" and is a breaded, deep-fried pork dish similar to schnitzel. The confusion is common since they differ by just one syllable!
A typical bowl of tonkotsu ramen contains approximately 500-700 calories, though this varies significantly based on toppings and portion size. The broth itself contributes around 150-200 calories per serving, with additional calories coming from noodles (200-300), chashu pork (100-150), and other toppings.
Classic tonkotsu ramen toppings include chashu pork (braised pork belly), ajitsuke tamago (marinated soft-boiled eggs), wood ear mushrooms, nori (seaweed), menma (fermented bamboo shoots), and thinly sliced scallions. Many shops also offer corn, bean sprouts, garlic, and spicy condiments like rayu (chili oil) or karashi takana (spicy pickled mustard greens).
The tonkotsu broth itself is naturally gluten-free since it's made only from pork bones and water. However, traditional ramen noodles contain wheat flour and are not gluten-free. Many tare seasonings also contain soy sauce (which has wheat). For a gluten-free bowl, you'd need to use rice noodles or specialty gluten-free ramen noodles and a gluten-free tare made with tamari instead of regular soy sauce.
Traditional tonkotsu broth is made purely from pork bones and does not contain fish. However, some ramen shops create a "double soup" (Gyokai Tonkotsu) that blends pork bone broth with fish-based dashi for additional umami depth. If you have a fish allergy, always ask whether the tare or broth contains any fish products like bonito flakes or dried sardines.

More Easy Ramen Recipes
If you're just getting into making homemade ramen (and ramen toppings to go with it), you can start right here with our favorite ramen recipes:
Here are my best Ramen recipes anyone can make:
- Easy Baked Baking Soda (for Ramen, Alkaline Noodles & Pretzels)
- How To Make Ramen Noodles From Scratch (The Easy Way)
- Perfect Ramen Egg Recipe (Ajitsuke Tamago 味付け卵)
- Easy Chashu Pork チャーシュー(Marinated Braised Pork Belly For Ramen)
- Easy Japanese Braised Pork Belly (Momofuku & Ippudo Style)
- Easy Crispy Chicken Breast Cutlets (Cotoletta di Pollo)
- Crispy Italian Turkey Breast Cutlets (Cotoletta di Tacchino)
- Fluffiest Homemade Pork Buns (Tangzhong Pork Buns)


Made this Recipe? We'd love for you to rate ⭐️ it and tell us how it went for you!
Let's Get Started!
Print📖 Recipe

Rich and Creamy Homemade Tonkotsu Ramen Broth Recipe
- Total Time: 8 hours 30 minutes
- Yield: 4 to 6 Servings
- Diet: Gluten Free
Description
This rich and creamy tonkotsu ramen broth is incredibly easy to make from scratch. It's the ultimate umami-packed, lip-smacking ramen broth loaded with complex flavors and slurpy deliciousness. Plus, it freezes extremely well for up to 1 year if you want to double the recipe!
Ingredients
Tonkotsu Broth Ingredients
- 1 ½ pounds pork trotters (pig's feet), split in half or cut into quarters (.75kg)
- ½ pound of chicken backs (about 2) (250g)
- 1 tablespoon oil (15g)
- ½ large onion
- ½ large carrot
- 2 scallions, or more to taste
- 1 whole leek, cut lengthwise (85g)
- 1 fresh or dried shitake mushroom, or more to taste (sub porcini)
- 1 teaspoon bonito flakes
- 3 to 4 garlic cloves
- 1 inch piece of ginger (3g)
- enough water to cover the bones fully throughout the duration of cooking
Instructions
- Blanch and clean the pork and chicken (is using). In a large stock pot or 7-quart Dutch oven, add pork and chicken and cover with water. Bring the water to a boil and immediately turn off the heat. Strain the water and wash the bones under cold running water. Clean the pot and dry it. Use a chopstick or skewer to clean the bones by removing any dark-colored coagulated blood, marrow, etc. Give the bones one last final rinse and set aside.
- (Optional step) Sear the vegetables. To the same pot, add the oil and pan-sear the vegetables and aromatics until slightly charred. Feel free to skip to step #3.
- Cook the tonkotsu. Add pork and chicken to pot with vegetables, cover with water to fully immerse bones. Bring to rolling boil, reduce to medium heat for low-rolling boil. Skim foam and any impurities until surface is clear - wipe pot sides with damp cloth to remove stuck residue. Cover and cook 6-8 hours, checking every 2 hours to add water as needed (I added 2 cups at 3h 40min mark - adjust accordingly). If using pork fatback or belly, remove after 4 hours, chop finely when cool, refrigerate until adding back to strained broth.
- Strain the tonkotsu. When the tonkotsu is finished cooking, strain it through a fine mesh sieve or cheesecloth. Place it back into the pot and reduce it as little or as much as you want to get the desired consistency. Season with shoyu tare (or your favorite tare) before using it and Enjoy!
Notes
I use a 7-quart Dutch oven, but any good heavy-bottomed stock pot will work.
Customization: This tonkotsu broth is delicious as-is, but feel free to add a few more mushrooms, onions, or even chicken or pork - you can't really go wrong. Just be sure to use the minimum amount of total meat called for.
Timing: Cook 6-13 hours (I prefer 8 hours). For 12-13 hour cooking, add water to prevent overly thick consistency unless you prefer it that way.
Pork fatback: If using, remove from strained broth, chop until creamy and paste-like, then add back to seasoned broth.
Storage tip: Repurpose old soy sauce bottles (like Kikkoman with pour spouts) for homemade tare - they're airtight and perfect for table service.
TARE & DASHI RECIPES (shoyu, shio, miso, and dashi stock recipes can all be found in the main post!
- Prep Time: 30 minutes
- Cook Time: 8 hours
- Category: Soups & Stews
- Method: Long Simmer Stovetop
- Cuisine: Japanese
Nutrition
- Serving Size: 2 to 3 cups
Regional Ramen Styles
Japan's diverse ramen culture varies dramatically by region, each area developing distinct styles that reflect local ingredients and preferences. Understanding these regional differences helps appreciate the complexity of Japanese ramen culture:
Northern & Central Japan:
- Sapporo Ramen (Hokkaido): Features rich miso-based broth developed in Sapporo around 1965, ideal for Hokkaido's harsh winters. Typically topped with sweetcorn, butter, bean sprouts, and finely chopped pork.
- Kitakata Ramen (Fukushima): One of Japan's "Big Three" ramen styles, known for thick, flat, curly noodles served in a pork-and-niboshi (dried sardine) broth. Has the highest per-capita number of ramen establishments in Japan.
- Iekei Ramen (Yokohama): Created in the 1970s, blends Hakata's tonkotsu richness with Tokyo's soy base. Features thick noodles, spinach, nori sheets and optional garlic paste.
Southern Japan (Kyushu):
- Hakata Ramen (Fukuoka): Originates from Hakata district with rich, milky pork-bone tonkotsu broth and thin, resilient noodles. Features the kaedama (noodle refill) system and toppings like crushed garlic and pickled ginger.
- Kumamoto Ramen (Kumamoto): Made from a blend of pork bone and chicken stock for a mild taste, characterized by roasted garlic chips and blackened garlic oil (mayu) that creates its distinctive aroma.
- Miyazaki Ramen (Miyazaki): A lighter variation of tonkotsu featuring medium-thick noodles with high water content and mild pork bone broth. Often served with pickled daikon radish and adjustable garlic soy sauce.
- Kagoshima Ramen (Kagoshima): The only Kyushu ramen not influenced by Kurume style, using pork bones combined with chicken stock, vegetables, and dried sardines for a lighter, milder taste. Traditionally served with pickled daikon (senmai-zuke).
- Saga Ramen (Saga): Characterized by light yet flavorful pork-based broth that's lighter than typical tonkotsu, featuring thin straight noodles and often topped with raw eggs and high-quality Ariake Sea nori
The History of Ramen
While ramen's origins trace back to Chinese lamian noodles brought to Japan in the early 20th century, it has evolved into something uniquely Japanese.
The first ramen shop opened in Yokohama's Chinatown in 1910, serving simple noodle soup to Chinese workers.
After World War II, ramen became a popular comfort food as Japan rebuilt, with regional styles developing throughout the 1950s and 1960s.
Tonkotsu ramen specifically emerged in Kurume, Fukuoka Prefecture, when, according to urban legend, a chef accidentally left pork bones boiling too long, creating the craveable signature milky-white broth that defines this style today.
Nutritional Information
Tonkotsu ramen provides substantial nutrition, though it's definitely a rich, indulgent meal.
A typical bowl contains high-quality protein from the pork broth and any meat toppings, plus carbohydrates from the noodles for sustained energy. The long-simmered bone broth provides collagen, minerals, and healthy fats.
While tonkotsu ramen is higher in calories and sodium than lighter ramen styles, it's incredibly satisfying and can easily serve as a complete meal when topped with vegetables and protein.
Cost Analysis: Homemade vs Restaurant
Making tonkotsu ramen at home is significantly more economical than ordering from restaurants, especially when you consider the quality and portion size.
Depending on where you live in the world, a single large batch of broth costs approximately $15-20 in ingredients but yields 8-10 servings of restaurant-quality ramen.
Compare this to $15-25 per bowl at authentic ramen shops, and the savings are substantial. Plus, you control every ingredient and can customize to your preferences - something impossible with takeout. The initial time investment pays dividends when you have frozen portions ready for quick weeknight dinners.
No, the energy (gas or electricity) cost isn't accounted for in this total but even with that added into the mix, it's a heck of a lot cheaper than restaurant ramen, especially when made in large batches.
Food Safety
- Maintain proper temperature during the long cooking process - the broth should stay at a rolling boil
- Cool broth quickly in an ice bath if not using immediately, then refrigerate within 2 hours
- Reheat leftover broth to 165°F (74°C) before serving
- Use clean utensils when skimming foam to prevent cross-contamination


KaseyHoo says
This tastes better than the $20 bowls I get at restaurants! The step-by-step instructions were clear and I love that it doesn't require obscure ingredients. I ended up adding a few more shitake mushrooms and an extra onion I needed to use up, but otherwise followed the recipe. Made it for my boyfriend and he was blown away!
Buckley says
Best ramen broth I've ever had. It takes a while (as the title suggests) but it beats anything locally from any restaurant we have near us (I'm not in a metro area like nyc or the likes). It's easy as sin to make and jelled up just like it's supposed to. You get the highest possible marks for this slurpy broth! Going to have to try your homemade ramen noodles and eggs next!
Archie says
Don't second guess the 8 hour simmer...it's worth every minute. You can see it change colors as it cooks which is cool. Knowing it's this easy to make a true japanese ramen broth, just about half pisses me off that so many "ramen" restaurants don't cook it long enough, but still charge and arm and a leg for it. Absolutely excellent recipe!