These Crispy Southern Fried Cherry Pies (aka cherry hand pies) are possibly the best fried pies you may ever eat. Golden and delicious, this light and flaky buttermilk fried pie dough is filled with a tart and sweet 10-minute homemade cherry pie filling and dusted with powdered sugar plus a hint of cinnamon.
The "secret" ingredient in the dough makes these cherry hand pies superiorly crispy and bubbly on the outside, creating that irresistible texture that Southern fried pies are famous for.

This is your Ultimate Fried Pie Guide for making the very best hand pies! Crispy fried pies are the hallmark of the best versions of this Southern dessert! In fact, you'll need a napkin under your chin when you take a bite because they're so flaky and crispy!
If you've been wanting to learn how to make fried cherry pies from scratch, this is one of the best Southern fried cherry pie recipes out there.
These crispy Southern fried pies are perfect year-round - use cherry filling in winter, strawberry in spring, peach in summer, and apple and Nutella in the Fall!
This recipe is worth the calories and the cholesterol (and not every recipe out there can say the same). Plus, they're easier to make than you think!

Let's talk about this sour cherry pie filling for a minute - you'll never find anything like this in a can.
It's sweet, tart, and bursting with fresh cherries in every bite (plus you know exactly what's in it). If you've only ever had store-bought cherry pie filling, prepare for a revelation of genuine cherry flavor.
For those of you new to making pastry dough, fried pies, or hand pies, don't worry!
Below, you'll find all the best tips and step-by-step photos to guide you through creating these Southern delicacies that have been bringing smiles to faces for generations.
This is Arkansas-style fried cherry pies at their best!
If you love this recipe, you might also enjoy my Flaky Southern Strawberry-Rhubarb Fried Pies (Hand Pies) or try making peach fried pies using the same dough recipe.
Jump to:
- Why You'll Love This Recipe
- What Are Fried Cherry Hand Pies?
- Where Do Fried Pies Originate From?
- Best Ever Homemade Fried Cherry Pie Ingredients
- How to Make the Best Southern Cherry Fried Pies Step-by-Step
- Fried Hand Pies Substitutions
- Fried Hand Pies Variations
- Cherry Fried Pie Equipment
- How to Roll Out and Cut the Dough for Fried Pies
- How to Seal Fried Pies Properly
- Do Not Overfill Fried Pie Dough
- How to Fry Cherry Hand Pies (Oil Temperature Guide)
- What to Serve With Fried Cherry Pies
- Delicious Glazes & Toppings for Fried Cherry Pies
- What is the Secret to Crispy Fried Pies?
- How to Store Cherry Fried Pies & Make Ahead Instructions
- Cherry Varieties for Fried Pie Filling
- History of Fried Pies in Southern Cuisine
- Looking for More Easy Cherry Recipes
- More Easy Pie Recipes
- Cherry Hand Pie/Cherry Fried Pie FAQs
- 📖 Recipe
- Food Safety

Why You'll Love This Recipe
- Authentic Southern Recipe - This recipe creates old-fashioned fried cherry pies from my Arkansas roots, using techniques passed down for generations
- Superior Texture - (aka Buttermilk fried pies) The secret combination of buttermilk and baking powder creates exceptionally crispy, bubbly exteriors that you won't find in other fried pie recipes
- Made From Scratch - 100% homemade fried pie (hand pie) dough and homemade cherry pie filling means you control the quality, and it's healthier
- Step-by-Step Photos - Clear visual guidance makes this recipe accessible even for beginners
- Versatile - Once you master the dough, you can fill these hand pies with countless sweet fillings
- Use this recipe to make Air Fryer Cherry Hand Pies - Less oil equals a healthier fried pie
- A perfect make-ahead Thanksgiving or Christmas Dessert - Plus they don't take up any oven space!

What Are Fried Cherry Hand Pies?
Cherry hand pies (also called fried cherry pies or cherry fried pies) are individual desserts made by encasing sweet cherry filling in a special pastry dough, folding it into a half-moon shape (or triangle), and deep-frying until golden and crispy.
These portable deep fried cherry pies are a defining dessert across the American South, particularly in my home state of Arkansas, and also across Tennessee, and Georgia.
Unlike regular pies that require plates and forks, these hand-held versions were historically made for coal miners, farmers, and workers (like my grandpas) who needed portable food.
The fried pie preparation method creates a uniquely crispy exterior while sealing in the sweet filling - resulting in a dessert that's crispy outside and tender inside and easy to hold in your hand (hence the name).

Where Do Fried Pies Originate From?
Fried pies filled with fruit or cream mixtures are a traditional southern dessert and ubiquitous throughout the American South. In fact, my home state of Arkansas is synonymous with this dessert (even a little famous for it).
They've been a part of the culinary heritage there for well over a century (check out what Saveur has to say about it). And everyone's granny, mama, or aunty swears they have "the best recipe", which of course is only sometimes true.
When made well, fried pies can be one of the BEST desserts you'll ever eat. But they can also be dry, or worse, greasy, made with low-quality ingredients, and overly sweetened without much actual fruit at all.
For me, the very best fried pies start with fresh, seasonal, local ingredients like summer peaches, strawberries, cherries, wild blackberries, blueberries, and, of course, fall apples.
This recipe really is one of the best things to ever come out of the South. And if you've never had the pleasure of eating a genuine Southern fried cherry pie (from scratch), give this recipe a try. You'll be happy you did♡.


Best Ever Homemade Fried Cherry Pie Ingredients
This recipe for traditional southern fried cherry pies is 100% made from scratch (and has even converted someone who is a self-proclaimed cherry-fried pie hater).
Made with just a few basic ingredients, it's hard to believe just how delicious these pies are (and how simple they are to make).
For the fried pie dough
- All-purpose flour (or 00 flour)
- Granulated sugar
- Salt
- Baking powder - The secret ingredient that creates those crispy, bubbly pockets on the dough when it fries
- Leaf lard - Creates exceptional flakiness, with a pure, clean flavor (and it's not hydrogenated, which makes it healthier)
- Buttermilk - Southerners know that buttermilk fried pies are superior in terms of flavor and the tenderness it lends to fried pie dough *see notes for buttermilk substitution
- Peanut oil (or other neutral vegetable oil) - The best oil for frying cherry pies is peanut oil or grapeseed oil, but you can use any neutral vegetable oil for frying the pies
- Powdered sugar (for dusting fried pies)
- Cinnamon (optional to add to the powdered sugar, but recommended)
For the fried pie filling
- ½ recipe of 10-Minute Sour Cherry Pie Filling
See recipe card for quantities.
Note about the flour: I use 00 flour to make fried pies when I'm at home here in Italy and King Arthur's all-purpose flour (or Heckers all-purpose) when I'm back home in the States.
The weight of different flours varies based on the humidity in the environment, in the flour itself, and the absorption potential of the flour you're working with.
So, if using measuring cups instead of a scale, be sure to use the 'scoop and level' method, which will give you a more accurate measurement.

How to Make the Best Southern Cherry Fried Pies Step-by-Step
This dough comes together quickly using just a fork. And it only takes 10 minutes to make the homemade cherry pie filling. If you happen to have a dough cutter or food processor, feel free to use them, but it's really not necessary since we're adding the fat at room temperature.
If you have kids, they can definitely help with this part!
Step 1. Mix the dry ingredients. Add the flour, sugar, salt, and baking powder into a medium bowl and whisk to combine.

Step 2. Blend in the lard. Pinch the lard off into ½" (1cm) pieces and add them to the dry ingredients. Use a fork (or dough cutter) to cut the lard into the flour mixture until you have pea-sized crumbles.


Step 3. Add the buttermilk. Next, slowly add the buttermilk to the mixture, approximately ¼ cup (40g) at a time, stirring the mixture with a fork to incorporate the buttermilk into the flour until the mixture leaves the sides of the bowl.
Form the dough into a disc and turn it out onto a floured surface, and sprinkle it with a little more flour. Fold the dough over itself 3-4 times. Wrap with plastic wrap and rest the dough in the fridge for at least 4 hours and up to 2 days.


Step 4. Roll out the pie dough. After the dough has rested, remove it from the fridge and place it on a lightly floured surface.
- For thinner fried pies: Roll the dough into an 11x15 inch (28x38cm) rectangle, approximately ⅛ inch thick.
- For slightly thicker fried pies: Roll the dough into a 9x10 inch (23x25cm) rectangle instead, approximately ¼ inch thick. This yields fewer pies since each one uses more dough, but gives a heartier, more substantial crust.


Step 5. Cut the dough and fill them. Using a 3-4 inch (7.5 to 10cm) round cookie cutter, cut circles out of the dough and fill with 1 to 2 tablespoons of filling.


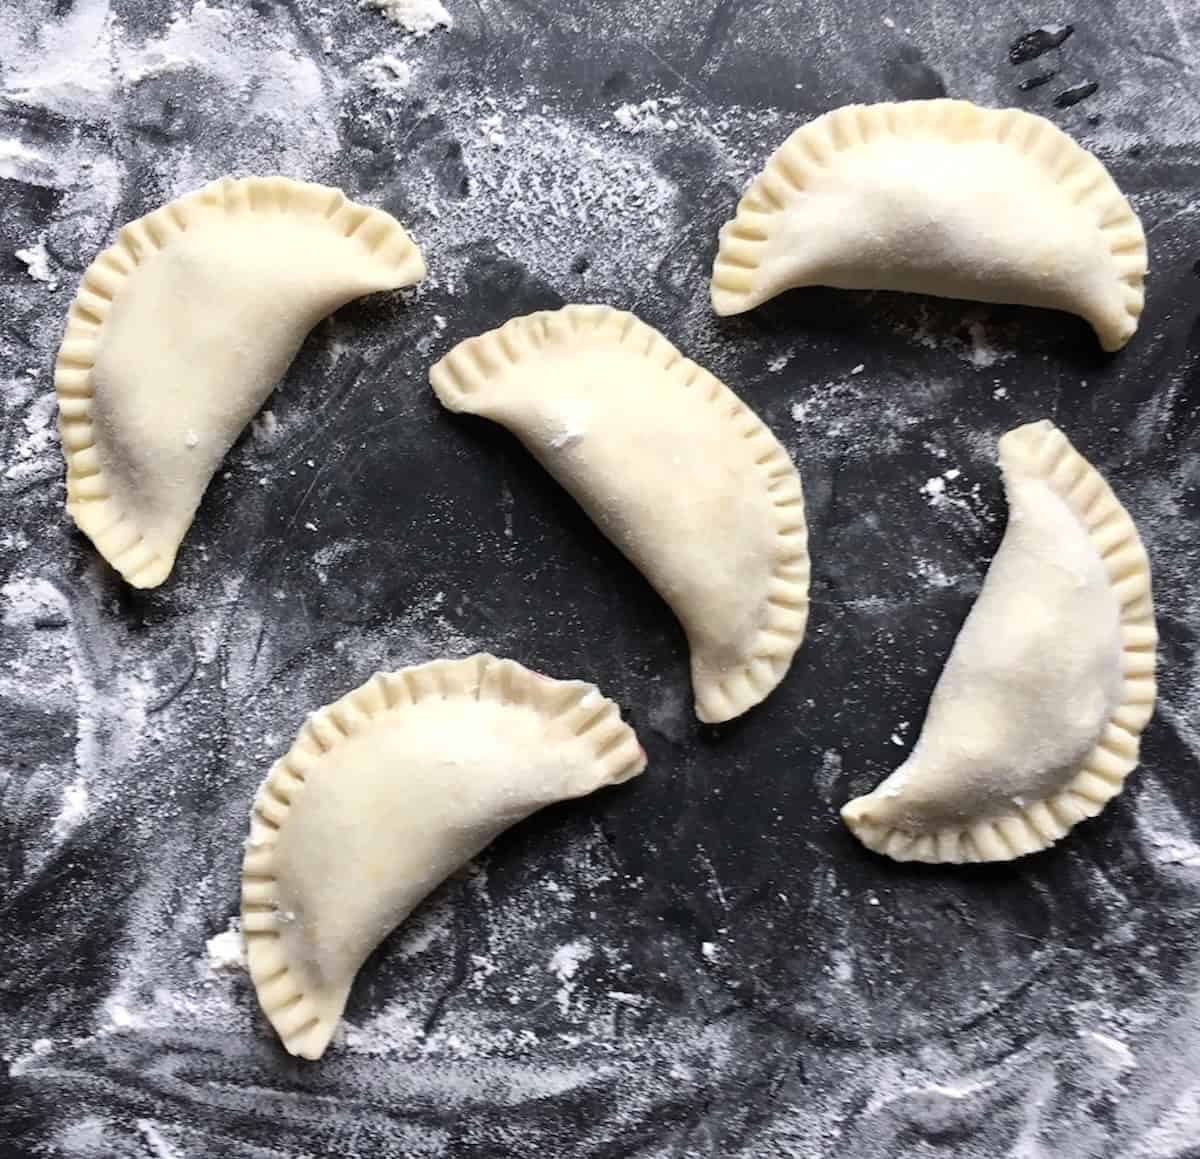
Step 6. Seal the dough. Dip one finger in a little buttermilk (or milk or water) and moisten the dough around the edge. Fold one half of the dough over the filling to create a half-moon shape and press down using your fingers to seal the edges.
Use a fork to crimp the edges and ensure the pies are sealed. Set the filled pies aside on a parchment paper-lined sheet pan, and if they start to get too warm, place them into the fridge to keep them cool while you fill the remaining pies.


Step 7. Fry the cherry pies. Preheat oil to 350°F/176°C and fry the pies in batches. Add the pies one at a time, very carefully, to the hot oil. Cook the pies for about 3 to 4 minutes, or until light golden brown, turning the pies over every 30 seconds or so to ensure even browning.


Step 8. Dust the pies with powdered sugar. Remove pies from the oil onto a cooling rack or paper towel-lined platter and lightly dust with powdered sugar. After the pies have cooled for about 10 minutes, sprinkle them once more with powdered sugar and serve hot or at room temperature. Enjoy!
Hint
Keeping the dough nice and cold but still malleable is key to being able to easily fill the dough without it becoming too messy. If your kitchen is warm, keep your prepared pies in the refrigerator until ready to fry.
Find detailed instructions in recipe card.
Fried Hand Pies Substitutions
Fat Substitutes:
You can use different fats for the fried pie dough, including regular lard or vegetable shortening instead of leaf lard. For a different flavor profile, try using half butter and half lard, which also makes a great fried pie dough.
You may use all butter, but the results will yield a less flaky, crispy fried pie.

Buttermilk Alternative:
While you can use regular whole milk instead of buttermilk, I don't recommend it. Instead, I recommend making a faux buttermilk or buttermilk substitute which is super easy.
Add 1 tablespoon (13g) of freshly squeezed lemon juice (or white vinegar) to a liquid measuring cup, then pour in whole milk until it reaches the ½ cup mark. Stir the mixture and allow it to rest at room temperature to thicken for 5 to 10 minutes.

Flour Options:
All-purpose flour is the standard fried-pie dough flour, but 00 flour will give a slightly more delicate texture if you have access to it (I use it when I'm in Italy).
Homemade Cherry Pie Filling Substitute:
If you don't have fresh or frozen cherries, you can use canned cherry pie filling in a pinch, but the flavor won't be as vibrant, delicious, or healthy as homemade.

Pie Dough Substitute:
Use store-bought refrigerated (rolled) pie dough if you don't feel like making fried pie dough from scratch.

Fried Hand Pies Variations
For the best fried pies and hand pies, use seasonal fruit for the fillings or your favorite spread like Nutella or non-traditional fillings like PB&Js using homemade strawberry jam and creamy natural peanut butter!

- Strawberry-Rhubarb Fried Pies: Substitute with strawberry-rhubarb pie filling
- Peach Fried Pies: Substitute the cherry filling with fresh summer peach filling for a classic Southern variation.
- Nutella Fried Pies: Substitute Nutella for the cherry pie filling.
- Strawberry Fried Pie: Substitute with strawberry pie filling.
- Blueberry Fried Pies: Substitute with blueberry pie filling.
- Apple Hand Pies: Use spiced apple filling with cinnamon and nutmeg for a fall-fried pie version.
More Delicious Fried Pie Fillings and Variations:
- Mixed Berry Pies: Create a filling with strawberries, blueberries, and blackberries for a multi-dimensional flavor.
- Chocolate Fried Pies: Fill with chocolate-hazelnut spread like Nocciolata or Nutella for a decadent treat.
- Cream Cheese Cherry: Add a small dollop of cream cheese to the cherry filling for a cheesecake-like twist.
- Sweet Potato Pies: Fill with spiced sweet potato filling for a Thanksgiving favorite.
- Pumpkin Pie Fried Pies: Bake pumpkin pie filling in a buttered glass baking dish without a crust and cool completely. Whip the filling and add it to the fried pie dough for a delicious alternative to Thanksgiving pumpkin pie.
- Baked Fried Pies: If you prefer not to fry, you can bake them at 375°F/190°C for 20-25 minutes until golden brown (brush with egg wash first).
- Air Fryer Cherry Hand Pies: Cook in an air fryer at 350°F/176°C for 8-10 minutes for a less-oil but still crispy finish.
- Mini fried cherry hand pies: Use a 2-3 inch circle cookie or dough cutter to make bite-sized cherry fried pies perfect for parties, serving crowds or for your kid's lunch box.
Cherry Fried Pie Equipment
- Large Mixing Bowl: For preparing the dough
- Fork or Pastry Cutter: To incorporate the lard (or butter if using) into the flour
- Rolling Pin: For rolling out the dough to the proper thickness
- 3-4 inch Round Cookie Cutter: To create uniform circles of dough
- Heavy-Bottomed Pan or Dutch Oven: For frying the pies (cast iron works particularly well)
- Deep-Fry/Candy Thermometer: To monitor oil temperature for perfect frying
- Slotted Spoon or Spider Strainer: For safely removing pies from hot oil
- Cooling Rack: Allows excess oil to drain from fried pies (this is how to keep fried pies crispy for longer)
- Sheet Pan: For holding prepared pies before frying
- Parchment Paper: To line the sheet pan and prevent sticking
How to Roll Out and Cut the Dough for Fried Pies
When rolling out this fried pie dough, be sure to dust the surface of the countertop(and the rolling pin) with a little flour to keep the dough from sticking. Try not to add too much flour. Roll out the dough using even pressure until it's just ⅛-inch thick or just slightly thicker.
Once it's rolled to the desired thickness, use a floured 3 or 4-inch round cookie cutter to cut circles.
If the dough circles become too warm while you're working with them, place them onto a floured (or parchment-lined) tray, cover them loosely with sustainable cling film, and pop them into the fridge for a few minutes to chill and firm up slightly before adding the filling and sealing the edges.
How to Seal Fried Pies Properly
Properly sealing fried pies is crucial to prevent filling leakage during frying. Follow these steps for perfectly sealed pies every time:
- Work with the right amount of filling - Use no more than 2 tablespoons of filling for a 4-inch pie circle. The filling should be centered with at least a ½-inch border around the edges. Use a little buttermilk (or milk or water) to moisten the dough around the edge to help create a better seal.
- Press firmly - After folding the dough over the filling to create a half-moon shape, press firmly around the curved edge with your fingers to create an initial seal.
- Remove air pockets - Gently press out any air bubbles around the filling before final sealing, like you do with homemade ravioli or tortellini.
- Crimp with a fork - Press the tines of a fork all around the edge to create a decorative crimped pattern that reinforces the seal.
- Double-check the seal - Visually inspect the entire edge to ensure there are no gaps, cracks, or thin spots where the filling might escape.
- Chill if necessary - If your kitchen is warm or the dough has become too soft during handling, place the sealed pies in the refrigerator for 15-20 minutes before frying to help firm them up and strengthen the seal.

Do Not Overfill Fried Pie Dough
As tempting as it is, do not overfill the pies. The filling spreads a little as you fold it. I know, it's easy to want to put in "just a little more", but don't do it. If you overstuff the dough, it can tear and split apart when you're sealing it or, worse, while it's frying.
The goal is to get a good dough-to-filling ratio without the cherry pie filling seeping out. A little pie filling goes a long way. Once you have the dough filled, close the circle by pressing down with your fingers to close it.
Then, use a fork to create the seal. This process can be a little messy, but it's still quick and easy.
How to Fry Cherry Hand Pies (Oil Temperature Guide)
Always make sure the oil is at the right temperature before frying. If the oil is too hot, it'll brown the outside before the inside has time to cook through. If the temperature is too low, the pies will absorb too much oil and become greasy.
The temperature should stay between 350°-375°F (176°C-190°C) when you first drop the pies into the oil. Try to maintain an oil temperature of 325-350°F (163-176°C) throughout the duration of the fry.
Also, don't overcrowd the pies while cooking. Doing so can lead to a rapid drop in oil temperature, which leads to greasy fried pies.
If you're new to deep-frying, test-fry one pie or a small leftover piece of dough to get the hang of it first, or buy a deep-fry/candy thermometer.
You can check to see if the temperature of the oil is ready by placing a wooden chopstick into the hot oil, being sure the chopstick touches the bottom of the pan. When you see bubbles coming up around the chopstick, the oil is ready.
What to Serve With Fried Cherry Pies
These Southern fried cherry pies are versatile desserts that can be served in several delicious ways, and they make great homemade food gifts:
- Classic Style: Serve warm or at room temperature with a dusting of powdered sugar mixed with a pinch of cinnamon.
- Fried Cherry Pie à la Mode: Serve warm with a scoop of vanilla ice cream for a perfect contrast of hot and cold and creamy and fruity.
- Glazed Cherry Fried Pies: Drizzle with a simple glaze made from powdered sugar, milk, and a pinch of cinnamon for extra sweetness.
- Breakfast Treat: Serve alongside morning coffee or tea for a special start to the day.
- Picnic Dessert: Cherry hand pies are the perfect dessert for picnics and outdoor BBQs or a summer fish fry.
- Thanksgiving and Christmas Dessert Buffet: Add to a dessert spread during holiday gatherings for a taste of authentic Southern tradition.
- Gift Giving: Package cooled cherry fried pies in decorative tins, boxes, or bags as homemade food gifts for neighbors, teachers, or friends.
Delicious Glazes & Toppings for Fried Cherry Pies
Transform fried pies and hand pies with these irresistible glazes and sweet toppings! Whether you prefer classic powdered sugar, a rich glaze, or something more adventurous, these finishing touches elevate your hand pies from delicious to extraordinary.
Classic Toppings
- Powdered Sugar Dusting: Sift ¼ cup powdered sugar over warm pies for a traditional finish
- Cinnamon Sugar: Mix ½ cup granulated sugar with up to 1 tablespoon cinnamon and sprinkle over hot pies right after frying
- Vanilla Glaze/Vanilla Bean Glaze: Whisk together 1 cup powdered sugar, 2-3 tablespoons milk, and ½ teaspoon vanilla extract (or seeds from ½ of a vanilla bean pod) until smooth


Fruit-Infused Sugars
- Strawberry Sugar: My strawberry-infused sugar adds bright berry flavor and beautiful pink color, and crunch to fried pies
- Lemon Sugar: Zesty sugar with a tangy bite - perfect for balancing the sweetness of cherry filling, strawberry, or even cream filling
- Orange Sugar: Citrusy sugar that complements cherries, strawberries, chocolate, or even Nutella beautifully
Specialty Glazes
- Almond Glaze: Combine 1 ¼ cups powdered sugar, 3 tablespoons milk, ½ teaspoon almond extract, and a pinch of salt
- Maple Glaze: Mix 1 cup powdered sugar with 3 tablespoons pure maple syrup and 1 tablespoon milk
- Chocolate Drizzle: Melt ½ cup chocolate chips with 2 teaspoons coconut oil and drizzle over cooled pies
- Nutella Glaze: Heat ¼ cup Nutella with 2 tablespoons heavy cream until smooth, then drizzle
- Cream Cheese Glaze: Beat 2 oz softened cream cheese with ½ cup powdered sugar, 1 tablespoon milk, and ¼ teaspoon vanilla extract
- Lazy Fried Pie Glaze: Drizzle fried pies with sweetened condensed milk for the easiest glaze ever
Berry Glazes
- Strawberry Glaze: Blend ¼ cup strawberry jam with ¾ cup powdered sugar and 1 tablespoon lemon juice
- Raspberry Drizzle: Warm ⅓ cup raspberry preserves with 1 tablespoon water until smooth, then strain
- Blueberry Glaze: Simmer ½ cup blueberries with 2 tablespoons sugar and 1 tablespoon water until soft, purée, strain, and mix with ½ cup powdered sugar
Pro Tips for Perfect Glazes
- Apply glazes while pies are slightly warm (not hot) for the best absorption
- For thicker glazes, use less liquid; for thinner glazes, add more milk or cream 1 teaspoon at a time
- Double-dip for an extra sweet coating
- Sprinkle chopped nuts, toasted coconut, or crushed candy over wet glaze for added texture
With these versatile glazes and toppings, you can customize your fried cherry hand pies for any occasion or flavor preference!

What is the Secret to Crispy Fried Pies?
The secret to the crispiest, flakiest, best fried pies lies in two ingredients - buttermilk and baking powder.
Baking powder is my "secret" ingredient that makes the fried pie dough bubble and crisp up on the outside.
It's the leavening agent that, when combined with liquid in this recipe, allows for the escape of carbon dioxide gas, adding lightness and unbeatable crispiness to the final fried pies.
Buttermilk adds acidity and great flavor, making this fried pie dough tender, much the same way it makes better pancakes!.
You can see from the photos above how light, bubbly, and crispy the fried dough is. These bubbles equal crispy-crunchy flaky goodness.

How to Store Cherry Fried Pies & Make Ahead Instructions
Fried cherry pies are best enjoyed the day they're made, when the contrast between crispy exterior and tender filling is at its peak. However, there are several options for storing any extras and meal-prepping cherry hand pies ahead of time.
Room Temperature
Store completely cooled fried pies in an airtight container at room temperature for up to 2 days. They will gradually lose their crispness but will still taste delicious.
Refrigerator
Refrigerate in an airtight container for up to 5 days. The cold environment will cause the crust to soften, but a quick reheat can help restore some crispness.
Freezer (Cooked Pies)
Freeze completely cooled fried pies by placing them in a single layer on a baking sheet until solid, then transfer to a freezer-safe container or bag with parchment paper between layers. They'll keep for up to 3 months.
Freezer (Uncooked Pies)
You can freeze filled and uncooked fried pies for up to 6 months before frying.
After filling the pies and sealing them, lay them out in a single layer (not touching) on a sheet tray and pop them into the freezer for about 1 to 2 hours, or until the pies have firmed up.
At this point, they can be placed inside an airtight container or freezer bag and sealed.
Reheating Cherry Hand Pies
The best way to reheat fried pies is in a 350°F/175°C oven for 5-10 minutes until warmed through and slightly crisp again. You can also use an air fryer at 325°F/163°C for 3-4 minutes. For frozen pies, add a few extra minutes to the reheating time.


Cherry Varieties for Fried Pie Filling
Different cherry varieties create distinctive flavors in your fried pie filling. Here's a quick guide to choosing the right cherries, but head over to my Ultimate 10-Minute Sour Cherry Pie Filling post for more details on cherry varieties.
In that post, you'll also learn the best way to pit cherries, using a cherry pitter or an easy DIY method in case you don't own a cherry pitter:
Sour Cherries (Montmorency, Morello)
These tart varieties(frozen or fresh) are traditional pie cherries with bright acidity that balances beautifully with sugar. Their firm texture holds up well in cooking. Available fresh briefly in summer, but is more commonly found frozen or canned.
Sweet Cherries (Bing, Rainier, Brooks)
Sweeter varieties that are more commonly available fresh. Bing cherries, with their deep red color and sweet-tart balance, make excellent pie filling when paired with a touch of lemon juice to brighten the flavor.
Frozen Dark Cherries
Often a mix of sweet varieties, these pre-pitted cherries are convenient and work beautifully in pie filling. They're picked at peak ripeness and frozen quickly, preserving their flavor.
Dried Cherries
In traditional Southern cooking, dried cherries were sometimes rehydrated to make pie filling when fresh fruit wasn't available. This creates a more intense, concentrated cherry flavor. (I still prefer using fresh or frozen cherries).
Sour Cherry & Dark Sweet Black Cherry Combination
For complex flavor, try combining different varieties like this mixed cherry pie filling recipe here.
A mix of sweet and sour cherries creates a perfect balance, while adding a few dried cherries to fresh or frozen ones intensifies the cherry flavor.
Growing up in Arkansas, I was fortunate enough to have a cherry tree in our backyard, providing juicy, sweet-tart cherries perfect for pie filling. If using backyard cherries, test a few for sweetness and adjust your sugar accordingly.

History of Fried Pies in Southern Cuisine
Fried pies are deeply rooted in Southern American cooking traditions, dating back to the early 19th century.
These portable pastries emerged as practical solutions for coal miners and farm families (including my own) who needed hearty, transportable meals that could be carried to the fields, to the mines, or eaten on long journeys.
Originally, fried pies were made with dried fruits like apples and peaches that could be preserved through the winter months.
The pies would be cooked over open fires in cast iron skillets using lard rendered from the family's own pigs. This making-do with available ingredients embodied the resourcefulness that characterized Southern cooking.
In Arkansas, where I grew up, fried pies hold particular cultural significance. Passed down through generations, each family guards their own recipe variations.
Some use buttermilk like this recipe, while others use water or regular milk. Some insist on lard for authenticity, while others adapt with shortening or butter, or a combination of fats.
When commercial bakeries began producing fried pies in the mid-20th century, they introduced versions that many Southerners found disappointing-often too sweet, with less fruit in the filling and thicker, less flaky crusts.
This commercialization actually reinforced the importance of homemade versions as markers of authentic Southern cooking heritage.
Today, these hand pies represent both nostalgia and innovation in Southern cuisine. While our traditional recipes remain treasured family heirlooms, new fillings like Nutella fried pies (yum, see above) build upon this rich culinary tradition.
Looking for More Easy Cherry Recipes


More Easy Pie Recipes


Cherry Hand Pie/Cherry Fried Pie FAQs
Yes, you can freeze filled and uncooked fried pies for up to 6 months before frying. After filling the pies and sealing them, lay them out in a single layer (not touching) on a sheet and pop it into the freezer for about 1 to 2 hours, or until the pies have firmed up.
At this point, they may be placed inside an airtight container or freezer bag and sealed. When you're ready to fry the pies, remove them from the freezer for about 15 minutes to allow some of the chill to come off.
Alternatively, you may place frozen pies in the refrigerator for 2 hours before freezing, which also helps take the chill off. Fry them for about 8 minutes or until cooked through and golden brown.
You'll know the dough is ready to be formed into a 'brick" when you can squeeze a handful of dough together and it holds. If the dough crumbles, add just a bit more buttermilk, 1 teaspoon (5g) at a time, or until the mixture just holds together.
Avoid adding too much buttermilk, or the dough will be wet and sticky, and never add all of the buttermilk all at once. Instead, add it in increments so you can be sure to use just the right amount.
Yes, you can use canned cherry pie filling if you're short on time. However, this all-natural homemade cherry filling takes 10 minutes to make (really!) and provides superior flavor with more actual cherries and less syrupy sweetness.
If using canned filling, you might want to drain some of the excess liquid and add a squeeze of fresh lemon juice to brighten the flavor.
To prevent sogginess, ensure your oil is at the proper temperature (350°-375°F/176°-190°C) before frying. Don't overcrowd the pot, which can lower the oil temperature too much.
Also, make sure to let excess oil drain properly by placing fried pies on a wire cooling rack rather than directly on paper towels. Lastly, store completely cooled pies in a container with good airflow-never place hot or warm fried pies in a sealed container, as trapped steam will create condensation and soften the crust.
Yes, you can make these cherry hand pies in an air fryer for a less-oil version. Preheat your air fryer to 350°F/175°C. Before air frying, lightly brush the assembled pies with a beaten egg or a little melted butter to help them brown.
Cook for 8-10 minutes until golden brown and crisp, turning halfway through cooking. The texture will be slightly different than deep-fried versions but still delicious and healthier!
The ideal oil temperature for frying cherry hand pies is between 350°-375°F (176°-190°C) when you first add the pies. Try to maintain an oil temperature of 325°-350°F (163°-176°C) throughout the frying process.
If the oil is too hot, the outside will brown too quickly while the inside dough remains undercooked. If the oil is too cool, the pies will absorb excess oil and become greasy. A candy/deep-fry thermometer is highly recommended for best results.
While similar in concept, hand pies and turnovers have distinct differences. Hand pies typically use a pie crust dough that's similar to traditional pie crusts, while turnovers usually use puff pastry or a laminated dough.
Hand pies can be either fried or baked, while turnovers are almost always baked. Southern fried pies specifically have a heritage rooted in rural Southern cooking traditions, with special dough recipes (like this buttermilk version) designed specifically for frying.
Fried pies typically burst open for one of three reasons: overfilling, inadequate sealing, or trapped air bubbles. Be sure to use only 1-2 tablespoons of filling per pie (depending on size), press the edges firmly with your fingers before crimping with a fork, and gently press any air pockets out before sealing.
It's also important to make sure the oil isn't too hot, as a rapid temperature change can cause the filling to expand too quickly and burst through the dough.
The ideal thickness for fried pie dough is about ⅛ inch (3mm) thick or just slightly thicker. If the dough is rolled too thin, it may tear easily when filled or during frying. If rolled too thick, the dough may not cook through properly and could result in a doughy interior. Use even pressure when rolling and try to maintain consistent thickness throughout your dough for the best results.
How do you keep the filling from leaking out of fried pies?
The first step to making sure your fried pie filling doesn't leak out of the pies is to not overfill the pie dough. For a 4-inch fried pie dough circle, you'll only need about 1-2 tablespoons (14-28g) of pie filling.
The second thing is to make sure you get a good seal, and remove any air pockets from the inside (see the "How to Seal Fried Pies Properly" section above for step-by-step instructions and photos of properly sealing fried pies so they don't leak or burst open when you fry them).
Can you use canned cherry pie filling instead of homemade?
You can absolutely use canned cherry pie filling to make these homemade fried pies, which saves time (although my homemade cherry pie filling takes just 10 minutes to make). They'll still be delicious!
Let's Get Started!
Made this Recipe? We'd love for you to rate ⭐️ it and tell us how it went for you!
Print📖 Recipe

Flaky Southern Fried Cherry Pies (Cherry Hand Pies)
- Total Time: 24 minutes
- Yield: 16-18 Fried Pies (using a 3 ⅝-inch cutter) OR 12-13 Fried pies (using 4-inch cutter)
Description
This is the best and only fried pie recipe you're ever gonna need (a truly no-fail fried pie dough)! Tender on the inside, with the crispiest, flakiest crust. SO crispy and flaky in fact, that you're gonna need a napkin under your chin when you take your first bite. And it's filled with my all-time favorite( all-natural) 10-minute homemade cherry pie filing. These fried pies will keep your family coming back for more - bite after delicious bite!
Ingredients
For the Pie Dough
- 1 ½ cups all-purpose flour (225g)
- 1 ½ tablespoons granulated sugar (25g)
- ¼ teaspoon kosher salt (1g)
- 1 teaspoon baking powder (4g)
- ¼ cup leaf lard, pinched off into small pieces (50g) (sub regular lard)
- ¼ to ½ cup buttermilk, room temperature (85-115g) *see recipe notes for how to make a buttermilk substitution
For the Pie Filling
For Frying & Garnishing the Fried Pies
- 2 to 3 cups neutral vegetable oil (for frying the pies) (450g-675g)
- ¼ cup powdered sugar (for dusting fried pies) (30g)
- up to ¼ teaspoon cinnamon (optional to add to the powdered sugar, but highly recommended)
*I use 00 flour when I'm in Italy for this recipe (and King Arthur or Hecker's all-purpose flour when I'm in the States), and the weight of different flours varies based on the humidity content and absorption potential of the flour you're working with. Just be sure to use the 'scoop and level' method to measure your flour into measuring cups and spoons and the recipe works perfectly every time.
Instructions
- Mix the dry ingredients. Add the flour, sugar, salt, and baking powder into a medium bowl and whisk to combine.
- Blend in the lard. Pinch the lard off into ½" (1cm) pieces and add them to the dry ingredients. Use a fork (or dough cutter) to cut the lard into the flour mixture until you have pea-sized crumbles.
- Add the buttermilk. Next, slowly add the buttermilk to the mixture, approximately ¼ cup (40g) at a time, stirring the mixture with a fork to incorporate the buttermilk into the flour until the mixture leaves the sides of the bowl. Form the dough into a disc, turn it out onto a floured surface and sprinkle it with a little more flour. Fold the dough over itself 3-4 times. Wrap with plastic wrap and rest the dough in the fridge for at least 4 hours and up to 2 days.
- Roll out the pie dough. After the dough has rested, remove it from the fridge and place it on a lightly floured surface. Roll the dough into an 11x15 inch (28x38cm) rectangle, about ⅛ inch thick.
- Cut the dough and fill them. Using a 3 to 4-inch (7.5 to 10cm) round cookie cutter, cut circles out of the dough. Re-roll any remaining dough scraps one more time get a few more rounds, but don't overwork it. Fill each round with 1 to 2 tablespoons of filling. *see notes for what to do with leftover dough scraps.
- Seal the dough. Fold one half of the dough over the filling to create a half-moon shape and press down using your fingers to seal the edges. Use a fork to crimp the edges and ensure the pies are sealed. Set the filled pies aside on a parchment paper-lined sheet pan, and if they start to get too warm, place them into the fridge to keep them cool while you fill the remaining pies.
- Fry the cherry pies. Preheat oil to 350°F/176°C and fry the pies in batches. Add pies one at a time very carefully to the hot oil. Cook the pies for about 3 to 4 minutes, or until light golden brown, turning the pies over every 30 seconds or so to ensure even browning.
- Dust the pies with powdered sugar. Remove pies from the oil onto a cooling rack or paper towel-lined platter and lightly dust with powdered sugar. After the pies have cooled for about 10 minutes, sprinkle them once more with powdered sugar and serve hot or at room temperature. Enjoy!
Notes
If you don't have buttermilk, add 1 tablespoon (14g) of freshly squeezed lemon juice to a liquid measuring cup, then pour in whole milk until it reaches the ½ cup mark on the measuring cup. Stir the mixture and allow it to rest at room temperature to thicken for 5 to 10 minutes before adding to the flour mixture.
This recipe can easily be doubled to make fried pies for a group. Wrap the extra dough and seal it in a freezer bag for up to 3 months.
Substitute vegetable shortening for the lard if you prefer. You may also use a 1:1 mixture of half butter and half lard. Using only butter will yield a slightly different texture but a wonderful flavor.
Let the pie dough rest. Do not skip this step. It's very important to let the dough relax so that it's more pliable and easier to roll out.
Use a scale to weigh the ingredients for more consistent measurements. Use measuring cups and spoons if that's what you have.
For a slightly thicker crust, roll the dough to about ¼ inch thick instead (9x10 inch / 23x25cm rectangle). This yields fewer pies since each one uses more dough, but gives a more substantial bite.
I use a 3 ⅝-inch round cutter for this recipe and get exactly 16 dough rounds (11 from the first roll and 5 more from rerolling the scraps once). Feel free to make your pies smaller or larger; just adjust the amount of filling to match. For a 4-inch cutter, use no more than 2 tablespoons of filling per pie. This helps the pies seal properly and fry without leaking. Whatever size you choose, resist the urge to overfill - overfilled pies can burst open while frying.
To skip rerolling scraps altogether, cut the dough into 3x3 inch or 4x4 inch squares instead of using a round cutter, then fold each square in half diagonally to make a triangle. Squares tile edge to edge with almost no gaps between cuts, so you get more pies out of the same amount of dough with none of the toughening that comes from rerolling.
Dust the pies with powdered sugar twice. The first time is right after they finish frying. This allows the sugar to melt into the hot pies. Then I dust them a second time after about 10 minutes.
Add extra flavor to the powdered sugar by adding a pinch or two of cinnamon to it before dusting the pies. This is especially good for peach, cherry, and apricot fried pies.
Use this pie dough with other fillings. Try chocolate, peach, strawberry-rhubarb, lemon cream, apricot, vanilla-bean cream, wild blackberry, sweet potato, pecan, or even coconut.
While you could technically re-roll the dough scraps a second time, the fried dough wouldn't yield what you see in these photos. That said, they do make perfect treats for the cooks who are making them). Instead after the re-rolling the dough scraps once, I recommend making mini weirdly-shaped fried pies out of the remaining dough or just frying it as is and sprinkling it with sugar or spooning extra cherry pie filling over it:) I don't like to waste any scraps!
- Prep Time: 20 minutes
- Cook Time: 4 minutes
- Category: Pies + Cobblers + Crostate
- Method: Deep Fried or Air Fryer
- Cuisine: Southern
Nutrition
- Serving Size: 1 Fried Pie
- Calories: 211
- Sugar: 12.8g
- Sodium: 49mg
- Fat: 11.5g
- Saturated Fat: 2.5g
- Unsaturated Fat: 8.5g
- Trans Fat: 0.1g
- Carbohydrates: 27g
- Fiber: 0.7g
- Protein: 1.5g
- Cholesterol: 2mg
Food Safety
- Use a reliable deep-fry thermometer to ensure oil reaches and maintains proper temperature
- Never leave hot oil unattended
- Keep a fire extinguisher rated for grease fires nearby when deep frying
- Allow oil to cool completely before discarding or storing
- Keep children and pets away from hot oil
- Be cautious of water near hot oil - even small droplets can cause dangerous splattering
- Use long-handled tools designed for frying to maintain a safe distance


Hannah Pestel says
My daughter and I made this recipe but the recipe only yielded six 4 inch pies. The recipe posted states it yields 18-20 pies. Is that for a doubled recipe?
Kelly Leding says
Hi Hanna!😊 First of all, thank you for trying out the recipe with your daughter! Some of my best adult memories are of me baking with my mom:) As for the recipe, I sent you a comprehensive email last week to explain everything. I even did a test batch for you on July 5th and sent you photos so you can see exactly what's going on!❤️ I hope this helped clear up any confusion I may have caused😳🤗?! Check your junk or spam folder if you don't see the email in your inbox. And don't hesitate to reach back out to me with any questions! Your comments and questions help me make the blog better for everyone:)
Melinda says
If baked, does it still render a bubbly flakey crust?
Kelly Leding says
Hi Melinda, If you bake these fried pies it will still be very flaky, delicious and definitely less calorific, but not "bubbly". Instead, they're more like a tender flaky hand pie..still delicious but not as much so as frying them. If you decide to bake them, I recommend giving them a little egg wash (using egg whites only) and sprinkling on some coarse sugar for added texture and sweetness. I hope this helps and I'd love to hear from you if you end up making them❤️! Good luck!
Scottt K. says
I burned my tongue because I couldn't wait for them to cool down. Worth it. 10/10 would burn tongue again🔥. Great recipe!
Georgia P. says
Incredible recipe! Made these for our church potluck and they were gone in like 10 minutes. Three people asked for the recipe! The dough stays crispy even after sitting out for a while which is impressive. Who knew making them from scratch could taste so good. Can't wait to try your strawberry-rhubarb filling next. Thanks🙏
Gavin says
These turned out divine!
Kelly says
Gavin, I'm so happy you made them and loved them! This is definitely one of our favorite southern desserts. Thanks so much for trying out the recipe and for taking the time to leave your comment🤗.