This bread flour pizza dough recipe is the easiest way to make incredible homemade pizza using a flour you probably already have in your pantry. Just 5 simple ingredients plus water, about 25 minutes of hands-on work, and you get a versatile dough that makes ultra-crispy thin-crust pizza or soft, chewy thick-crust pizza.
Bread flour's higher protein content gives this dough an edge over all-purpose flour, creating a stronger gluten network that holds up to any topping you pile on!

As a former private chef in NYC, King Arthur bread flour was my go-to pizza flour. It's what I always kept stocked in my and my clients' pantries.
Most often, at their request, I'd prepare dough balls in advance so families could have pizza party nights and cook together with their kids. Other times, I'd bake whole pizzas with their favorite toppings to be warmed up. Either way, it made for a quick, restaurant-quality meal that gave them more time for other activities over the weekend without having to order out.
This dough can be made the same day or prepped 1-3 days ahead. Cold fermenting in the fridge develops a deeper, more complex flavor that makes an already delicious pizza even better and makes it more digestible (never dense, or stodgy like you get with 30-minute yeasted pizza doughs).
It's also freezer-friendly for up to 3+ months, so you can always have homemade pizza dough ready to go. Watch the video below to see exactly how it comes together!
If you want to try a recipe using Italian 00 flour instead, check out my authentic 00 flour pizza dough recipe. But if you've got bread flour, this is the recipe for you!

If you enjoy making homemade pizza, check out my Ultimate Pizza Dough & Best Toppings Guide for topping inspiration. You might also love my Whole Wheat Thin-Crust Pizza Dough for less refined carbs with the same great flavor, or my thick-crust 00 flour pizza dough if you want an Italian flour version.
Jump to:
- Why You'll Love This Bread Flour Pizza Dough Recipe
- Ingredients for Bread Flour Pizza Dough
- How to Make Bread Flour Pizza Dough (Step-by-Step With Photos)
- What Temperature Should I Bake Pizza?
- What Is "Dough Point" and Why It Matters
- Can I Substitute All-Purpose Flour for Bread Flour?
- Equipment
- How to Store Bread Flour Pizza Dough
- How to Freeze Bread Flour Pizza Dough
- Top Tips for Perfect Bread Flour Pizza Dough
- FAQ
- Looking for More Easy Pizza Recipes?
- 📖 Recipe
- How to Reheat Leftover Pizza
- Food Safety

What Is Bread Flour? (And Why It's Perfect for Making Pizza)
Bread flour is a high-protein flour (typically 12-14% protein) designed for baking where strong gluten development matters. The extra protein creates stronger gluten networks when mixed with water, which is what gives pizza crust made with its signature chew and crispy structure.
In the US, bread flour is milled from hard red wheat. King Arthur Bread Flour, for example, is 100% US-grown hard red wheat at 12.7% protein. In Italy, the equivalent high-protein flour is called "farina Manitoba" and is still classified as grano tenero (soft wheat), even at similar protein levels.
In fact, nearly all Italian flours used for pizza, from 00 flour to Manitoba to integrale, are milled from soft wheat grain. Hard wheat (grano duro) in Italy is reserved for dried pasta and some regional breads (especially in the South and in Sicily). It's a completely different flour system than what American bakers are used to.
The good news? Bread flour is available at every American grocery store, making it the most accessible high-protein flour for making exceptional pizza dough at home.
Why You'll Love This Bread Flour Pizza Dough Recipe
- 5 everyday pantry ingredients plus water, no specialty flour needed. Bread flour, yeast, salt, sugar, and olive oil. If you cook or bake at all, you likely already have everything.
- One dough, two styles of pizza. Roll it thin for ultra-crispy thin-crust pizza, or hand-stretch it thicker for soft, chewy thick-crust pizza. Same recipe, same dough, totally different results. I show you both methods below with step-by-step photos.
- Bread flour's high protein (12-14%) creates the best texture. More protein means more gluten, which means a crispier crust with perfect chew. This is why professional bakers reach for bread flour over all-purpose.
- Only about 25 minutes of actual hands-on time. That includes measuring, kneading, rolling, and topping. The rest is just waiting for the dough to rise (and smelling something amazing coming from the oven).
- Works in any home oven, toaster oven, or countertop pizza oven. The pizzas in this post were baked at 482°F/250°C in a regular home oven. You don't need a 500°F oven for great results.
- Make it 1-3 days ahead for even better flavor. Cold fermenting this dough in the fridge lets the yeast work slowly, developing deeper flavor and better digestibility. It also freezes beautifully for up to 3 months.
- Beginner-friendly, even for kids. When I ran my cooking school in Chengdu, China, pizza dough was one of the first recipes I taught in kids' classes. If a 4-year-old can nail it, so can you 😉. Check out the photos here.
- Restaurant-quality results at home for a fraction of the cost of delivery, takeout, or dine-in pizza.
Ingredients for Bread Flour Pizza Dough
Here's what goes into this dough and why each ingredient matters. See the recipe card below for exact quantities.
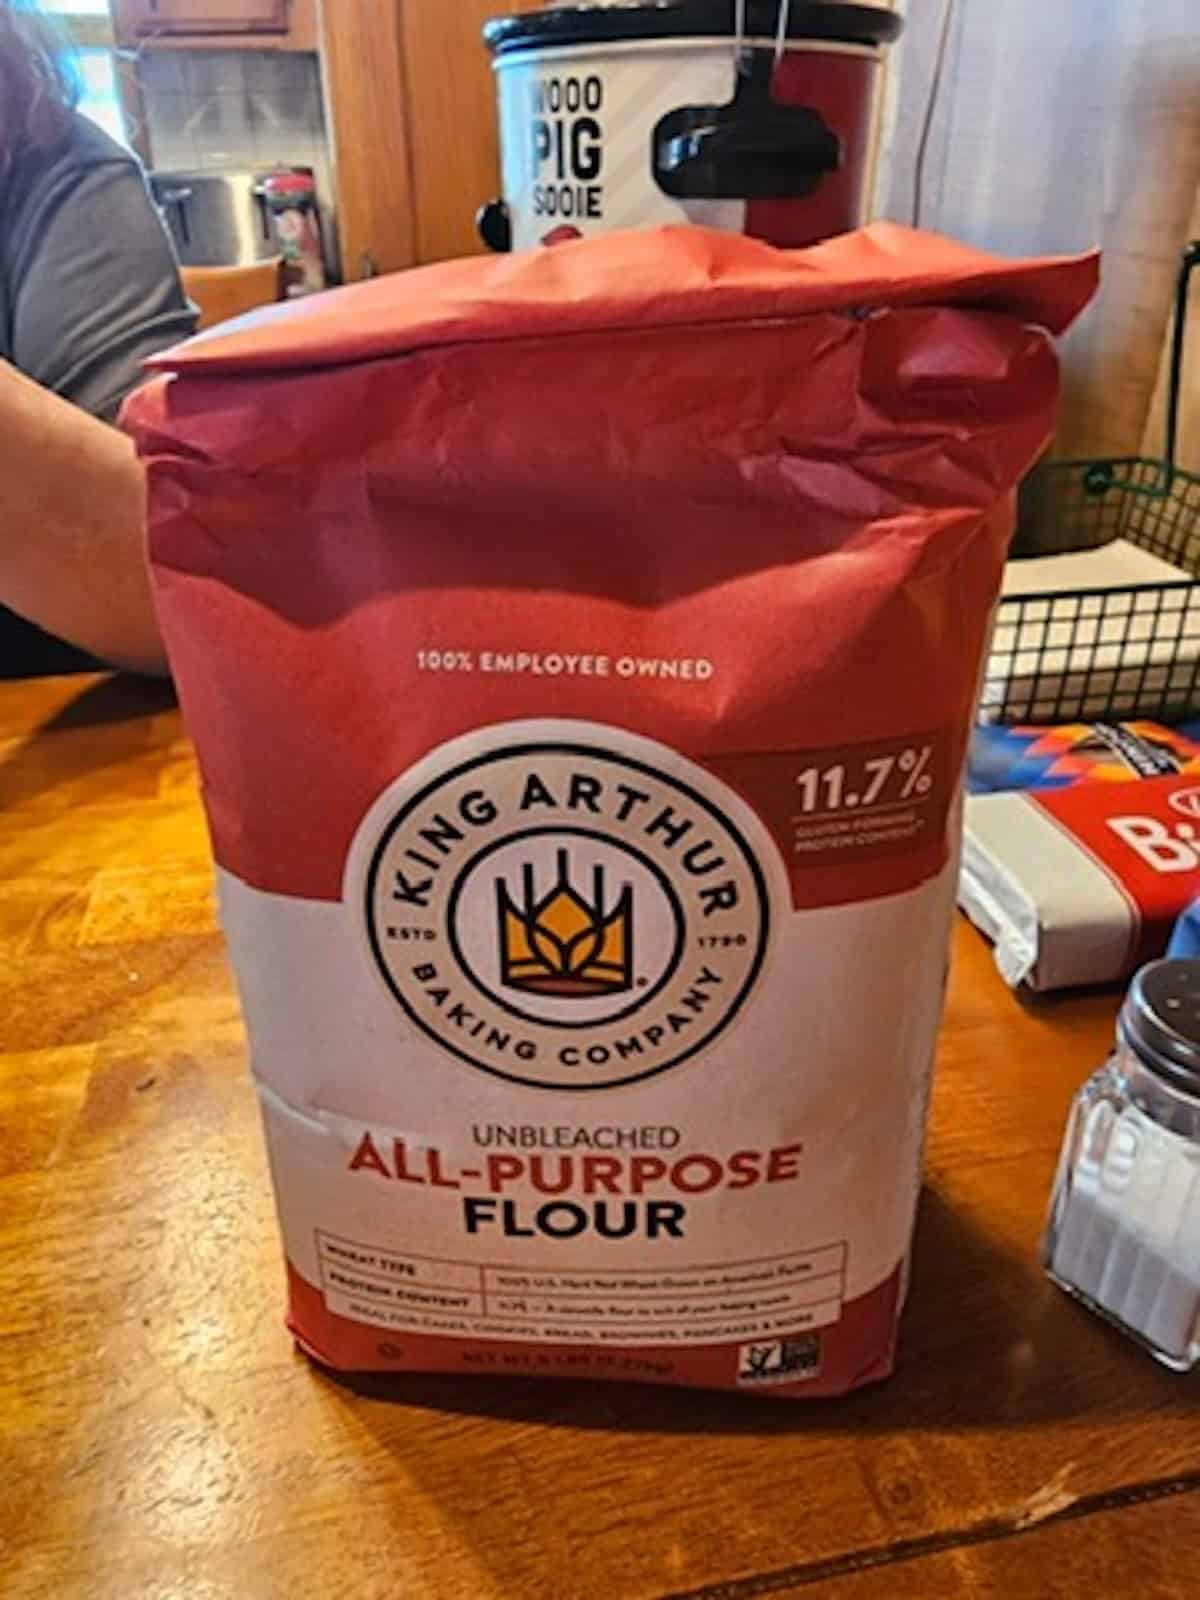
- Bread flour - I've used bread flour with 14% protein, but King Arthur Bread Flour (12.7% protein) also works beautifully. Higher-quality flour always equals a better pizza crust.
- Instant yeast - I use SAF or Red Star Yeast. Instant yeast mixes directly into the flour with no blooming required. You can substitute active dry yeast, but bloom it in warm water for about 10 minutes first (see recipe notes) before using.
- Warm water - Between 110-115°F (43-46°C). Yeast dies above 130°F (54°C), so don't make it too hot or it will kill your yeast. It shoudl be slightly just warmer than milk for a baby.
- Salt - I use Diamond Crystal Kosher salt. For a low-sodium pizza dough version, you can reduce the salt and still get a delicious result. I made it this way for my Mom during her cancer treatment and it was still really delicious (see recipe notes).
- Sugar - Helps with browning in lower home oven temperatures, but can omit it it or substitute honey, maple syrup if you have dietary restrictions.
- Extra virgin olive oil - Provides fat for a well-textured crust in a home oven. Any vegetable oil works as a substitute, but EVOO is healthier. Always use high quality EVOO for drizzling over the tops of the assembled pizza before baking.

How to Make Bread Flour Pizza Dough (Step-by-Step With Photos)
Here's an overview of how to make this dough. Full measurements and detailed instructions are in the recipe card below. Watch the video too!
Step 1. Mix the Dough


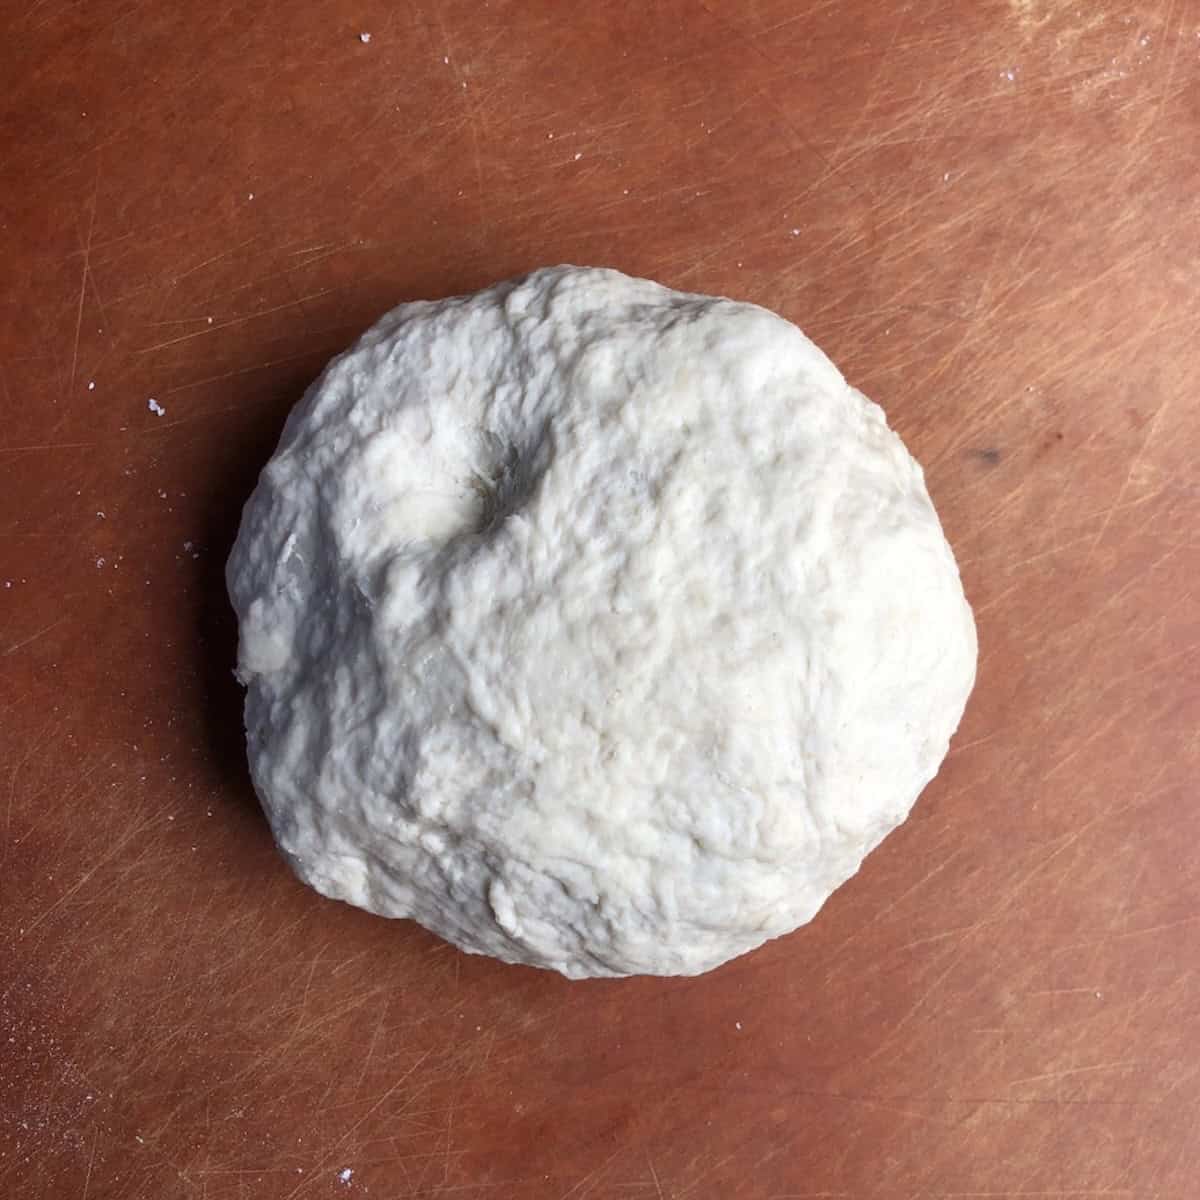
Whisk the dry ingredients together, then add the warm water and olive oil. Stir until a rough, shaggy ball forms. It won't look pretty yet, and that's exactly right. You can mix by hand or use a stand mixer with the dough hook.
Step 2. Knead the Dough (10-12 Minutes)
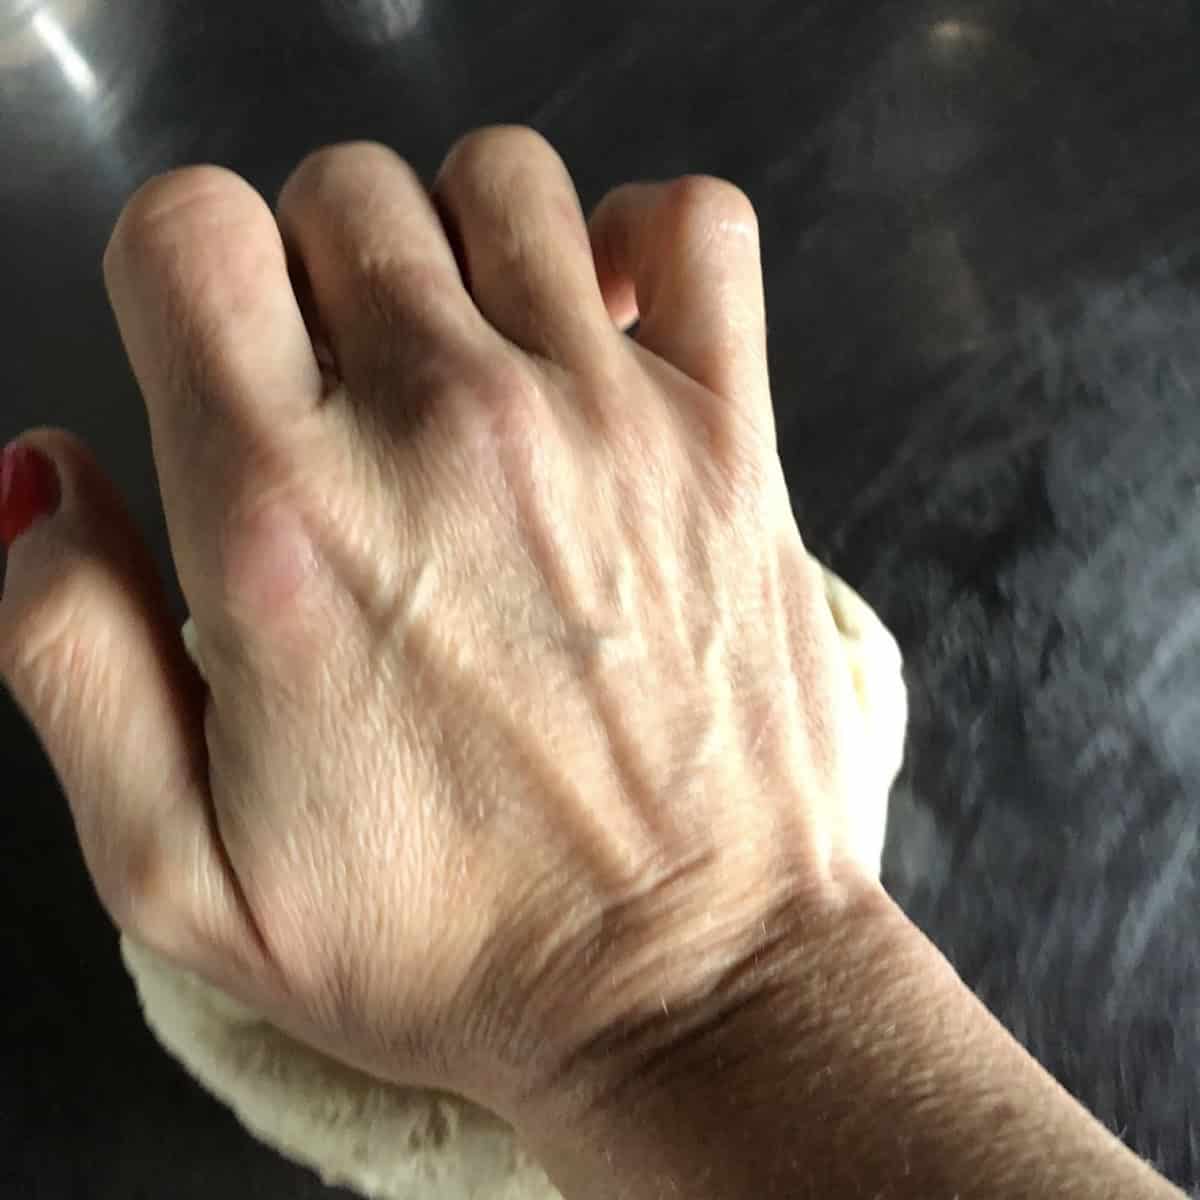

Knead by hand on a lightly floured surface for 10-12 minutes. The dough is ready when it's smooth, elastic, and springs back slowly when poked.
Stand mixer option: Use the dough hook on speed 2 for about 8 minutes. Scrape down the sides once or twice.
Bread flour tip: This dough will feel more elastic and springy than dough made with all-purpose flour. That's the extra gluten at work, and it's a good thing. Don't add more flour if the dough feels bouncy, just keep kneading.
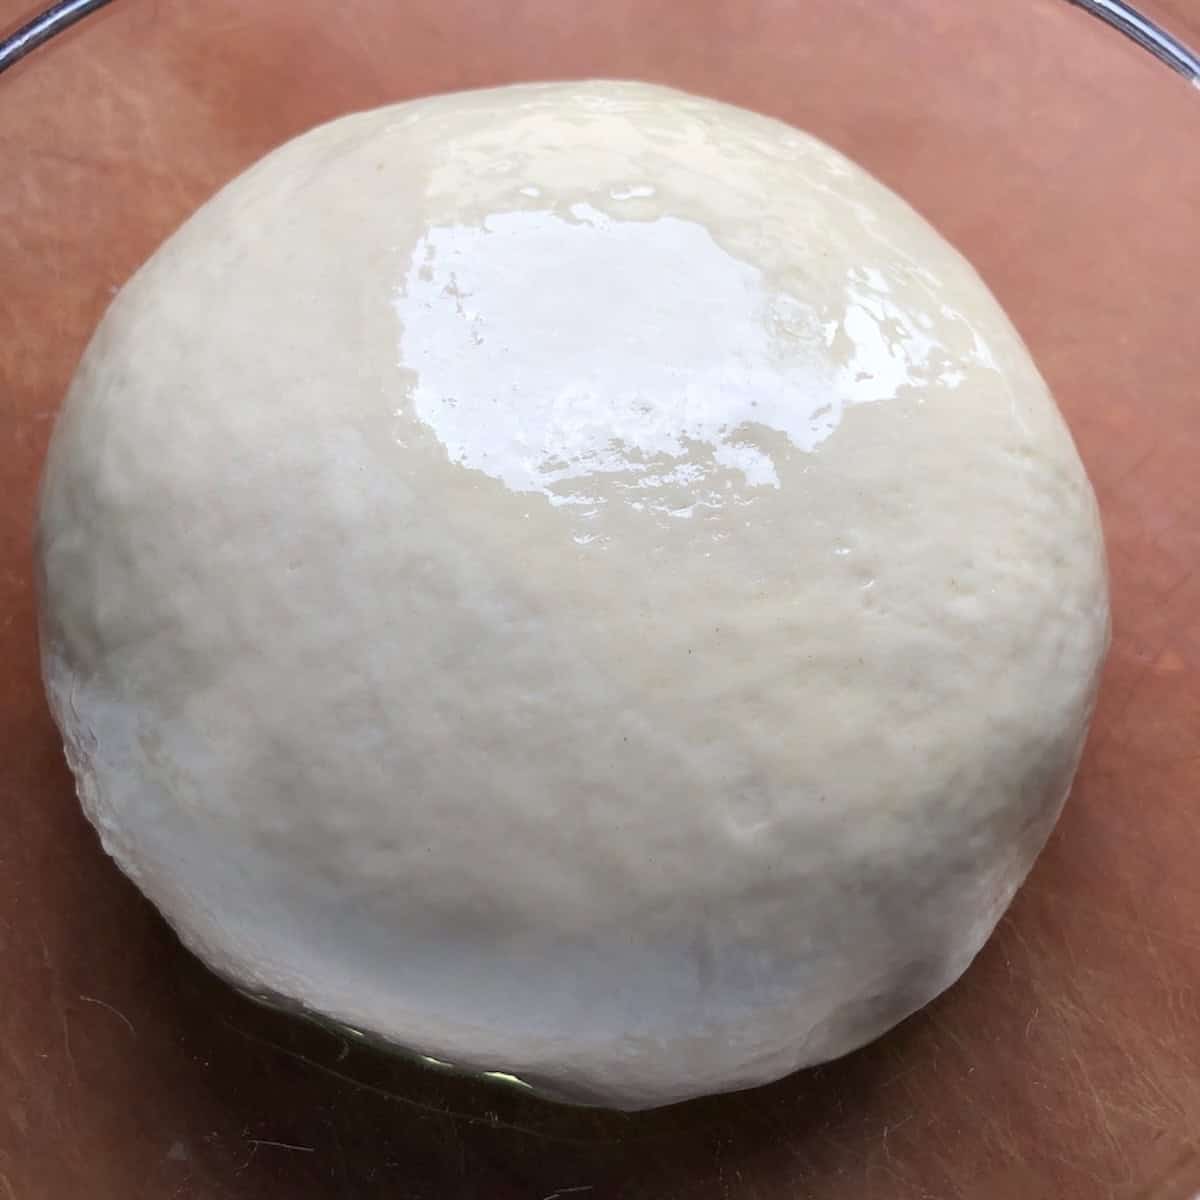
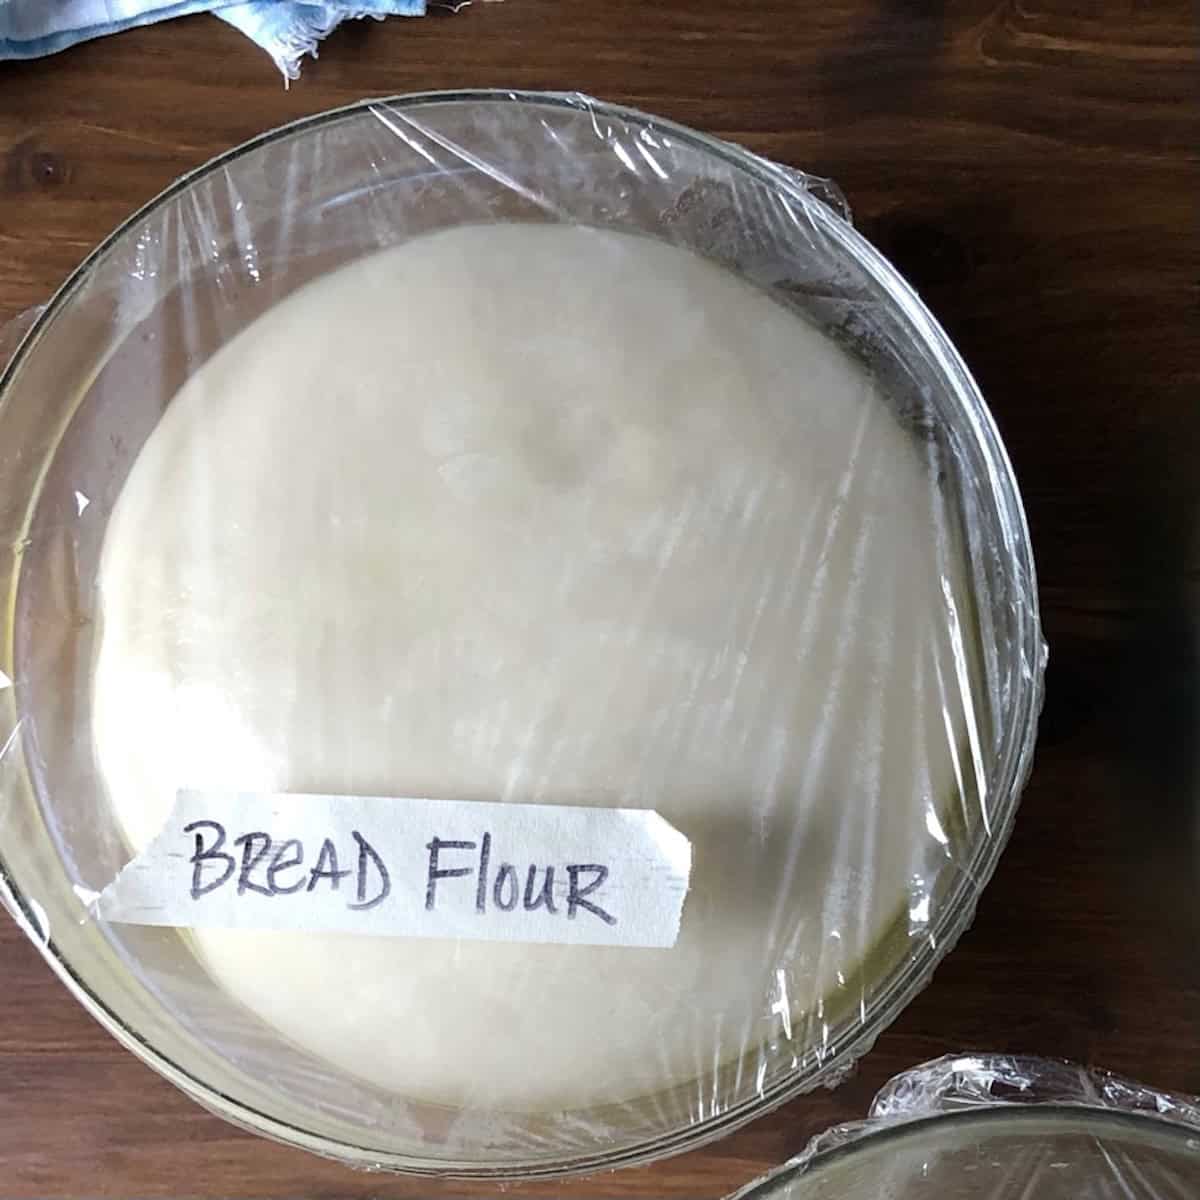
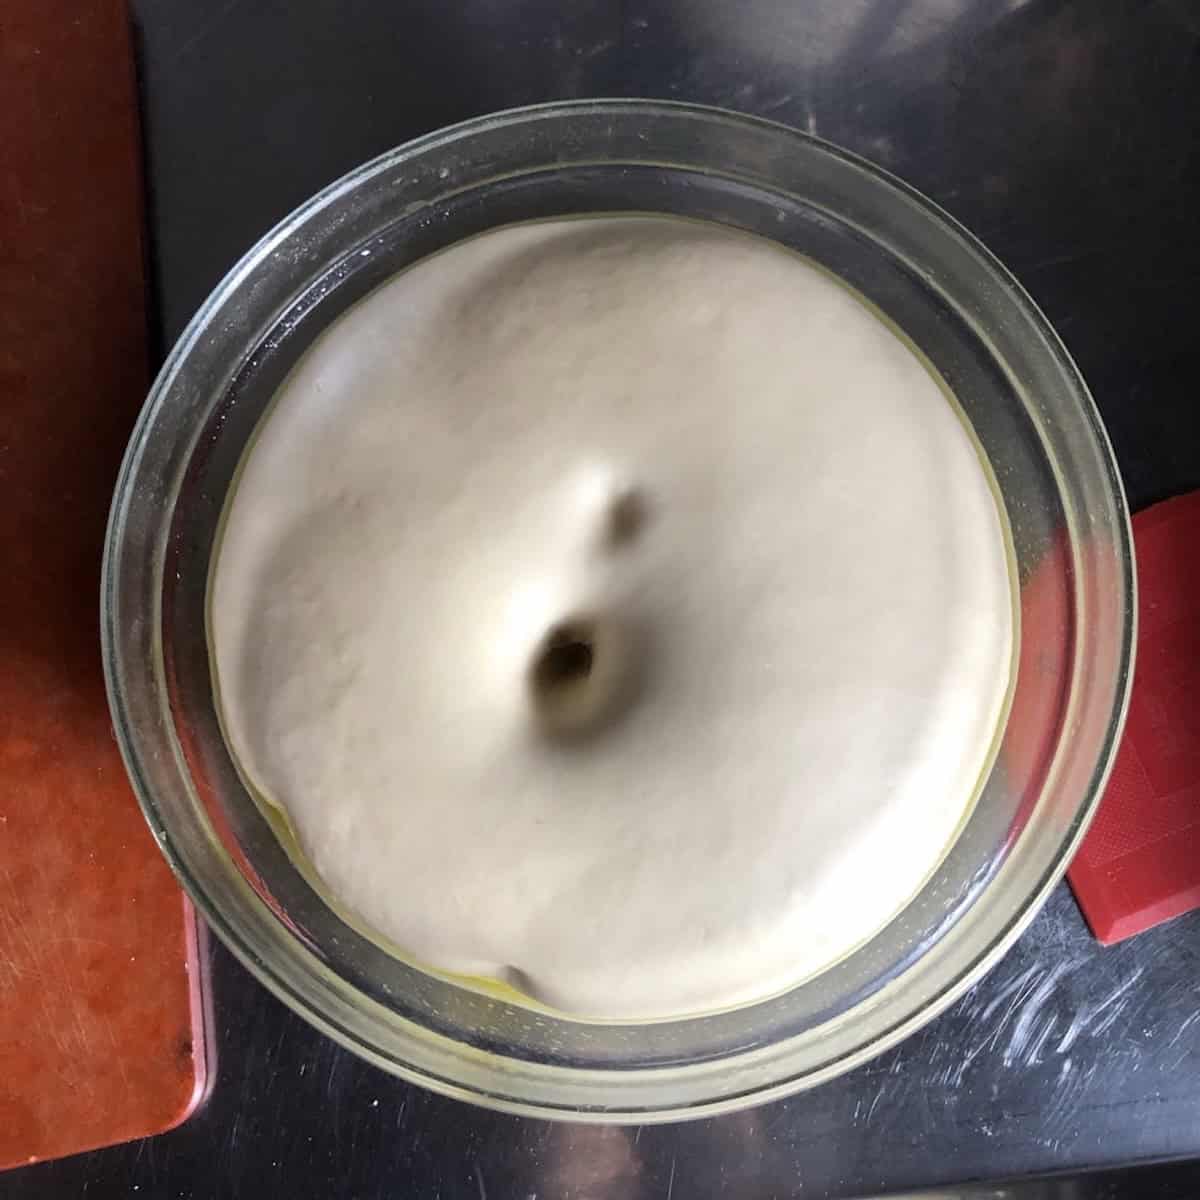
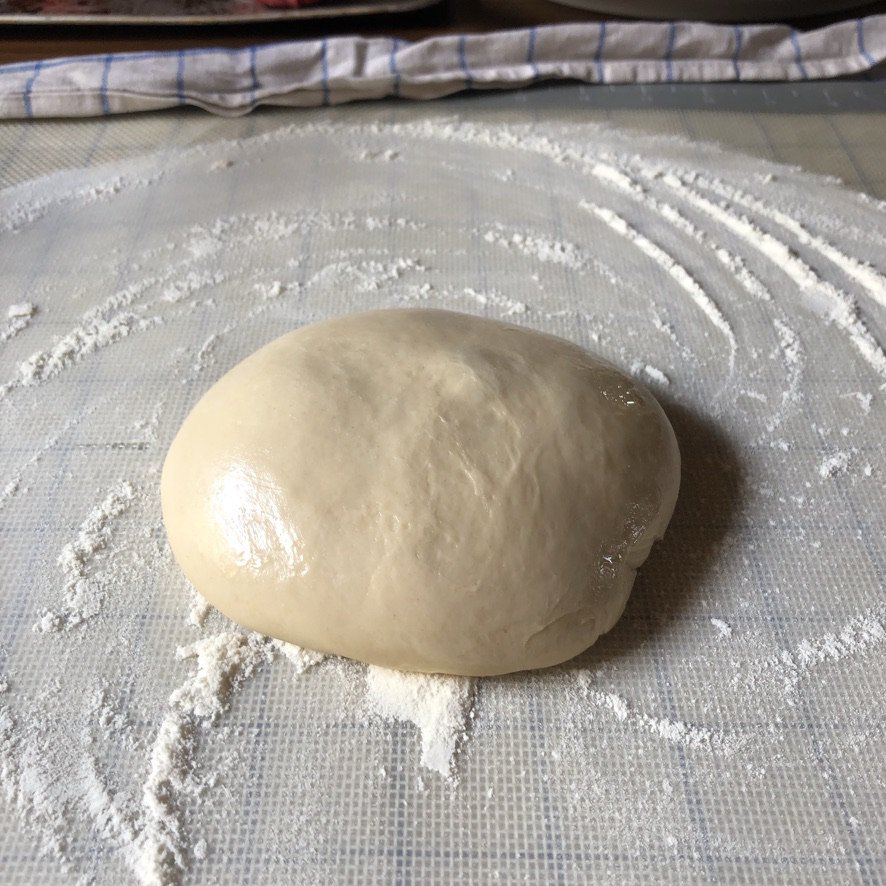
Step 3. First Rise (90 Minutes)
Place the dough in a lightly oiled bowl, cover tightly, and let it rise for about 90 minutes or until doubled in size.A warm spot like an oven with just the light on helps speed things up.
Step 4. Deflate and Form the Dough Balls
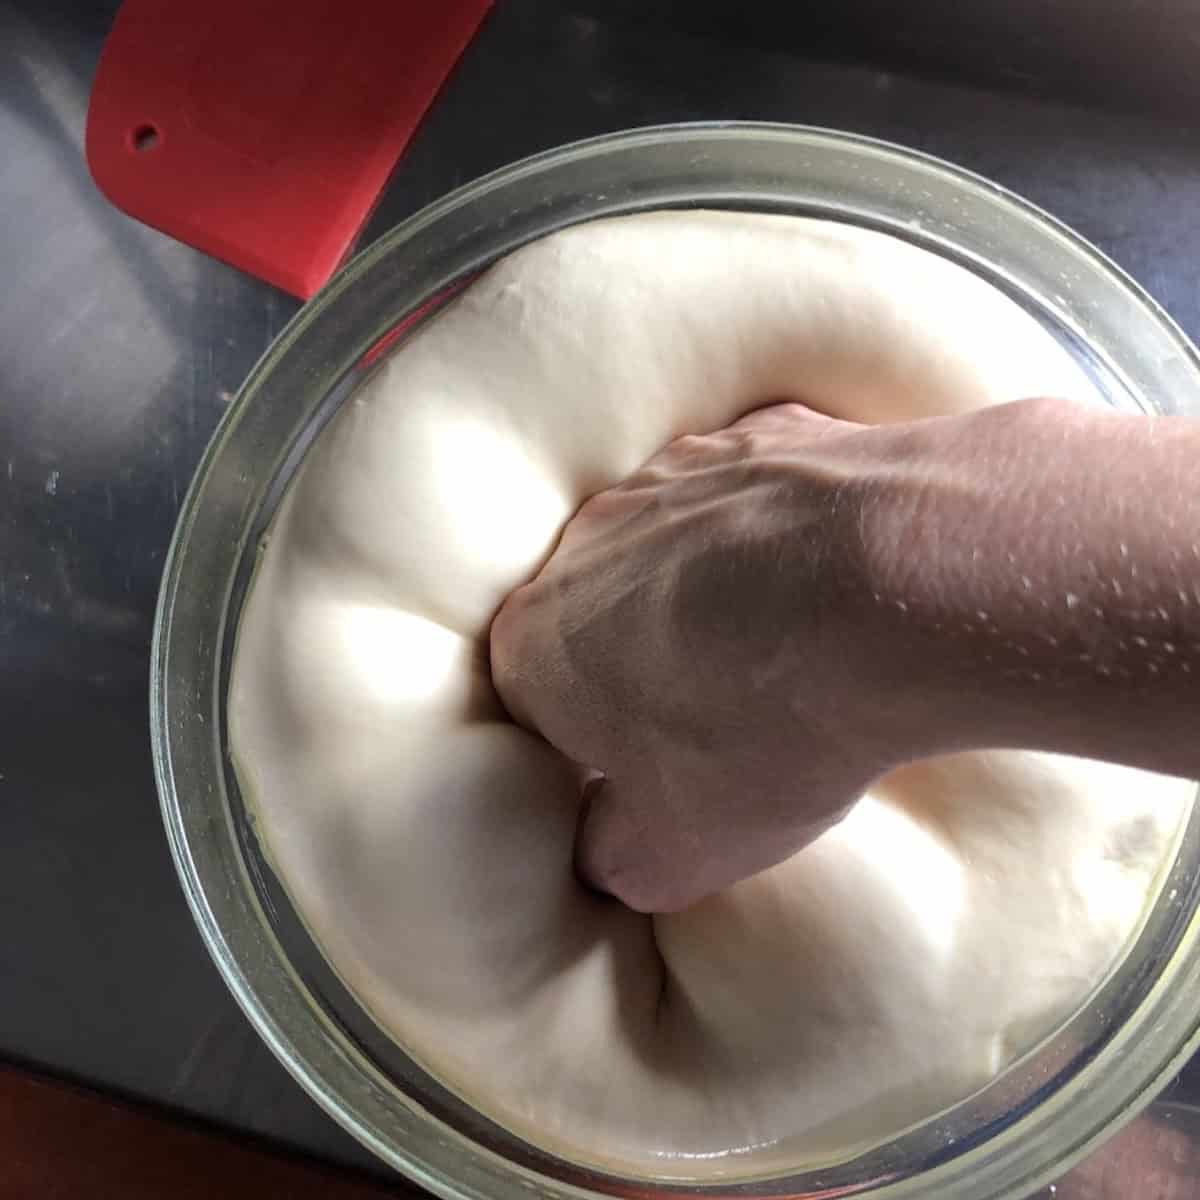
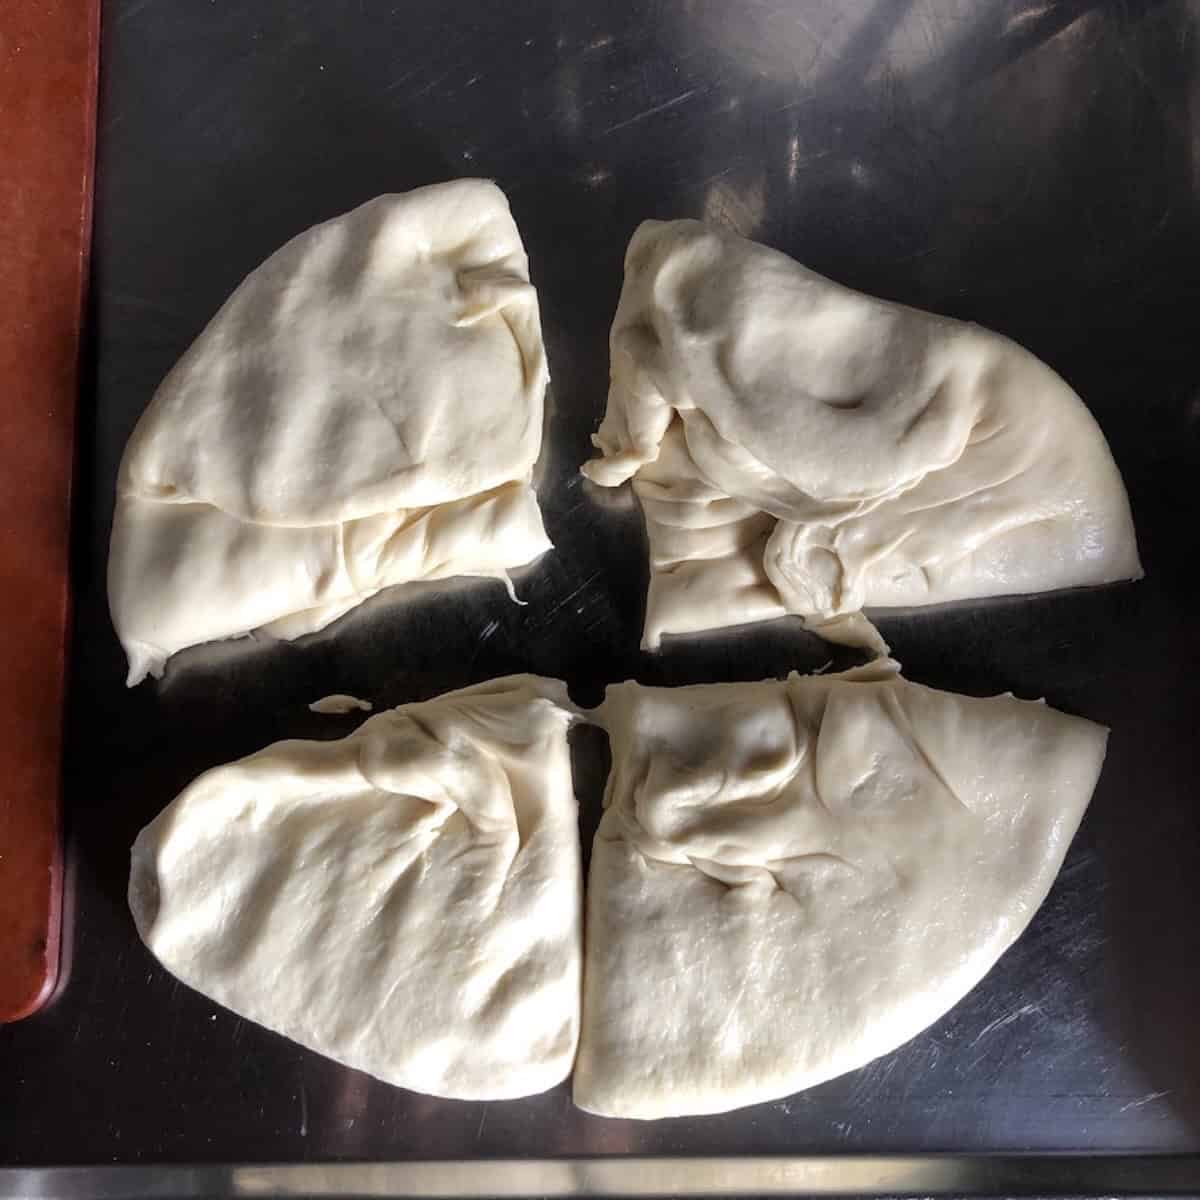
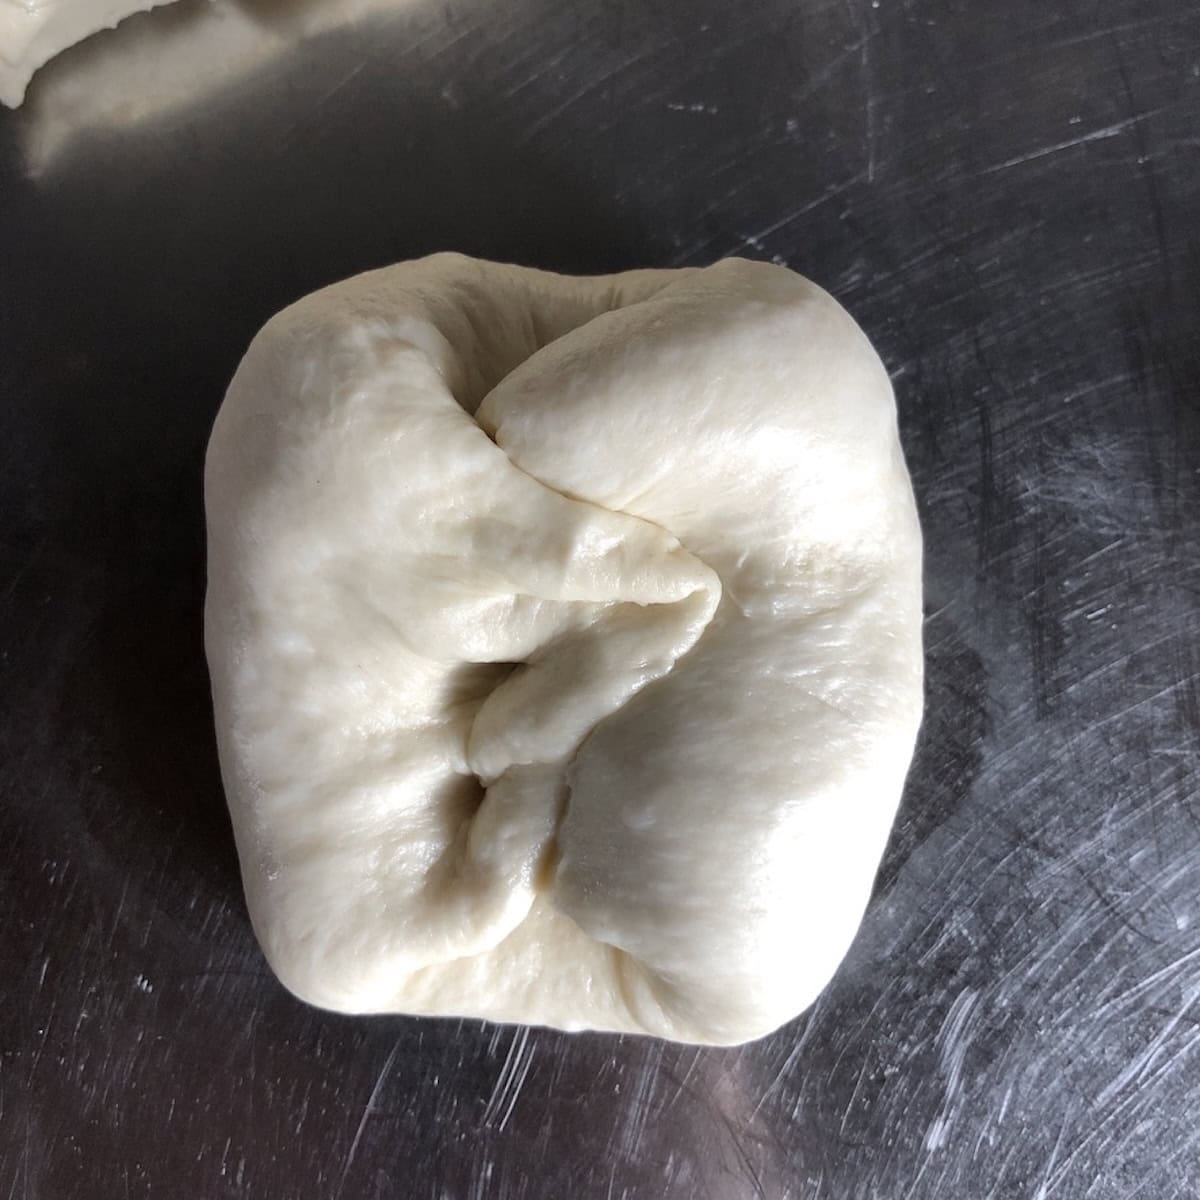
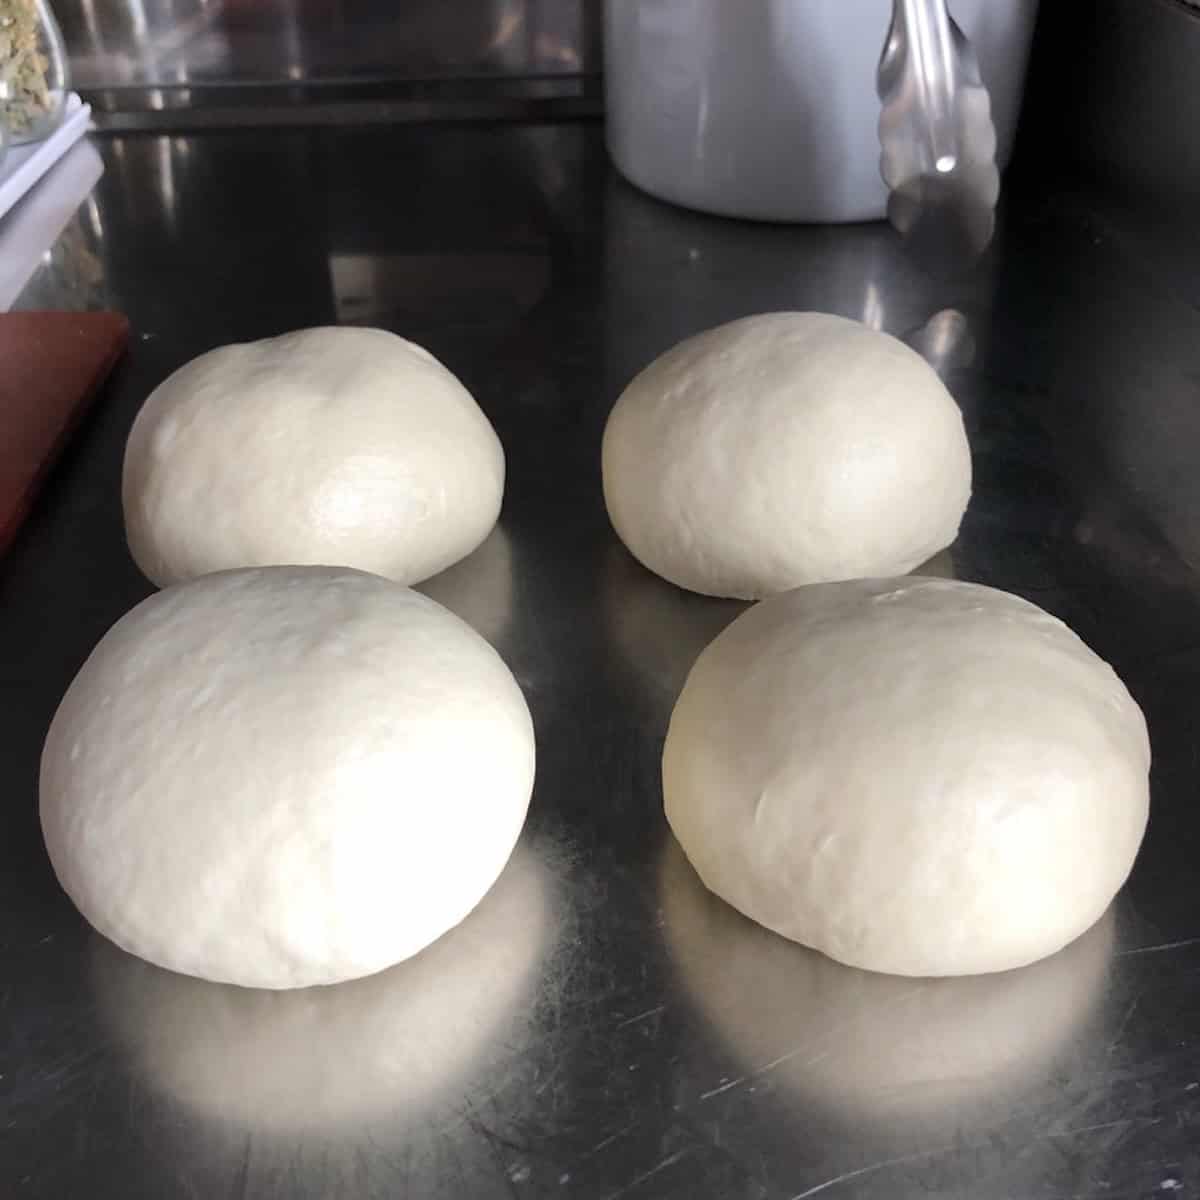
Punch down the dough to release the air, then divide it into 4 equal pieces. Roll each piece into a smooth ball and place on a lightly oiled pan.
For making same-day pizza, brush the balls lightly with oil and cover with sustainable cling film, or a clean, lint-free kitchen towel.
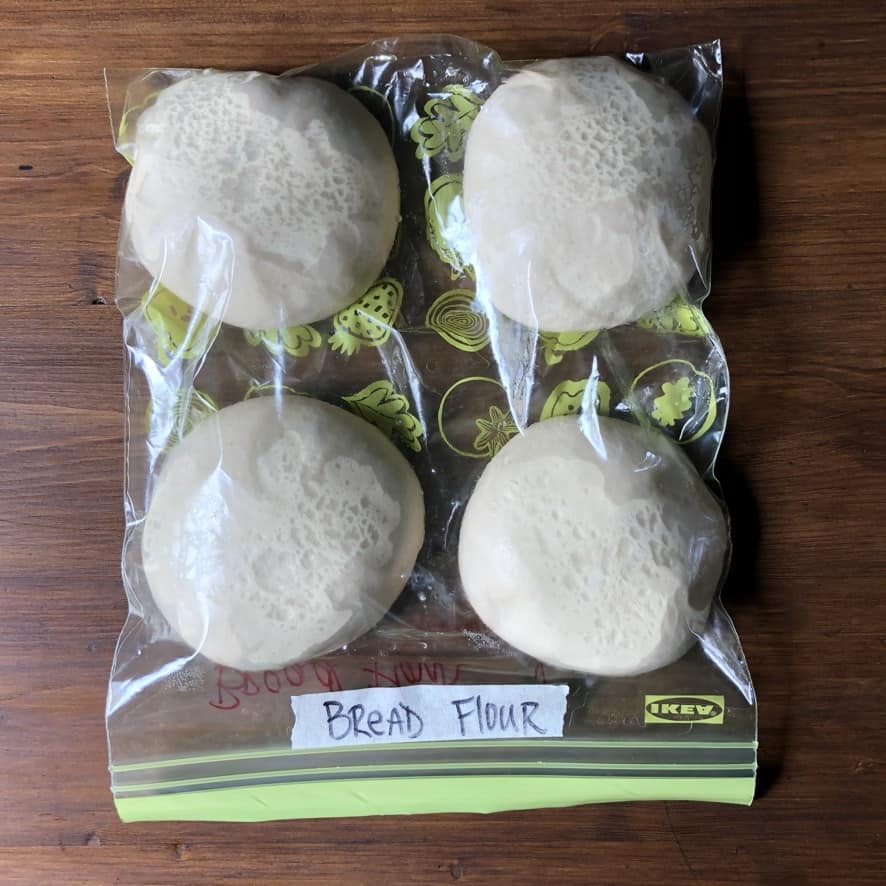
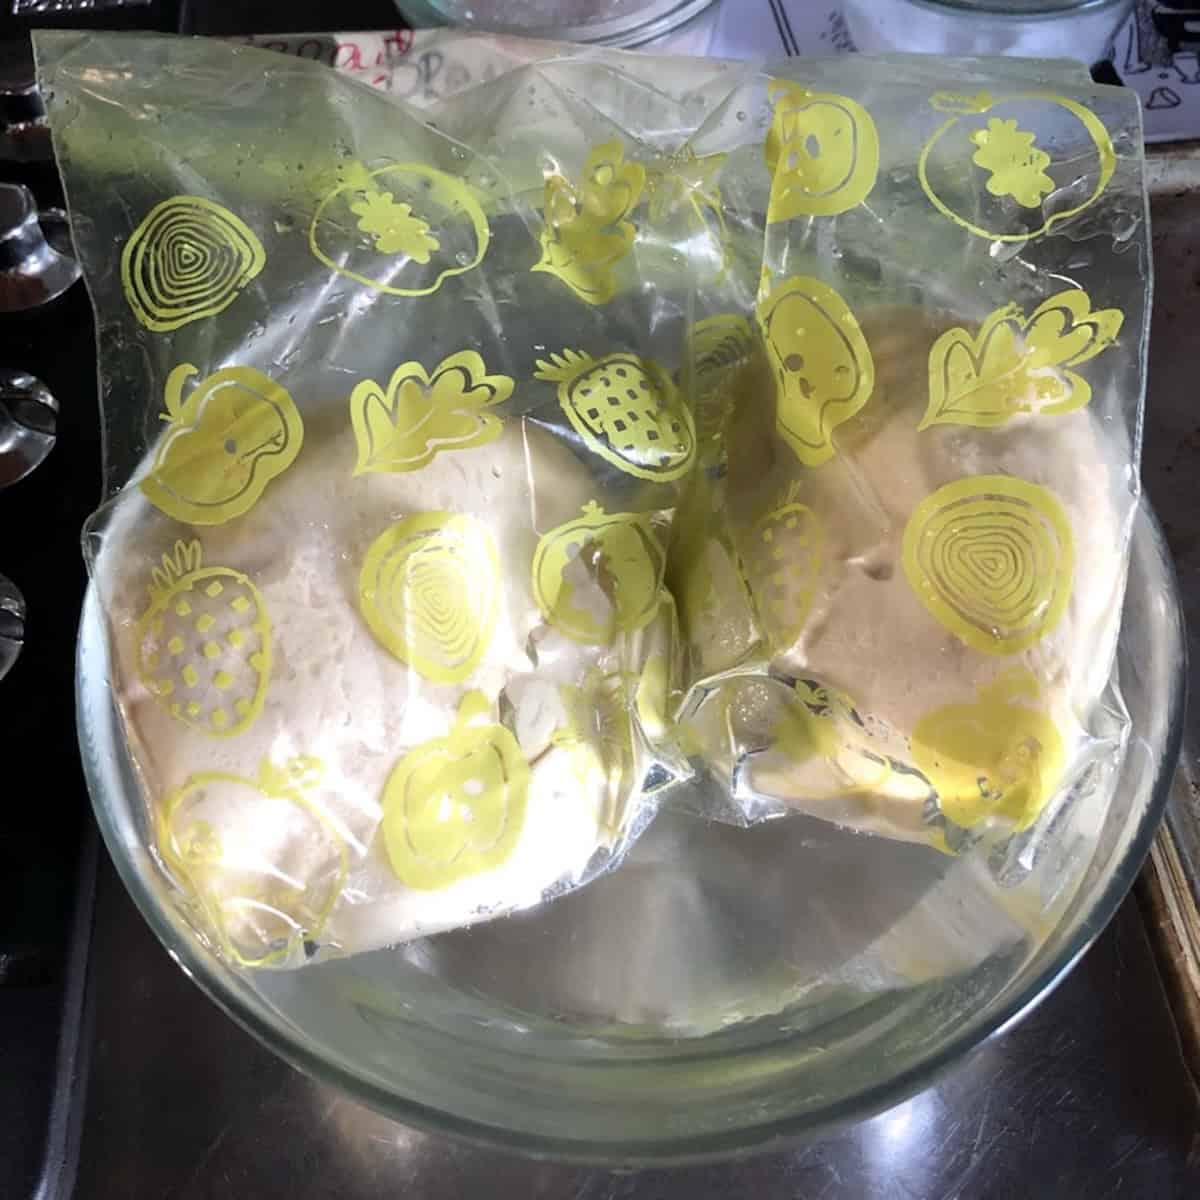
If cold fermenting in the fridge overnight, place dough balls in a lightly oiled freezer bag with the air removed and refrigerate for 1-3 days.
Step 5. Second Rise (30 Minutes)
Let the covered dough balls rise for about 30 minutes in a warm spot until noticeably puffy, more airy, and doubled in size again.
Step 6. Shape the Pizza Dough
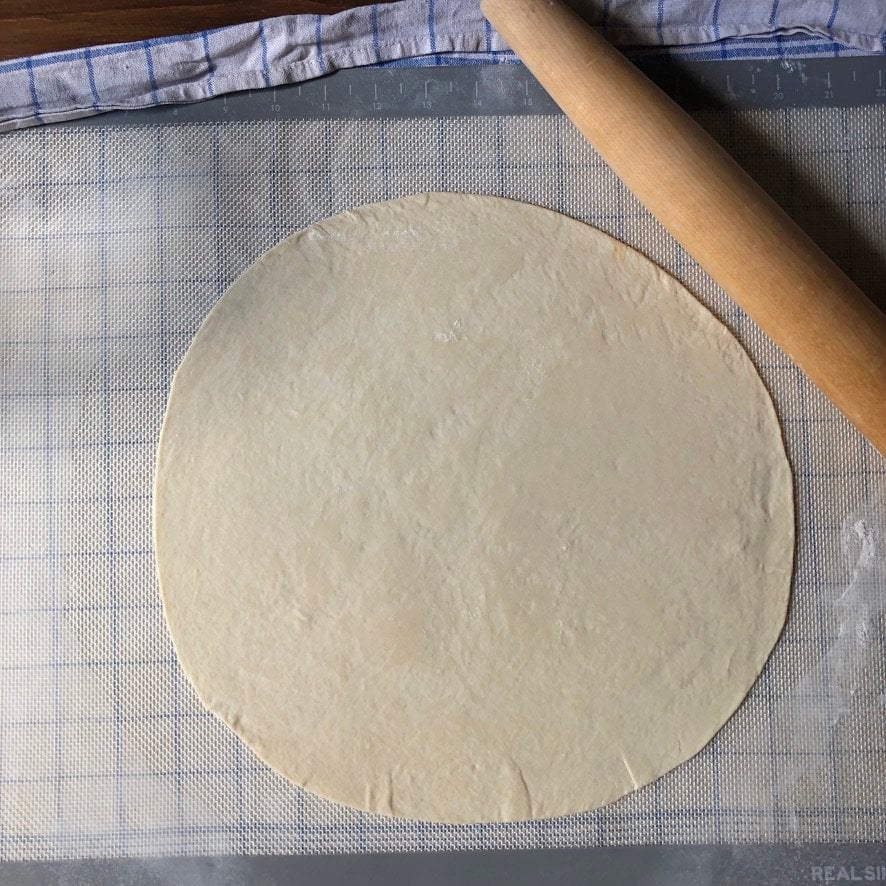
This is where you decide: thin-crust or thick-crust. Both use the exact same dough. The difference is just how you shape it.
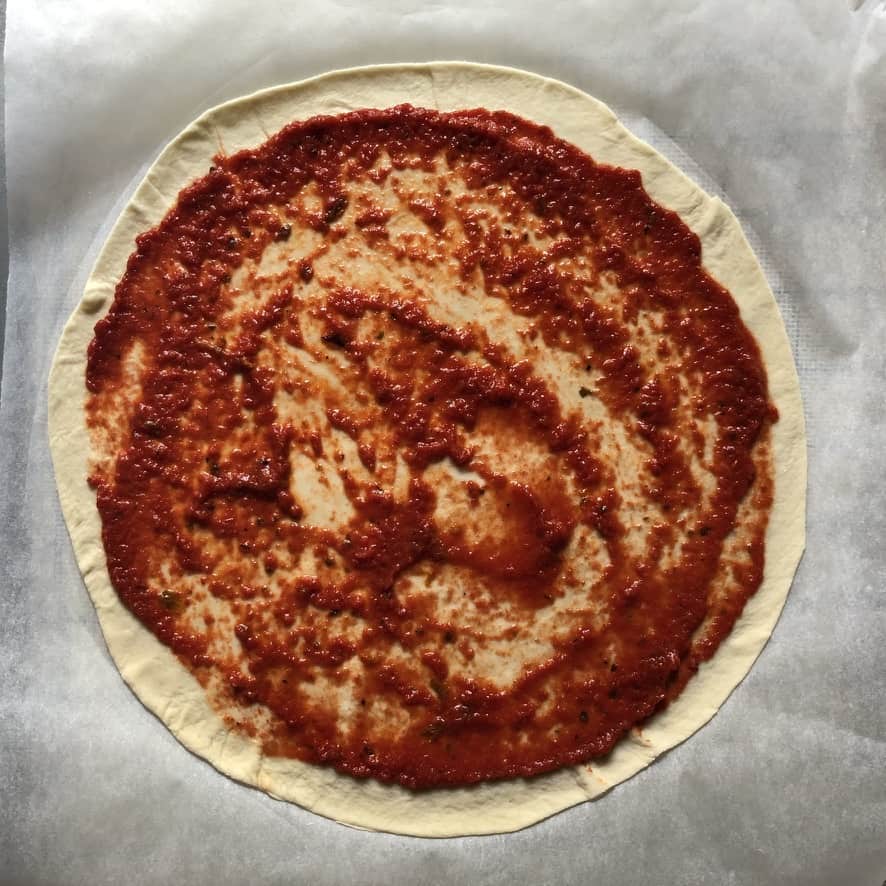
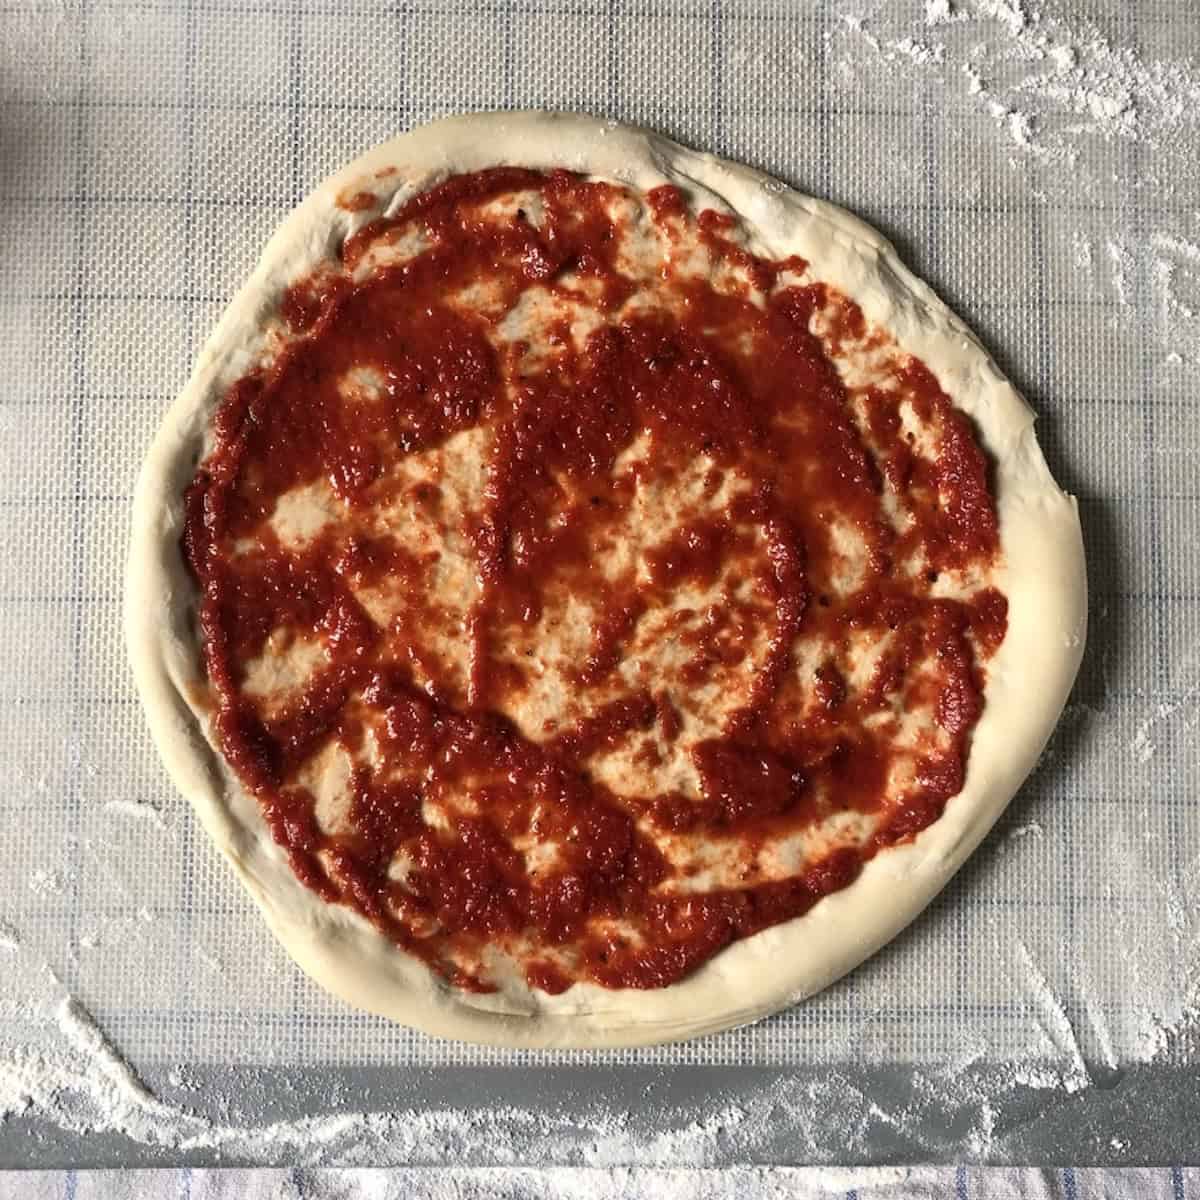
For thin-crust pizza↑: Flatten the dough with your hand. Use a rolling pin to roll the dough out on a lightly floured surface or non-stick mat to about ⅛ inch thick. Place it onto a semolina-dusted pizza peel.
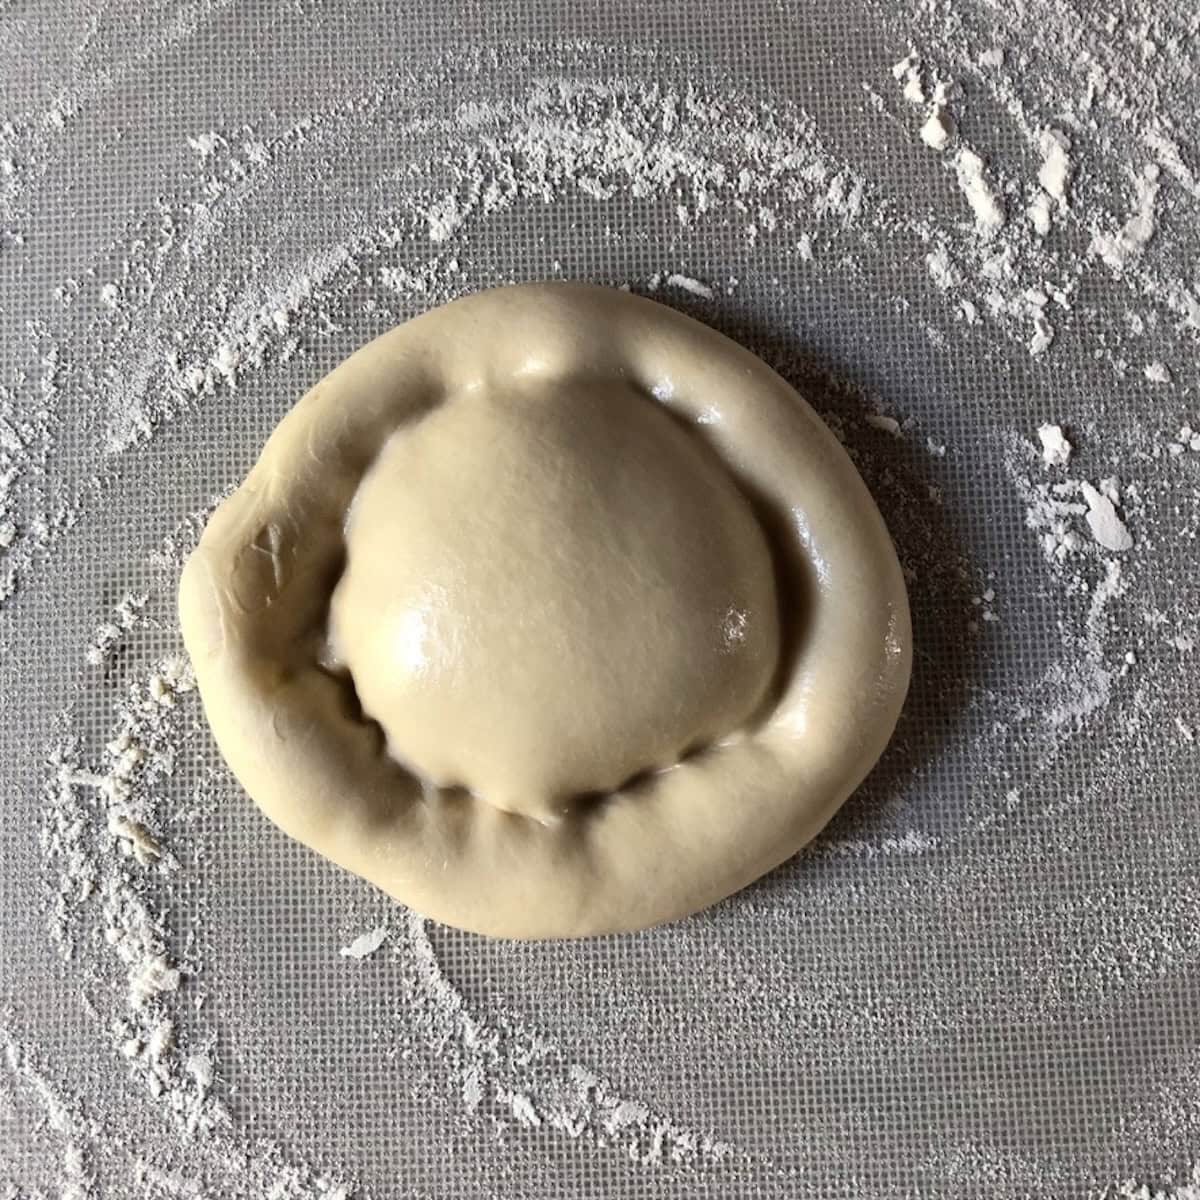
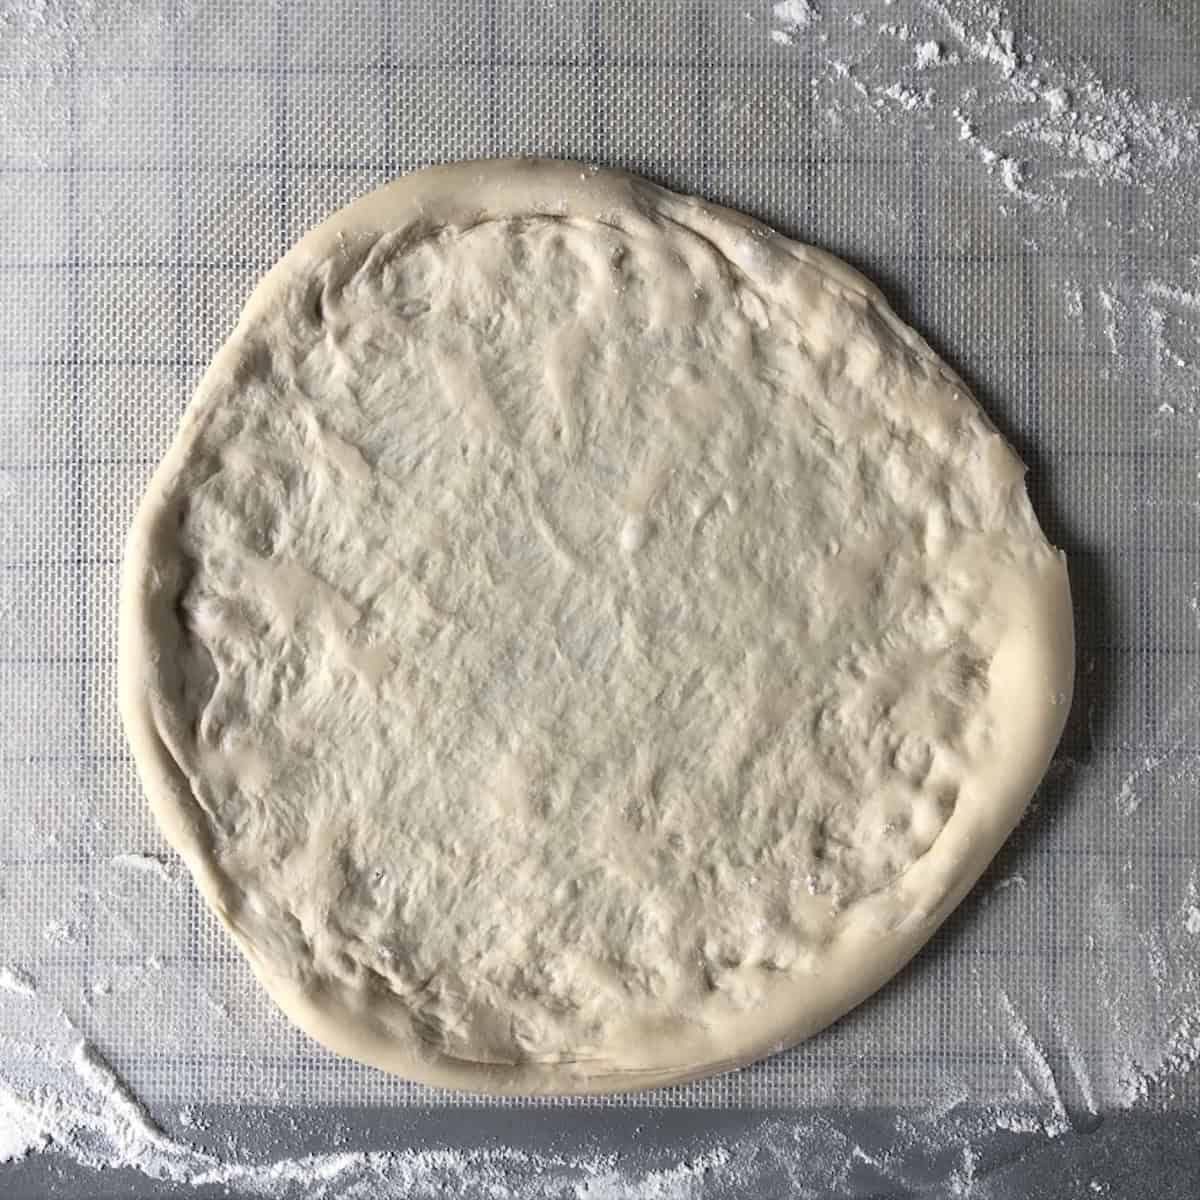
For thick-crust pizza↑: Form a cornice (the raised outer rim we call the crust) by pressing your fingers into the dough around the perimeter to create a 1-inch rim or crust. Flip the dough over, press down only in the center to flatten it, and gently hand-stretch it to about ¼ inch thick, pressing from the center outward.
Don't deflate the edges, which will be your puffy crust rim ("cornice" pronounced kor-NEE-cheh in Italian). Don't use a rolling pin for thick-crust since you want to keep those air bubbles intact.
Bread flour snap-back tip: If the dough keeps springing back when you try to stretch or roll it, cover it with a towel and let it rest for 5-10 minutes. The gluten needs time to relax before it will hold its shape. This is completely normal with bread flour.
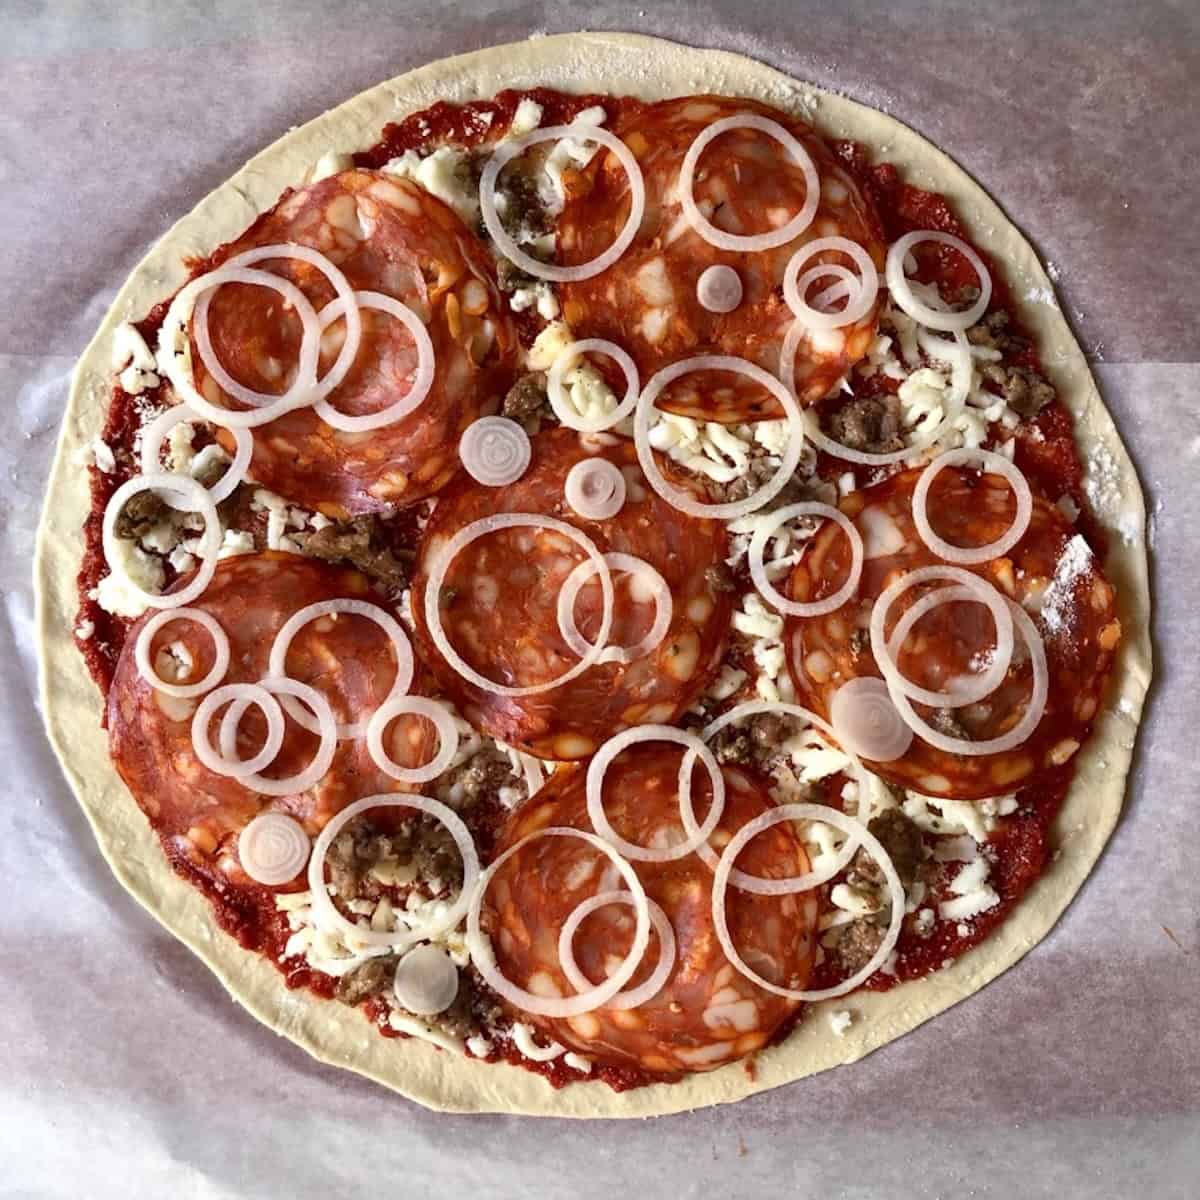
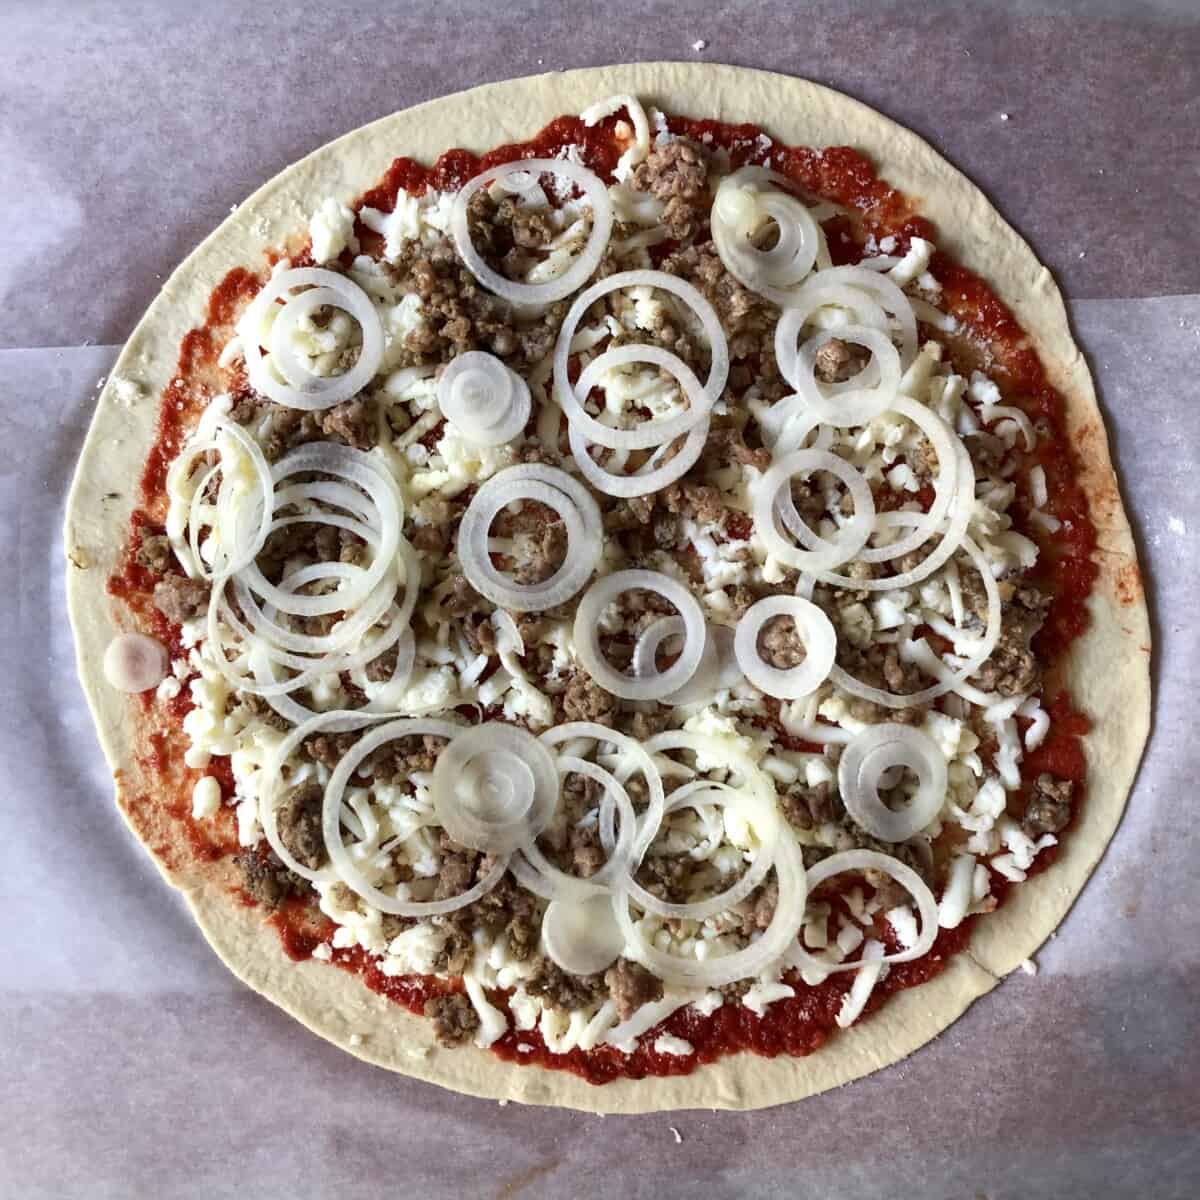
Step 7. Top and Bake the Pizza
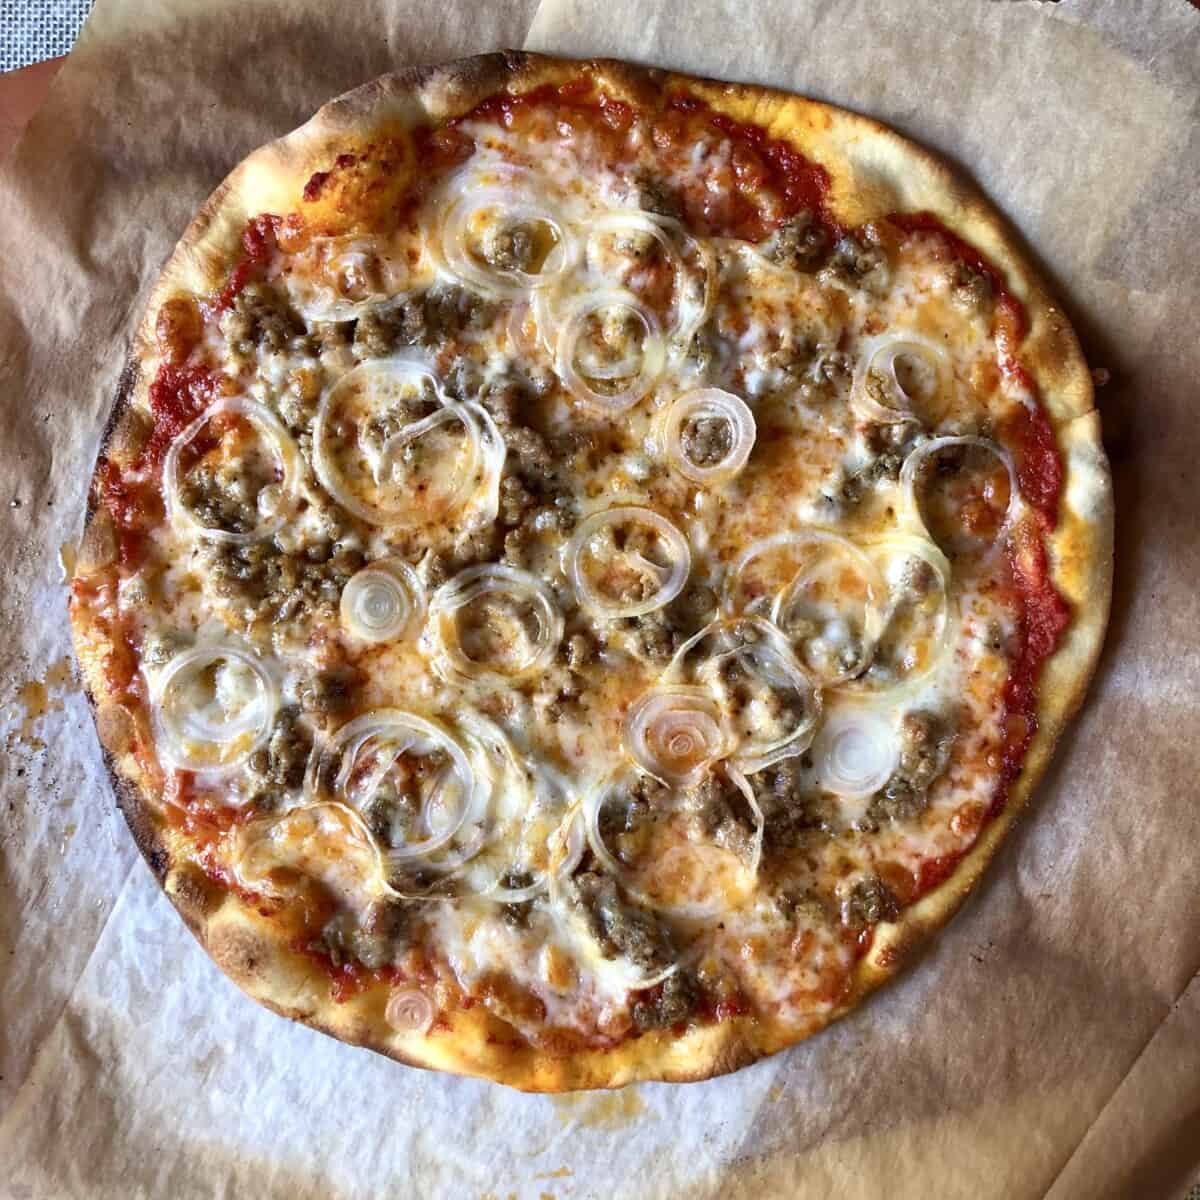
Thin-crust↑: about 8 minutes.
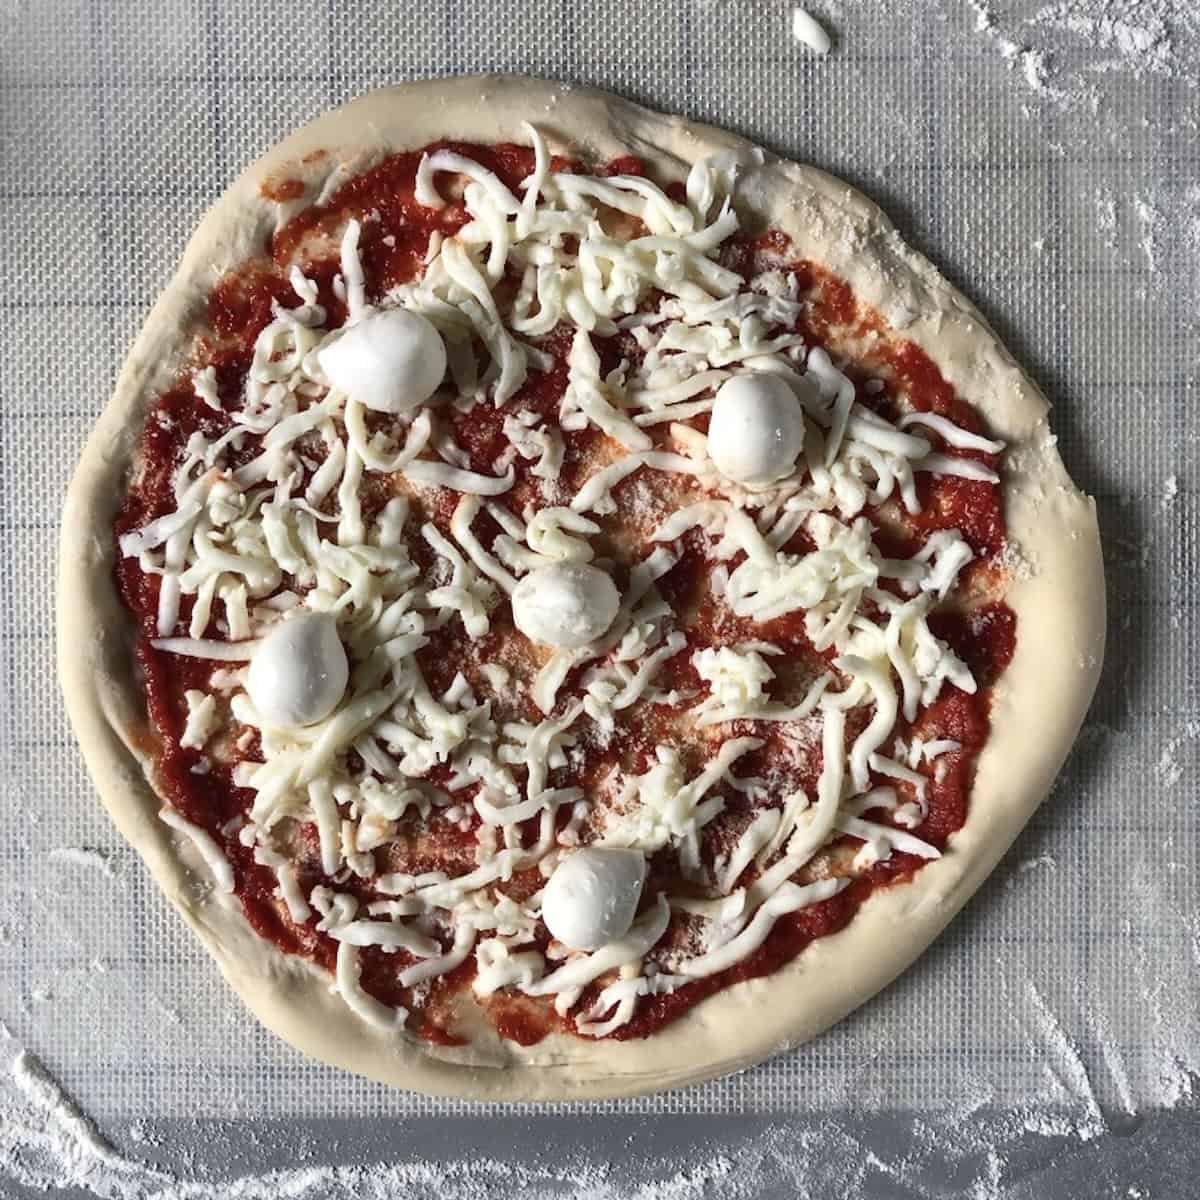
Thick-crust: about 10-12 minutes. Watch for golden-brown edges and bubbling cheese.
Top with your favorite sauce, cheeses, and toppings. Drizzle with extra virgin olive oil before baking for better browning and flavor. Bake in a preheated oven at the highest temperature it will go (ideally 475-500°F /246-260°C) on a preheated pizza stone, pizza steel, cast iron pan, or baking sheet.
What Temperature Should I Bake Pizza?
The pizzas in this post were baked at 482°F/250°C in my regular home oven, and as you can see from the photos and video, they come out super crispy and delicious. Here's what to expect at different temperatures:
- Regular home oven (475-550°F+ / 246-287°C+): 6-10 minutes with the pizza stone or baking pan preheated for at least 45 minutes (preferably 1 hour). Most home ovens top out around 500-550°F, and that's plenty for excellent results.
- Ooni Volt 12 or outdoor pizza oven (662°F / 350°C): 5-6 minutes, turning the pizza as needed for even cooking. The higher heat produces an incredibly light and crispy pizza as you can see from the photo above.
- Toaster oven: Works great at max temperature. I've made this pizza many times in a toaster oven while living in Chengdu when my 2-burner Chinese wok kitchen didn't have an oven. And I can guarantee it still tastes amazing!
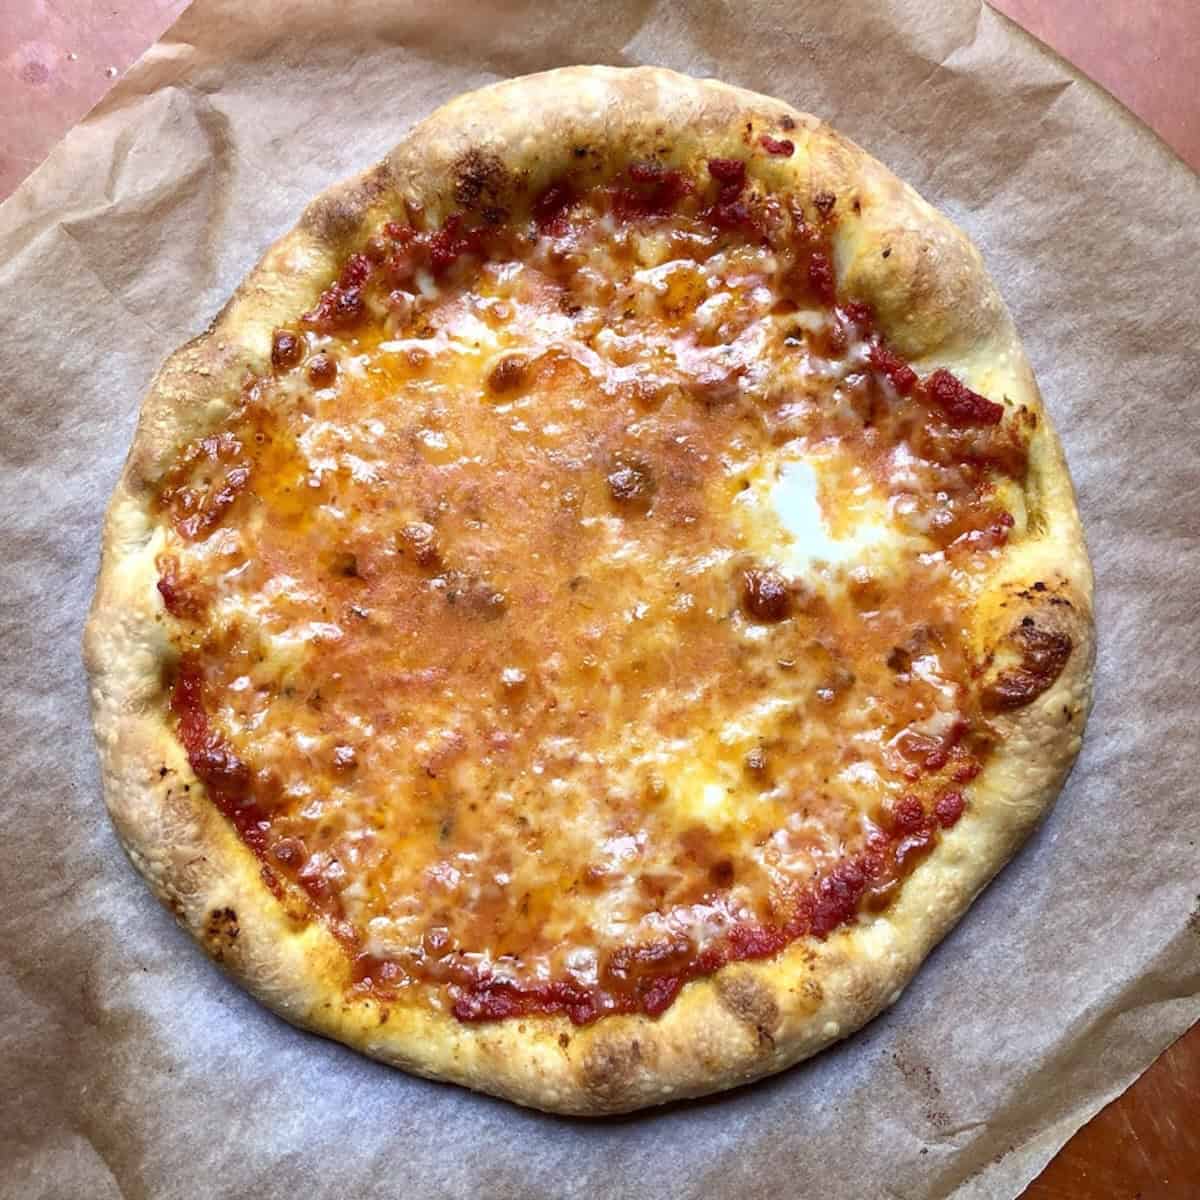
Pizza is done when the crust is golden, and the cheese is bubbly, so be sure to check it often to make sure it doesn't burn, like in this photo↓.

The most important step for a crispy crust in a home oven: Preheat your pizza stone, pizza steel, or baking pan in the oven at the highest temperature for at least 45 minutes before baking. Place it on the hottest rack (for me, that's the oven floor). If you skip preheating, the pizza will still taste good but will be much softer and won't have the same crispy bottom or overall texture.
What Is "Dough Point" and Why It Matters
The dough point is the stage when your dough reaches its maximum potential of structure and form, meaning the ideal balance of elasticity, softness, and hydration.
Recognizing it helps you know exactly when to stop kneading. Learn how to find the dough point and why it matters for any yeasted dough in my 00 flour pizza dough post.
Can I Substitute All-Purpose Flour for Bread Flour?
Yes, you can substitute all-purpose flour for the bread flour in this recipe, though the crust won't have quite the same chew or crispiness.
If you go this route, I recommend King Arthur Unbleached All-Purpose (11.7% protein) or Hecker's All-Purpose (11.4-11.7% protein). Both have higher protein than most grocery store brands and are much higher-quality flours than Gold Medal, Great Value, Pillsbury etc., so you'll get closer to bread flour results.
You may need slightly less water since all-purpose flour absorbs less than bread flour. Add it gradually and adjust as needed.
If you have 00 flour in your pantry instead, try my Italian 00 flour pizza dough recipe.

Equipment
- Pizza stone or pizza steel (preheat for at least 45 minutes, preferably 1 hour). This is the single biggest upgrade you can make for crispier homemade pizza.
- Cast iron skillet or heavy baking sheet as a substitute if you don't have a pizza stone. Preheat it the same way.
- Rolling pin for thin-crust pizza. Not needed for thick-crust (hand-stretch instead).
- Stand mixer with dough hook (optional) for hands-off kneading. I use a KitchenAid, but any stand mixer with a dough hook works. Speed 2 for about 8 minutes.
- Natural Parchment paper for easy transfer to the hot stone or pan when you don't have a pizza peel. Build your pizza on parchment placed on a cutting board or rimless baking sheet, then slide the parchment (with the pizza on it) directly onto the preheated stone or steel. No pizza peel needed. Remove the parchment halfway through baking for a crispier bottom.
How to Store Bread Flour Pizza Dough
This dough stores beautifully in the fridge for 1-3 days. In fact, I prefer making it ahead because cold fermentation develops deeper, more complex flavor.
The best stage to refrigerate is after the first rise or after forming the dough balls. Place them in a lightly oiled freezer bag with the air squeezed out, and refrigerate.
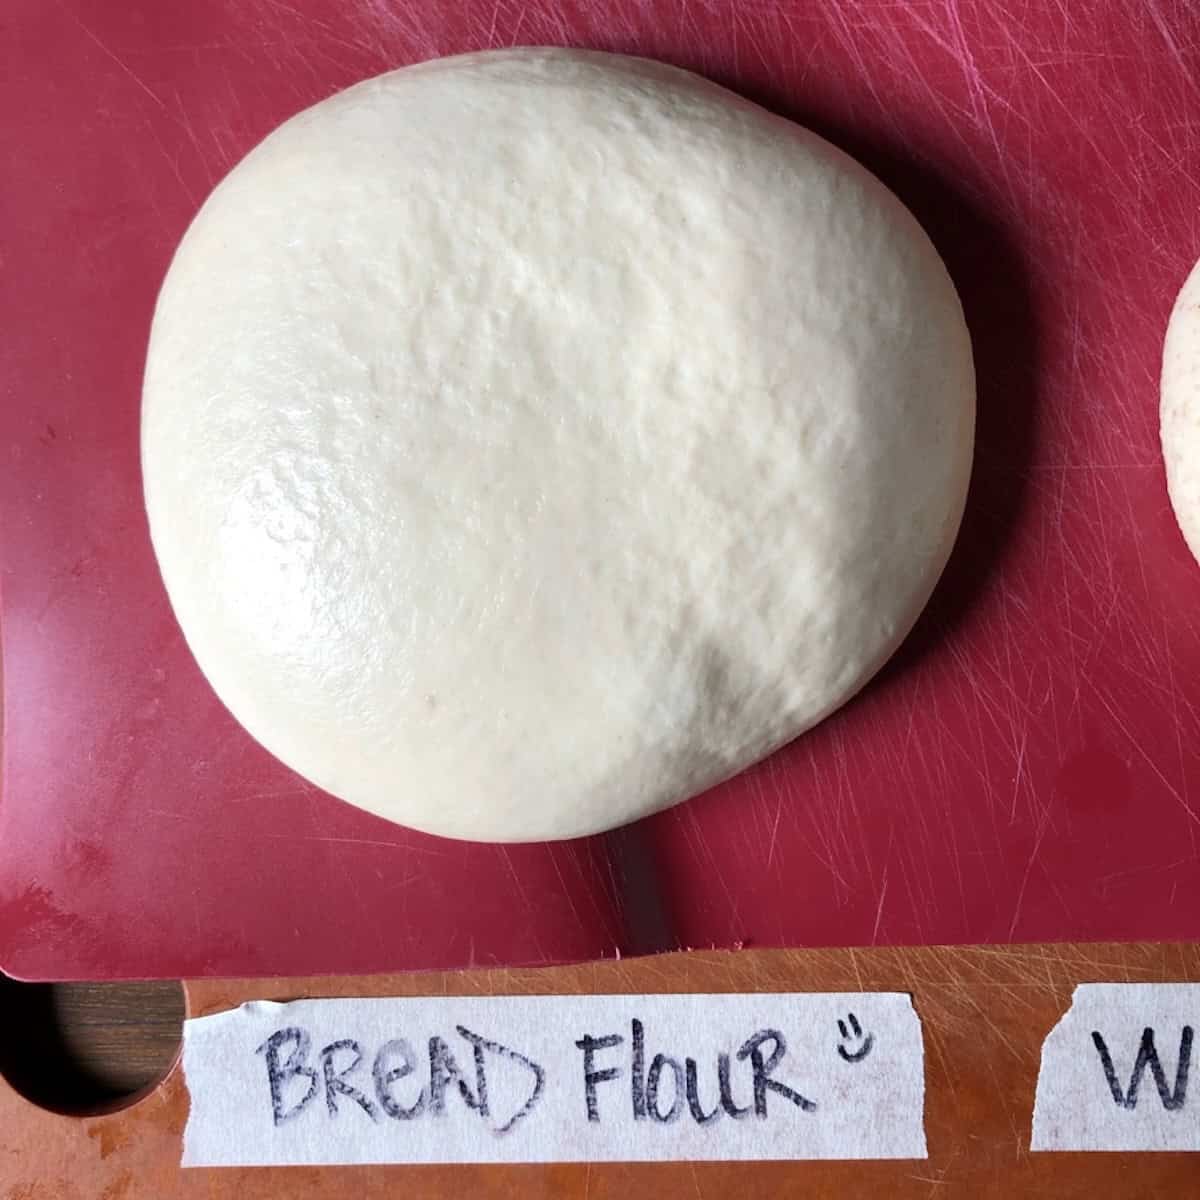
When you're ready to bake, remove the dough from the fridge and let it come to room temperature for 30-60 minutes before shaping. If the dough pulls back on itself, cover it and let it rest a little longer so the gluten can relax.

How to Freeze Bread Flour Pizza Dough
You should definitely freeze this dough! I always double the recipe so I always have some in the freezer. There are no negative effects from freezing pizza dough, only net positives because it saves you time and provides meal flexibility.
Lightly oil the inside of a large freezer bag. Place the dough balls at equal distances apart, squeeze out all the air, seal, and freeze for up to 3 months.
The featured image for this post was made using a previously frozen dough ball, and it's always perfect😉!
Top Tips for Perfect Bread Flour Pizza Dough
- Check your water temperature. Warm water between 110-115°F (43-46°C) activates the yeast. Too hot (above 130°F/54°C) kills it.
- Don't fight the snap-back. If bread flour dough springs back while rolling or stretching, cover it and let it rest 10-15 minutes more. The gluten just needs time to relax.
- Don't skip the second rise. Those 30 minutes (or longer in cooler kitchens) needed for the second rise make a real difference in texture and flavor. The dough will be easier to shape too.
- Preheat your baking surface for at least 30 minutes but even better up to 45 minutes to 1 hour. A screaming hot pizza stone, steel, cast iron, or baking tray is the difference between a crispy crust and a soft one.
- Cold ferment 1-3 days for the best flavor. Same-day dough is great, but not as good as slow cold fermented dough. Dough that's been in the fridge for 24-72 hours is noticeably better tasting and has better texture. The slow fermentation develops complexity you can't get any other way.
- Drizzle olive oil on the assembled pizza before baking. This helps browning in a home oven, which doesn't get as hot as a commercial pizza oven.
FAQ
Yes, bread flour is one of the best flours for homemade pizza dough especially for thin crust pizza. Its high protein content (12-14%) creates a strong gluten network that produces a crispy, chewy crust with excellent structure. It's also available at every grocery store, making it the most accessible option for great pizza at home.
Bread flour produces a noticeably superior, chewier, crispier crust than all-purpose flour because it has 2-4% more protein. All-purpose will work in a pinch, but the texture won't be the same. If you use all-purpose, choose a high-quality, higher-protein brand like Hecker's King Arthur (11.7%) for the best results.
Yes, but the two flours produce slightly different results. Bread flour gives a chewier, more structured crust while 00 flour produces a more tender, delicate one. Both make excellent pizza. This recipe is written specifically for bread flour's hydration needs. But you can find my 
Yes, and I recommend it! Refrigerating the dough for 1-3 days (cold fermentation) develops deeper flavor and better digestibility. Store the dough in a lightly oiled bag with the air squeezed out. Let it come to room temperature for 30-60 minutes before shaping.
Yes, I do it all the time! Freeze dough balls in a lightly oiled bag for up to 3+ months. There are no negative effects from freezing and you can have pizza night anytime even on a whim. The featured image of this post was made with previously frozen dough. Thaw in the fridge overnight or in a bowl of hot tap water for about 40 minutes (see thawing tips above).
This recipe has two rises: 90 minutes for the first rise and 30 minutes for the second rise after forming the dough balls in an ambient temperature of around 70°F/21°C. Both rises are important for developing flavor, texture, and digestibility. Don't skip the second rise. Rising times may vary slightly depending on the time of year (colder or warmer) and the temperature of your oven. In cooler months, you can turn on the light in your oven to create a slightly warmer environment for your dough to rise.
Knead by hand on a lightly floured surface for 10-12 minutes until the dough is smooth and elastic and no longer shaggy looking. Alternatively, use a stand mixer with a dough hook on speed 2 for about 8 minutes. The dough is ready when it springs back slowly when poked.
This is completely normal with bread flour. The higher protein creates stronger, more elastic gluten that resists stretching. Simply cover the dough and let it rest for 10-15 minutes more. The gluten will relax, making it much easier to roll or stretch.
Sticky dough usually means too much water or not enough kneading. Bread flour absorbs more water than all-purpose and 00 flour, so if you substituted flours without adjusting the water, the dough may be too wet. Knead a few more minutes before adding flour, as the dough often firms up on its own and becomes less sticky, and then not sticky at all after kneading it a little longer.
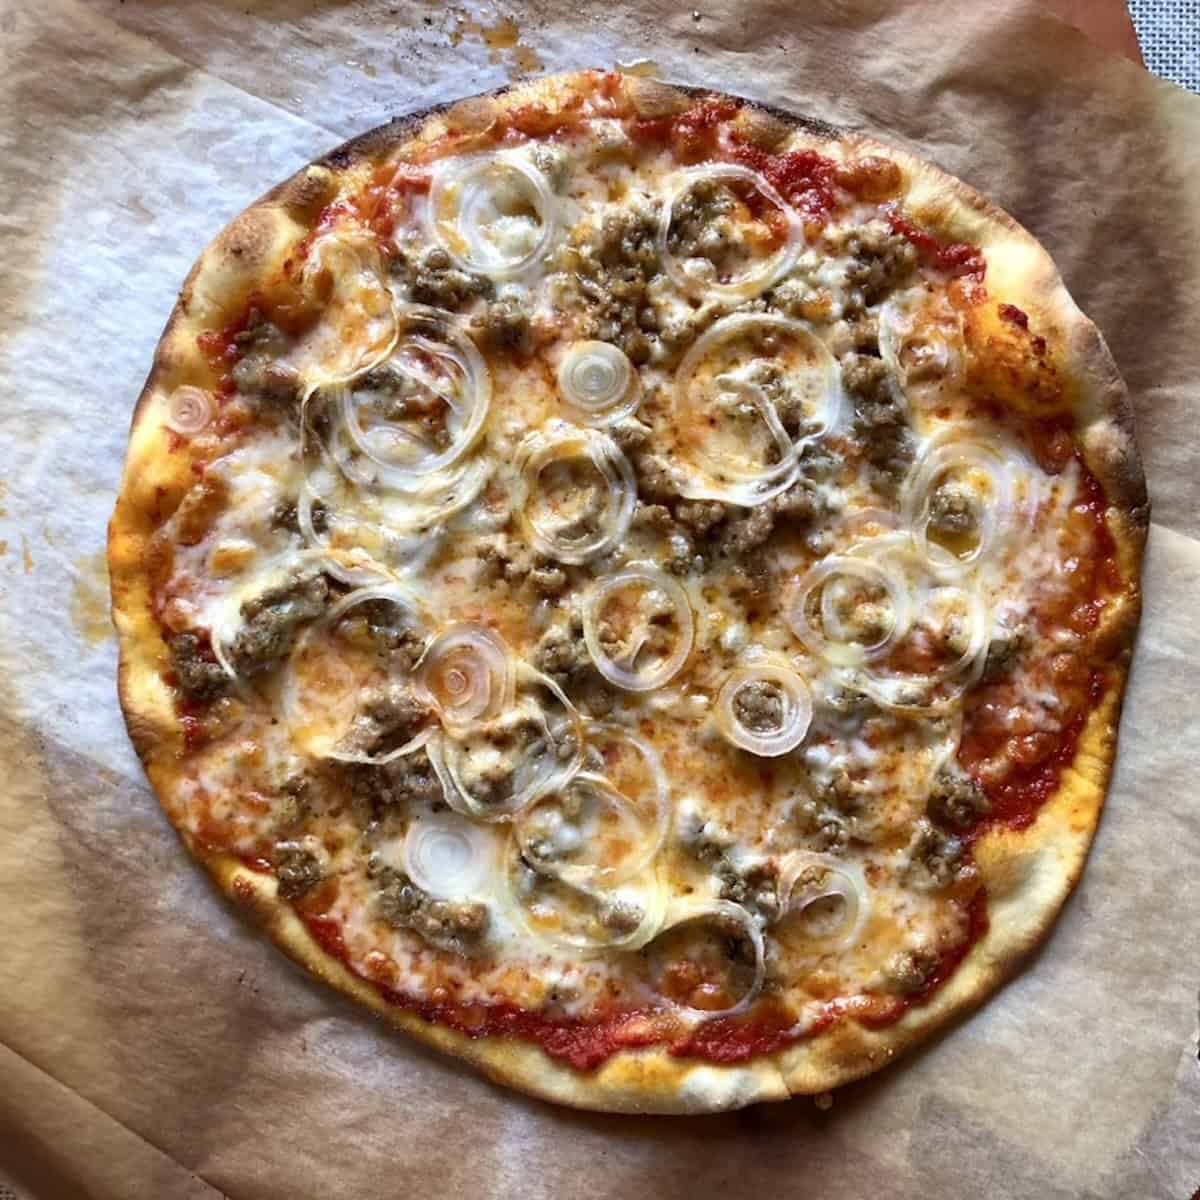
Yes. This same dough makes both thin-crust and thick-crust bread flour pizza. For thick-crust, hand-stretch the dough to about ¼ inch thick instead of rolling it thin. Leave the edges slightly thicker for a puffy rim. Bake for 10-12 minutes instead of 8. See the instructions and photos above for making thick crust bread flour pizza!
Looking for More Easy Pizza Recipes?
Here are a few of my favorite pizza recipes you might also want to try!
- Best Pizza Topping Ideas, 30+ Combinations (With REAL Photos)
- Best 00 Flour Pizza Dough Recipe (Thin-Crust, 5 Ingredients)
- Easy Homemade Pizza Sauce Recipe (With Video)
- Crispy Italian Fried Pizza (Easy Abruzzo Pizza Fritta)
- Best Whole Wheat Pizza Dough Recipe (For Thin Crust Pizza)
- Thick-Crust Pizza (Fluffy 00 Flour Pizza Dough Recipe)
- 20-Minute Valentine's Day Heart-Shaped Pizza
- Easy 20-Minute Thin & Crispy St. Louis-Style Whole Wheat Pizza


Let's Get Started!
Made this Recipe? We'd love for you to rate ⭐️ it and tell us how it went for you!
📖 Recipe

Best Bread Flour Pizza Dough Recipe (5 Ingredients)
- Total Time: 20 minutes
- Yield: 4 (14-inch) Thin-Crust Pizzas
- Diet: Vegan
Description
This easy bread flour pizza dough recipe takes just 25 minutes of hands-on work to mix and knead. Made with only 5 ingredients plus water, this versatile homemade pizza dough makes ultra-crispy thin-crust pizza or soft, chewy thick-crust pizza. Bread flour's higher protein (12-14%) creates a stronger gluten network for a crust that's crispy on the outside and tender on the inside. Make it same-day or cold ferment 1-3 days for deeper flavor and better digestibility. Works in any home oven, toaster oven, or pizza oven.
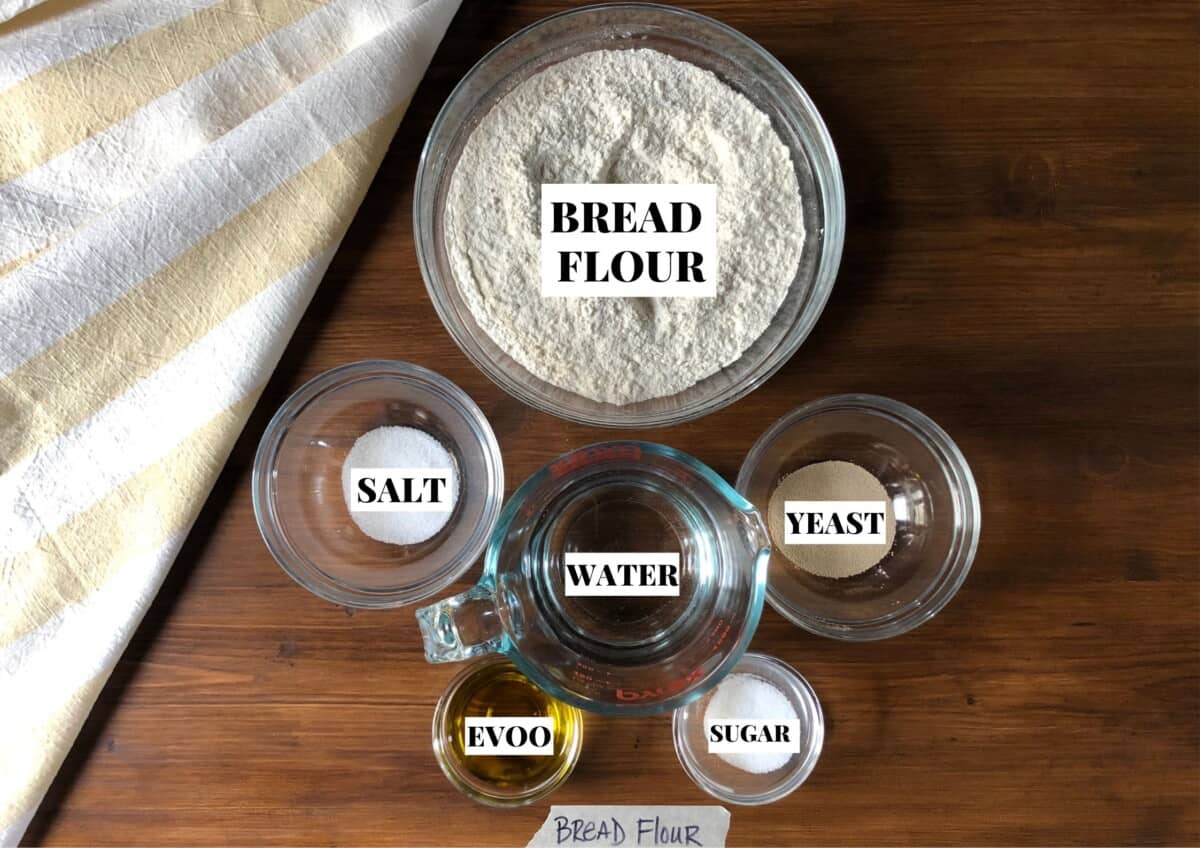
Ingredients
For the Bread Flour Dough
- 480g King Arthur's Bread Flour (about 4 cups)*
- 300g warm water (between 110°F-115°F) (10 ⅝ fluid ounces)
- 2 teaspoons Red Star Platinum instant yeast (9g) (sub active dry yeast)*
- 2 teaspoons sugar (9g) (sub honey or pure maple syrup)
- 2 teaspoons kosher salt (8g)
- 2 tablespoons extra virgin olive oil (30g) (sub other vegetable oil)*
For Working the Dough
- 2 teaspoons extra virgin olive oil (for oiling the dough bowl and dough balls)
- 1 tablespoon of 00 flour (for incorporating into the dough while kneading it)
Toppings
- ¼ cup pizza sauce per pizza
- 1 cup to 1 ⅓ cups shredded mozzarella cheese
- 2 tablespoons grated Grana Padano (sub Parmesan or Parmigiano-Reggiano)
- ½ cup cooked sausage and sliced onions (or toppings of your choice)
- 1 teaspoon extra-virgin olive oil (for drizzling over the top of assembled pizza before baking)
Instructions
- Preheat the oven and pizza stone/grill pan. Turn the oven on to its highest setting (in my case this is 482°F/250°C) and allow it to preheat with the pizza stone or baking pan in (it in the hottest part of your oven) for at least 30 minutes (and up to 45 minutes or 1hr).
- Make the pizza dough. In a large mixing bowl (or the bowl of a stand mixer fitted with the dough hook) combine the bread flour, instant yeast, and sugar and whisk well to combine. *If using active dry yeast, see recipe notes for instructions. Add the olive oil and salt and slowly start adding the warm water just until the dough starts to come together and you can form a ball that's not wet and sticking to your fingers. *I rarely use all of the water - depending on the humidity of your environment and the absorption potential of the flour you're using, you may not need all of the water, or you may need just a teaspoon or two more if the mixture is too dry. See the video below for what the dough should look like at this stage.
- Knead the pizza dough and let it rise (1st rise). Turn the dough out onto a lightly floured work surface and knead it for 10 to 12 minutes until it's soft, smooth, and pliable. Add a sprinkle of flour every now and again if needed to keep the dough from sticking to the countertop as you knead, but be careful not to add too much. Place the kneaded dough into a lightly oiled bowl, cover, and allow to rise for 2 hours in the oven with the light turned on, or at room temperature (70°F/21°C) until doubled in size.
- Portion and shape the dough. Punch down the risen dough to remove air bubbles and divide it into 4 equal pieces. Shape each piece into a ball and roll each on the countertop to seal the bottom and create a uniform dough round.
- Let the dough balls rise (2nd rise). Place the dough balls onto a lightly oiled baking pan, brush them lightly with oil, and cover the dough with sustainable cling film, OR place them onto a lightly floured baking pan, dust them with a little more flour, and cover them with a clean lint-free kitchen towel. Allow the dough to rise for 30 minutes, or until it becomes puffy and hydrated looking.
- Roll out the pizza dough: Roll out the pizza dough on a lightly floured work surface or non-stick baking mat to ⅛ inch thick. Sprinkle the surface and the rolling pin as needed to keep the dough from sticking. Use the rolling pin to transfer the dough to a piece of parchment paper (as you would with pie crust) and place a cutting board underneath it for support while you top it. *If using a pizza peel, sprinkle a little semolina or cornmeal on it and transfer the pizza dough to the pizza peel.
- Top pizza and bake: Top the pizza with sauce, sprinkle with grated Grana Padano (or Parmesan), and op it with grated mozzarella and the toppings of your choice. Drizzle the pizza with a little extra virgin olive oil and transfer it to the oven to bake for about 8-10 minutes. Bake a few minutes longer if you're baking pizza at a lower temperature like 450°F/232°C., and bake it a couple of minutes less if your oven is at 500°F-550°F, and Enjoy!
Notes
Scale down: To make 2 pizzas instead of 4, halve the recipe.
Low-sugar or high-heat oven: Omit the sugar if you're on a low-sugar diet or baking in a wood-fired, Ooni, or Weber kettle pizza oven. These ovens bake hot enough for natural browning without it.
Low-sodium: Reduce salt to ⅛ or ¼ teaspoon, or omit altogether.
Flour swap: You can substitute half the bread flour with whole wheat, all-purpose, or 00 Italian flour.
Active dry yeast substitute: Bloom the yeast first by combining the sugar and half the warm water in a large bowl, sprinkling the yeast on top, and waiting 10 minutes until foamy. Then add the flour, salt, olive oil, and remaining water. Proceed with kneading as instructed.
Oil: Any vegetable oil works in the dough, but always use extra virgin olive oil when drizzling over the assembled pizza before baking. That drizzle is for flavor.
Yeast math: 2 teaspoons is just under one standard packet (which contains 2 ¼ teaspoons). Using the whole packet is fine but not necessary.
Use a scale: Measuring flour by weight in grams is more accurate and consistent. If using cups, always use the scoop-and-level method: spoon flour into the cup until heaping, then level with the back of a knife. Never dig the cup into the bag.
Less is more with toppings. Too much sauce, cheese, or toppings makes for soggy, undercooked pizza. Slice vegetables as thin as possible (a mandoline is perfect) and pat them dry.
Preheat your baking surface for at least 30-45 minutes at maximum heat. This is the single most important step for a crispy bottom crust.
- Prep Time: 12 minutes
- Cook Time: 8 minutes
- Category: Pizza
- Method: Baked
- Cuisine: Italian
Nutrition
- Serving Size: 1 pizza
- Calories: 510
- Sugar: 2g
- Sodium: 485mg
- Fat: 9g
- Saturated Fat: 1.5g
- Unsaturated Fat: 7.5g
- Trans Fat: 0g
- Carbohydrates: 91g
- Fiber: 3g
- Protein: 16g
- Cholesterol: 0mg
How to Reheat Leftover Pizza
- Oven broiler (best method): Place the pizza under a preheated broiler for 3-4 minutes until the cheese is bubbly and the crust is crisp.
- Regular oven: Place pizza in a preheated 375°F/190°C oven for 6-8 minutes, loosely covered with foil.
- Skillet: Place pizza in a dry skillet, cover with a lid or foil, and heat over medium-high for 4-6 minutes.
- Emergency microwave: Place on a paper towel-lined plate and microwave. Not recommended, but sometimes you need pizza fast.

Food Safety
- Always wash your hands thoroughly before and after handling raw dough.
- Do not taste or eat raw pizza dough. Raw flour can contain harmful bacteria.
- Ensure pizza reaches an internal temperature of 165°F/74°C if topped with meat or poultry.
- Refrigerate leftover pizza within 2 hours and consume within 3-4 days.
- When cold fermenting dough, keep it at or below 40°F/4°C in the refrigerator.

Gerry says
Obsessed with this pizza dough recipe! It's not just good, it's GREAT! Used King Arthur bread flour and it's the best pizza dough we've ever made. Not even our local place has dough this light and crispy. I think they must be make and using the dough on the same day (which now I know is a major rookie error😉 so thank you!). We've already saved money by not ordering out as often. Hands down the best pizza dough recipe.
Tatiana says
Best pizza dough we've ever made!
Lief says
Fantastic recipe. I weighed out the ingredients withy new kitchen scale, and let it rise in the refrigerator. Cooked it on a Recteq Bullseye grill at 475. Perfectly crispy, tender inside, nice char, light tasty crust. I made 2 BBQ chicken pizzas, homemade sausage, mushroom and green olive pizza, and a pepperoni, sausage and poblano pizza drizzled with honey and red pepper flakes. This will be my house pizza dough recipe after trying several.
Kelly says
Leif, your comment makes me (so) happy! Mostly because I know how it feels when you finally make great pizza at home and you're not left eating it and wishing it was better:) Thanks for trying out the recipe (and for leaving such a thorough comment with great pizza combos)! I'm especially inspired by the pepp/saus/poblano with honey and red pepper flakes...I may have to try that with Sichuan chili oil drizzled over the top!
Mike says
How will this recipe hold up to higher heat pizza ovens? Mine is usually around 650-700 degrees Fahrenheit. Thank you!
Kelly says
Hi Mike, if you're using a real pizza oven, brick oven, Ooni, or even a Weber pizza grill converter that goes this high, I'd omit the sugar from the recipe. I talk about this a bit in the post, but just a quick recap: Sugar is typically only ever added to pizza dough when you're baking it in a typical home oven because it adds nice color to the finished pizzas. Home oven baked pizzas have to bake for much longer than what you're looking at in your high heat pizza oven and need a little help browning. So, you won't need to add sugar if you're cooking pizzas in your pizza oven...I'd suggest omitting it. You can always do a side by side comparison of one dough with the 2 tsp of sugar and one without. Also, you will need to watch your pizza because they cook incredibly fast at this heat! A typical (thicker Italian pizza like what we eat here locally, only takes about 90 seconds to cook in a brick oven. Do a small test to see how fast the dough cooks according to the temperature of the oven. Also, I haven't posted it yet, but this pizza dough also makes excellent hand-stretched pizza that's thicker, but crispy, chewy, and tender...it gets a really nice "cornicione" that bubbles up nicely (even in the home oven) so it'll be amazing in your pizza oven I'm sure! If you decide to make a couple of more traditional Italian pizzas like this, just be sure to make a "ring" around the dough using your fingers, then flip it over and press down on the middle and then start stretching out only the middle trying not to flatten or disturb the cornicione or pizza crust.Stretch it until the dough is about 11 inches..sauce it, top it, bake it! Let me know it goes for you (I'd love to see a photo)! Good luck😊🍕