If you've never made St. Louis-Style crispy thin-crust pizza, you're in for a treat with this super delicious easy no-yeast pizza recipe. Whether you're just really busy or have some fussy eaters, this is the perfect quick and easy homemade pizza recipe for the whole family. Forget the stodgy, dry-crusted homemade pizzas you've been making and expensive delivery. From your first thought of, "Let's have pizza", to actually sitting down and eating these ooey-gooey crispy pizza squares it takes just 20 minutes from start to finish (really).


Is St. Louis Style Pizza any Good?
I can honestly say this is a pizza recipe everyone should make! Not everyone has the time, desire, or patience to make a yeasted pizza dough. So, if you're a busy mom with kids who love pizza, a college kid on a budget who can't afford pizza delivery, you're a thin-crust pizza lover, or you're someone who's just looking for a way to make the easiest pizza recipe in the world without any fuss -- this is your pizza! It's SO good and quick!
Get all of my tried and true tested tips below for how to get the best crispiest St. Louis-Style pizza crust even if you don't own a pizza stone or a pizza peel. This easy St. Louis pizza recipe can even be made in a regular oven or toaster oven (and it's a great beginner pizza recipe for kids to make)!


What Is St. Louis Style Pizza?
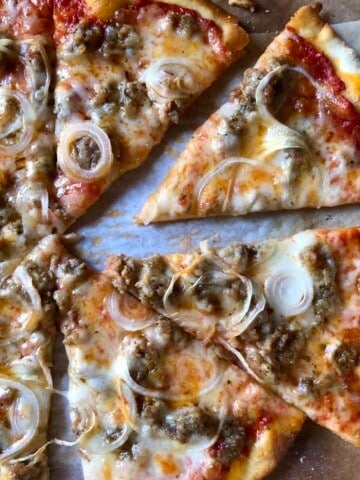
By all accounts, most of the "authentic" St. Louis-style recipes online have evolved from Imo's, a mom-and-pop pizza joint in St. Louis with over 90 locations in and around the city. A true St. Louis-style Pizza is made without yeast and has a crispy cracker-like crust topped with Provel cheese (the really melty processed cheese with a hint of smokiness to it).
It should be sauced and topped with ingredients from side to side without a visible crust perimeter, and it's always cut into squares instead of wedges for serving. I skip the Provel cheese here and use fresh balls of mozzarella instead. Top your pizzas with shredded mozzarella, cheddar, or whatever other cheese you like.
- What is Provel cheese? Provel cheese is a processed cheese invented in the '40s that has the same melting texture as American cheese, but with a flavor that's often described as a cheddar, Swiss, and provolone mix. It contains extra fat, moisture, and chemical salts to achieve a highly meltable, (not stringy like mozzarella) cheese topping.
- How can I make a Provel-style cheese mixture? Create a cheese mixture similar to that offered up by King Arthur which suggests using a combination of 1 cup white cheddar cheese, ½ cup grated Swiss cheese, and ½ cup smoked provolone cheese. If you can't find smoked provolone cheese you can use regular provolone and then add up to 1 teaspoon of Liquid Smoke (to taste), per cup of cheese mixture and toss everything to combine before topping your pizza.

The Best Homemade St. Louis Style Thin-Crust Pizza Ingredients
All you need to make St. Louis-style pizza is flour, salt, baking powder, olive oil, water, and golden syrup (or corn syrup). I use Lyle's Golden Syrup but you can substitute it with light corn syrup, honey, or even maple syrup instead.
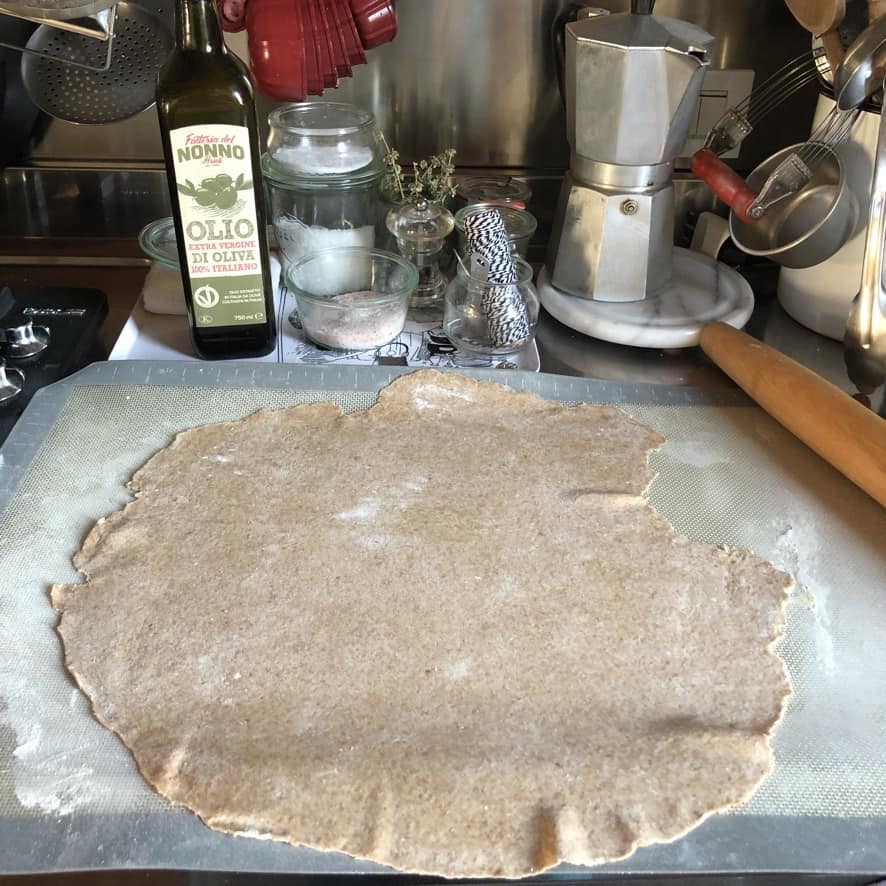
If you don't have any of these syrups, substitute it with sugar. The purpose of using the syrup in the dough is to help with the browning of the crust and add moisture to the dough giving it a more tender, finer crumb. But again, it's not totally necessary. This is a versatile pizza that can be made with just about any type of flour (I've used Italian 00 flour, all-purpose flour, bread flour, and even 100% whole wheat flour: see comparison photos below) and they all taste great.
For the Classic St. Louis Style dough
- all-purpose flour (sub "00" flour)
- salt
- baking powder
- extra virgin olive oil
- Lyle's Golden Syrup (sub maple syrup, brown rice syrup, or light corn syrup)
- water
For the pizza sauce and pizza toppings
- canned tomatoes (or your favorite pizza sauce)
- fresh mozzarella balls (or your favorite shredded cheese)
- sliced veggies and/or any meat toppings, to taste
- dried or fresh oregano (or another Italian herb blend)
- grated Parmigiano-Reggiano or Parmesan cheese
- salt


Below 3 Examples of St. Louis-Style Pizza Dough Made From Different Types of Flour -- All-Purpose, 00, 100% Whole Wheat
All-purpose and bread flour both make a somewhat shaggy dough compared to softer, smoother Italian 00 flour dough (seen in middle photos). Even the very shaggy whole wheat dough creates an excellent pizza crust with a little extra flavor. L's favorite is the regular all-purpose dough and mine is the whole wheat.


How to Make The Best Homemade St. Louis Style Pizza -- Measure, Mix, Roll, and Bake.
For this recipe, I prefer to cook the pizza on a preheated baking pan (or stone) for extra crispiness and I provide those instructions (including photos of the process) below. However, it's not mandatory to preheat your baking pan in order to get a good pizza using this dough. If you choose not to preheat your baking pan first, just place the rolled-out and shaped pizza dough directly onto a lightly oiled (room temperature) baking pan, sauce it, top it, and place it in the oven for 10 to 15 minutes, or until perfectly crispy and the cheese is melted.
- Preheat the oven to 500°F/260°C. Place a baking pan inside the oven in the hottest location (for my oven, this is the oven floor) and preheat the oven while you prepare the dough. *If you're not using the preheated-pan method, lightly oil a baking pan and leave it on the counter while you prepare the dough.
- Mix the dry ingredients. In a large mixing bowl, add the flour, salt, and baking powder, and whisk well to combine.
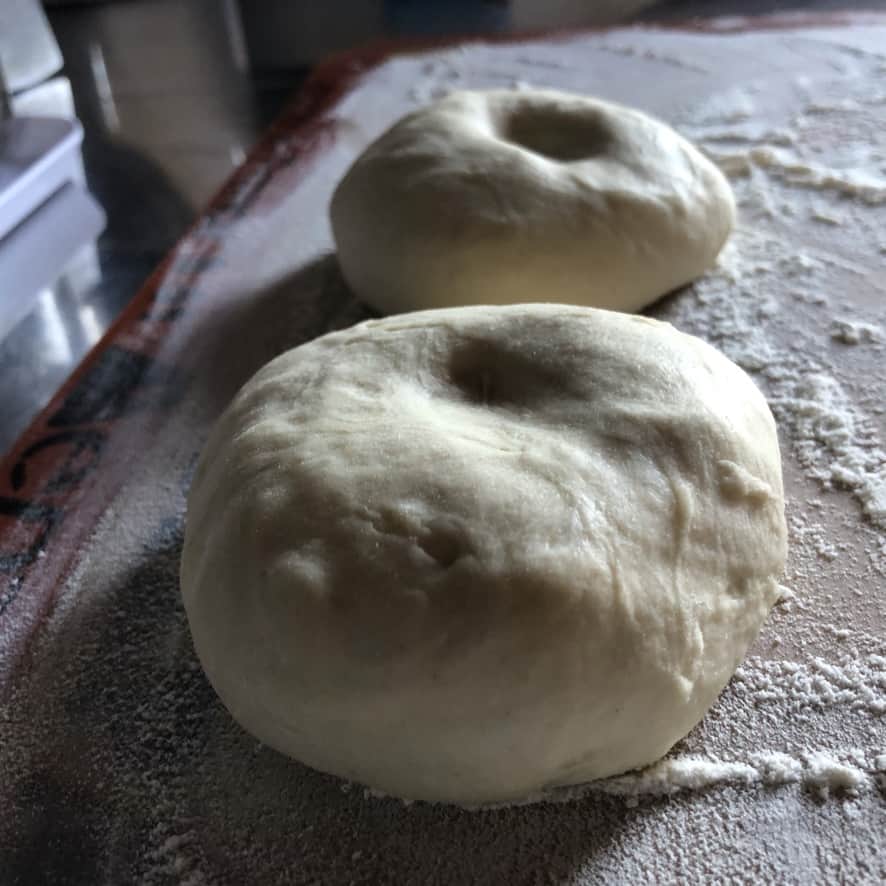
- Add the wet ingredients. Add the olive oil, syrup, and about ½ of the water to the flour mixture stirring it with your hands to combine. Add the remaining water 1 tablespoon at a time just until the dough comes together and is soft but not wet or sticky. Note, you may not need to add all of the water depending on the humidity of your flour. Divide the dough in half. If you have time, cover the dough and let it rest for 10-15 minutes to make it easier to roll out.
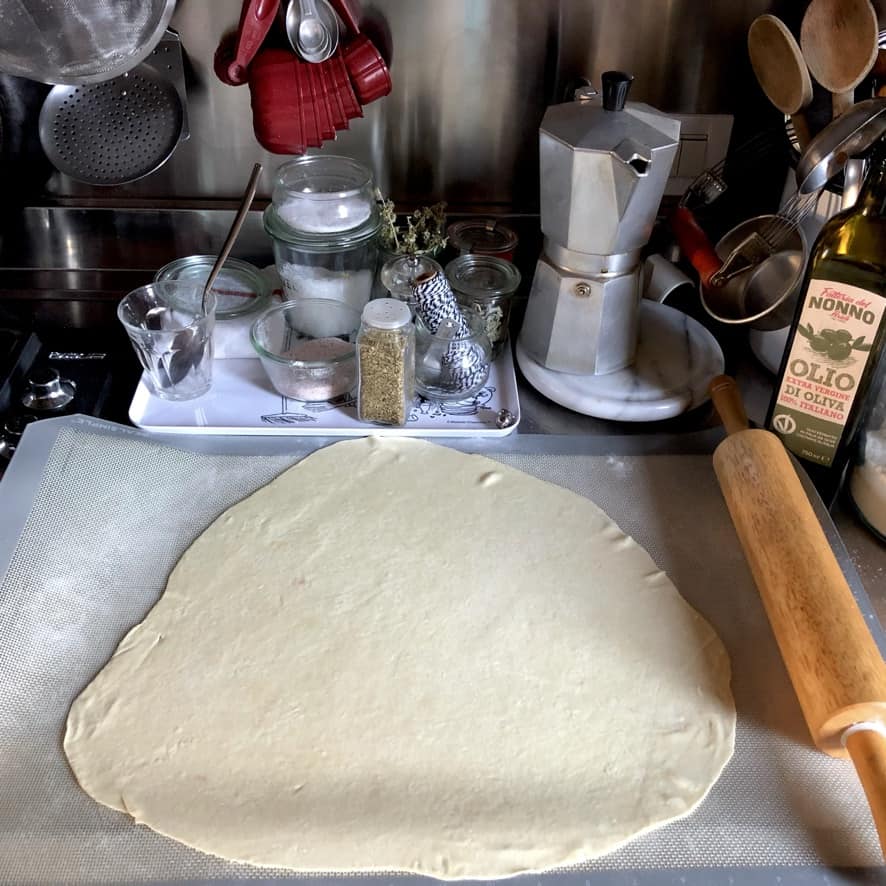
- Roll out the dough. Lightly flour a non-stick baking mat and roll out the dough into one large family-style pizza, or divide the dough in half and make two smaller pizzas. The dough should be about ⅛ inch or thinner. Helpful Hint: If you do not own a non-stick baking mat, roll out the dough between 2 pieces of lightly oiled parchment paper to get it as thin as it needs to be, remove the top piece of parchment paper and proceed to Step. 6 below.
- Add oil and parchment paper to the rolled-out pizza dough. Drizzle the pizza dough lightly with olive oil and evenly spread the oil over the surface of the dough. Cover the dough with parchment paper making sure the paper is slightly larger than the perimeter of the dough itself which makes it easier to transfer into the oven. Place a cutting board on top of the parchment paper, and flip the dough over. Remove the non-stick baking mat by peeling it away from the dough. This is now the top of your pizza.
- Top the pizza. Add about ⅓ cup of your favorite pizza sauce (or finely chopped Mutti brand tomatoes) and spread it out evenly over the dough. Sprinkle with a little salt to taste, dried or fresh oregano, and Parmigiano (or Parmesan) cheese. Top with a layer of torn fresh mozzarella and your favorite pizza toppings. Finish with a drizzle of olive oil over the top of the pizza.
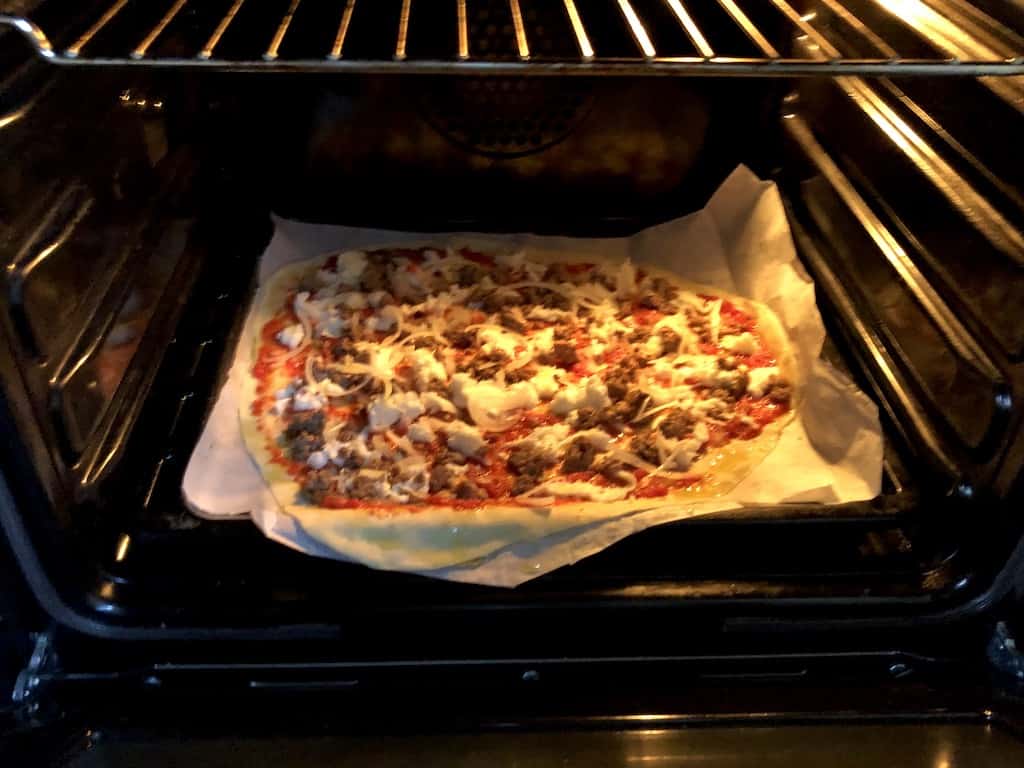
- Bake the pizza. Place a cutting board under the parchment paper with assembled pizza on it to easily transport the pizza to the oven. Gently slide the parchment paper with the pizza off of the cutting board and onto the hot baking tray. Bake for 6 to 7 minutes, or until the cheese is bubbling and the crust is crispy around the edges move the pizza to the middle top rack to finish crisping up for 4 to 5 minutes more. Remove the pizza from the oven and allow it to cool for a couple of minutes before slicing it into squares and serving. Enjoy!
How to Make St. Louis-Style Pizza in Step-by-Step Photos Below


How to Safely Get a Thin Crust Pizza Into the Oven & Onto a Pre-heating Baking Pan
In the photos below, you can see I've used the shallow grill pan (that came with my oven) as my pizza baking pan. I allow the pan to preheat on the oven "floor" where I get the most heat. And by using an oiled piece of parchment paper under the raw rolled-out dough, I'm able to add sauce and toppings to this super-thin crust and still be able to easily transport it to the hot oven (using a cutting board underneath for support).
Working quickly, I open the oven door and gently slide the piece of parchment paper with the pizza on it, right onto the hot baking pan. After about 10 minutes I have a super delicious pizza to eat. Read more tips below.

Don't Love The Rustic Edges of St. Louis-Style Pizza? Check Out How to Make This Pretty St. Louis-Style Heart-Shaped Pizza Instead!


St. Louis-Style Pizza Tips (How to Make an Extra Crispy Thin-Crust Pizza)
If you don't have a pizza stone or pizza peel (or if you only have a small toaster oven), there are a couple of techniques you can use to ensure a crispy pizza crust. In the absence of a pizza stone (which uses refractory heat to cook), it's important to ensure the surface that your pizza will bake on (i.e. a cookie sheet, etc.) gets really hot before you add the pizza to it. This helps the crust to start cooking on the bottom immediately.
So, how do you get a super thin-crust assembled pizza safely into the oven without a pizza peel? Below are a few of my favorite tested tips and techniques (with photos above for each step) which use parchment paper, a non-stick rolling mat, some flimsy plastic cutting boards (or placemats), and a little EVOO to get a superior crisp.
- Preheat the pizza stone, grill pan, or baking sheet that you'll be cooking your pizza on for at least 30 minutes. Preheating the baking sheet in the hottest part of your oven (for me this is the oven floor) helps ensure the bottom of the pizza crust starts cooking as soon as it hits the hot grill pan or pizza stone.
- Place a layer of parchment paper on top of the rolled-out lightly oiled pizza dough. Roll the pizza dough out onto a non-stick baking mat if you have one (or use parchment paper). After you've rolled it out to about ⅛ inch thick, drizzle the dough very lightly with just enough extra virgin olive oil to create a thin layer (see photos above). Use your hand (or a pastry brush) to smear the oil over the entire top of the dough. This oiled side of the dough will actually end up being the bottom of your pizza and will have near-direct contact with the hot baking pan or pizza stone once it goes into the oven to bake. This small addition of olive oil helps the crust crisp up even more. Place parchment paper over the top of the oiled dough and press gently to adhere. The olive oil acts like "glue" and keeps the parchment paper in place. Make sure the size of parchment paper you use is slightly larger than the entire dough itself (even if you have to use two sheets to get full coverage). The goal is to have enough excess parchment around the edges so you can use it to pull and slide the assembled pizza into the oven to bake.
- Place one or two flimsy cutting boards (or plastic placemats) on top of the parchment-covered dough and flip it over. Place flimsy cutting boards (or any large item with a flat surface) on top of the parchment paper/dough to provide support when you flip it over. Flip everything over including the non-stick baking mat. Now the oiled dough is resting on top of the parchment paper and you can peel off the non-stick mat revealing the top of the pizza dough. Start topping!
- Slide the flimsy cutting boards underneath the parchment paper with rolled-out dough to provide support for your pizza before you add toppings. Sliding cutting boards under the parchment paper allows you to top your pizza and then safely and easily transport it from the countertop to the hot baking sheet. I prefer to use the two flimsy plastic placemats/cutting boards (see photos) because they're thin enough to effortlessly slide under the parchment paper and they also provide just enough support so I can hold the topped pizza securely with one hand while I'm opening the oven door with the other hand. Get as close to the hot grill pan or pizza stone as possible and pull the parchment paper (with the pizza on it) off and directly onto the hot baking pan. This is a really simple way to get a super crispy crust on the pizza in a home oven without needing a baking stone or a pizza peel.
*If you don't want to use the above techniques for a super crispy crust, skip them. -- Simply roll out the dough, add it to a lightly oiled (room temperature) baking pan then add sauce, and toppings, and bake as directed or a few minutes longer to achieve a crispy crust. Just know it won't be nearly as crispy.

Looking For More Delicious and Easy Pizza Recipes?
We LOVE pizza and even though we live in Italy, we make a lot of it at home! Here are some of our favorite pizza recipes you may also want to make.
- Best Ever 00 Flour Thin-Crust Pizza Dough (recipe posting this week)
- Authentic Italian Pizza Fritte (Pizzonte Frittelle Abruzzese)
- 20-Minute Quick and Easy Valentine's Day Heart-Shaped Pizza
- Easy 20-Minute Thin & Crispy St. Louis-Style Whole Wheat Pizza


A Few Delicious Side-Dishes and Dessert Recipes to Eat with Your Freshly Baked St. Louis-Style Pizza
Depending on how hungry you are, or how many people you're serving, here are a few tasty recipes that make any St. Louis Style pizza night even better.
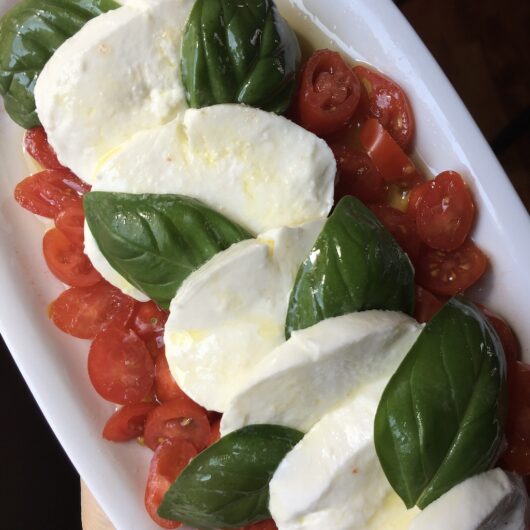
- Italian Caprese Salad (l'insalata Caprese)
- Starburst Vinaigrette w/your favorite mixed salad greens
- Easy Classic Cheesecake w/Biscoff Cookie Crust (+Mini's)
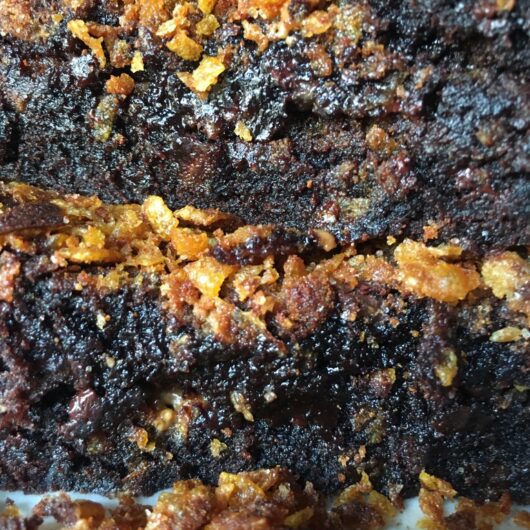
- Super Fudge Biscoff Brownies w/Cornflake Crunch
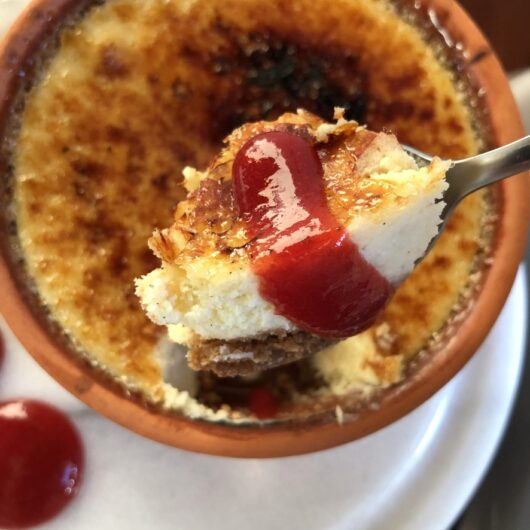
- White Chocolate Creme Brûlée Cheesecake w/Biscoff Cookie Crust
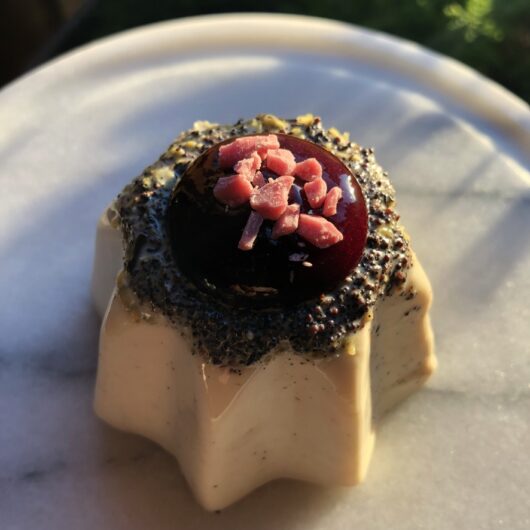
- White Chocolate Vanilla Bean Panna Cotta


Let's get started!
Print📖 Recipe

Easy Thin and Crispy St. Louis-Style No Yeast Pizza
- Total Time: 20 minutes
- Yield: 2 Pizzas
Description
If you've never made St. Louis-Style crispy thin-crust pizza, you're in for a treat with this super delicious easy no-yeast pizza recipe. Whether you're just really busy or have some fussy eaters, this is the perfect quick and easy homemade pizza recipe for the whole family. Forget the stodgy, dry-crusted homemade pizzas you've been making. From your first thought of, "Let's have pizza", to actually sitting down and eating these ooey-gooey crispy squares it takes just 20 minutes from start to finish (really).
Ingredients
- 1 ¼ cups all-purpose flour (160g) (sub "00" flour)
- ½ teaspoon kosher or sea salt (3g)
- ½ teaspoon baking powder (1g)
- 1 tablespoon extra virgin olive oil (15g)
- 1 teaspoon Lyle's Golden Syrup (7g) (sub maple syrup, brown rice syrup, or light corn syrup)
- up to ½ cup lukewarm water (118g)
- ⅔ cup finely chopped canned tomatoes (150g) (sub favorite pizza sauce)
- 2 fresh balls of mozzarella (about 7 ounces) (200g) (sub favorite shredded cheese)
- sliced veggies and/or any meat toppings, to taste
- dried or fresh oregano (or another Italian herb blend)
- grated Parmigiano-Reggiano or Parmesan cheese
- salt to taste
Instructions
- Preheat the oven to 500°F/260°C. Place a baking pan inside the oven in the hottest location (for my oven, this is the oven floor) and preheat the oven while you prepare the dough. *If you're not using the preheated-pan method, lightly oil a baking pan and leave it on the counter while you prepare the dough.
- Mix the dry ingredients. In a large mixing bowl, add the flour, salt, and baking powder, and whisk well to combine.
- Add the wet ingredients. Add the olive oil, syrup, and about ½ of the water to the flour mixture stirring it with your hands to combine. Add the remaining water 1 tablespoon at a time just until the dough comes together and is soft but not wet or sticky. Note, you may not need to add all of the water depending on the humidity of your flour. Divide the dough in half. If you have time, cover the dough and let it rest for 10-15 minutes to make it easier to roll out.
- Roll out the dough. Lightly flour a non-stick baking mat and roll out the dough into one large family-style pizza, or divide the dough in half and make two smaller pizzas. The dough should be about ⅛ inch or thinner. Helpful Hint: If you do not own a non-stick baking mat, roll out the dough between 2 pieces of lightly oiled parchment paper to get it as thin as it needs to be, remove the top piece of parchment paper and proceed to Step. 6 below.
- Add oil and parchment paper to the rolled-out pizza dough. Drizzle the pizza dough lightly with olive oil and evenly spread the oil over the surface of the dough. Cover the dough with parchment paper making sure the paper is slightly larger than the perimeter of the dough itself which makes it easier to transfer into the oven. Place a cutting board on top of the parchment paper, and flip the dough over. Remove the non-stick baking mat by peeling it away from the dough. This is now the top of your pizza.
- Top the pizza. Add about ⅓ cup of your favorite pizza sauce (or finely chopped Mutti brand tomatoes) and spread it out evenly over the dough. Sprinkle with a little salt to taste, dried or fresh oregano, and Parmigiano (or Parmesan) cheese. Top with a layer of torn fresh mozzarella and your favorite pizza toppings. Finish with a drizzle of olive oil over the top of the pizza.
- Bake the pizza. Place a cutting board under the parchment paper with assembled pizza on it to easily transport the pizza to the oven. Gently slide the parchment paper with the pizza off of the cutting board and onto the hot baking tray. Bake for 6 to 7 minutes, or until the cheese is bubbling and the crust is crispy around the edges move the pizza to the middle top rack to finish crisping up for 4 to 5 minutes more. Remove the pizza from the oven and allow it to cool for a couple of minutes before slicing it into squares and serving. Enjoy!
Notes
- If your dough seems too dry, you can continue adding water just a splash (about a teaspoon) at a time until the dough comes together. Flour can be dry or humid and so can your environment, which means that you may have to slightly adjust for these variables. Doing so slowly and in increments will ensure you don't add too much water and end up with a wet and sticky dough. If that accidentally happens, just add a bit more flour a teaspoon at a time, until you have a cohesive dough.
How to Bake a Heart-Shaped Pizza on a Preheated Baking Pan (for Extra Crispiness)
If you don't have a pizza stone or pizza peel (or if you only have a small toaster oven), there are a couple of techniques you can use to ensure a crispy pizza crust. In the absence of a pizza stone (which uses refractory heat to cook), it's important to ensure the surface that your pizza will bake on (i.e. a cookie sheet, etc.) gets really hot before you add the pizza to it. This helps the crust to start cooking on the bottom immediately.
So, how do you get a super thin-crust assembled pizza safely into the oven without a pizza peel? Below are a few of my favorite tested tips and techniques (with photos in the main post for each step) which use parchment paper, a non-stick rolling mat, some flimsy plastic cutting boards (or placemats), and a little EVOO to get a superior crisp without a pizza peel.
- Preheat the pizza stone, grill pan, or baking sheet that you'll be cooking your pizza on for at least 30 minutes. Preheating the baking sheet, pizza stone, or grill pan in the hottest part of your oven (for me this is the oven floor) helps ensure the bottom of the pizza crust starts cooking as soon as it hits the hot grill pan or pizza stone.
- Place a layer of parchment paper on top of the rolled-out lightly oiled pizza dough. Roll the pizza dough out onto a non-stick baking mat if you have one (or use parchment paper). After you've rolled it out to about ⅛ inch thick, drizzle the dough very lightly with just enough extra virgin olive oil to create a thin layer (see photos above). Use your hand (or a pastry brush) to smear the oil over the entire top of the dough. This oiled side of the dough will actually end up being the bottom of your pizza and will have near-direct contact with the hot baking pan or pizza stone once it goes into the oven to bake. This small addition of olive oil helps the crust crisp up even more. Place parchment paper over the top of the oiled dough and press gently to adhere. The olive oil acts like "glue" and keeps the parchment paper in place. Make sure the size of parchment paper you use is slightly larger than the entire dough itself (even if you have to use two sheets to get full coverage). The goal is to have enough excess parchment around the edges so you can use it to pull and slide the assembled pizza into the oven to bake.
- Place one or two flimsy cutting boards (or plastic placemats) on top of the parchment-covered dough and flip it over. Place flimsy cutting boards (or any large item with a flat surface) on top of the parchment paper/dough to provide support when you flip it over. Flip everything over including the non-stick baking mat. Now the oiled dough is resting on top of the parchment paper and you can peel off the non-stick mat revealing the top of the pizza dough. Start topping!
- Slide the flimsy cutting boards underneath the parchment paper with rolled-out dough to provide support for your pizza before you add toppings. Sliding cutting boards under the parchment paper allows you to top your pizza and then safely and easily transport it from the countertop to the hot baking sheet. I prefer to use the two flimsy plastic placemats/cutting boards (see photos) because they're thin enough to effortlessly slide under the parchment paper and they also provide just enough support so I can hold the topped pizza securely with one hand while I'm opening the oven door with the other hand. Get as close to the hot grill pan or pizza stone as possible and pull the parchment paper (with the pizza on it) off and directly onto the hot baking pan. This is a really simple way to get a super crispy crust on the pizza in a home oven without needing a baking stone or a pizza peel.
*If you don't want to use the above techniques for a super crispy crust, skip them. -- Simply roll out the dough, add it to a lightly oiled (room temperature) baking pan then add sauce, and toppings, and bake as directed or a few minutes longer to achieve a crispy crust. Just know it won't be nearly as crispy.
[gallery type="rectangular" link="none" size="full" columns="2" ids="18079,18046"]- Prep Time: 10 minutes
- Cook Time: 10 minutes
- Category: Pizza
- Method: Oven Bake
- Cuisine: American
Nutrition
- Serving Size: 1 pizza


Marty Johnsen says
Super simple and truly a good tasting and crispy thin crust. Question: can this dough be made ahead of time and kept in the fridge for a day or two?
Kelly says
Hi Marty! I'm so happy you tried the recipe and enjoyed it (we just made the whole wheat St. Louis style pizza two weeks ago 🤗). The longest I've made the dough ahead of time is 1 day and it worked fine and tasted great. I probably wouldn't go past 1 day though? - here's why: Keep in mind when using baking powder, the first chemical reaction is taking place when the liquid (water in this case) is added to the dough and the second reaction happens when it hits the hot oven and starts to rise. Typically, when baking (using baking powder) you want to add the dish to the oven as quickly as possible after adding the liquid in order to get the best rise. This is because baking powder's efficacy will start to fade after it come into contact with the liquid. Ok, that said, this is a super thin crispy crust (you're not looking for a Neapolitan cornicione) so it's worth a test to see if a 2-day refrigeration time would still yield nice results. If you do a test, please come back and let us know how it worked😊. And the next time I make it, I'll go ahead and do the test in case you're not up for it and I'll post the results:) Fair warning though, just yesterday we ate a new test for a yeasted half whole wheat and half bread flour pizza dough, so it may be a bit before I do the St. Louis style again. I'll keep you posted here when I make it though! Thanks again for rating the recipe (means a lot) and for your comment.