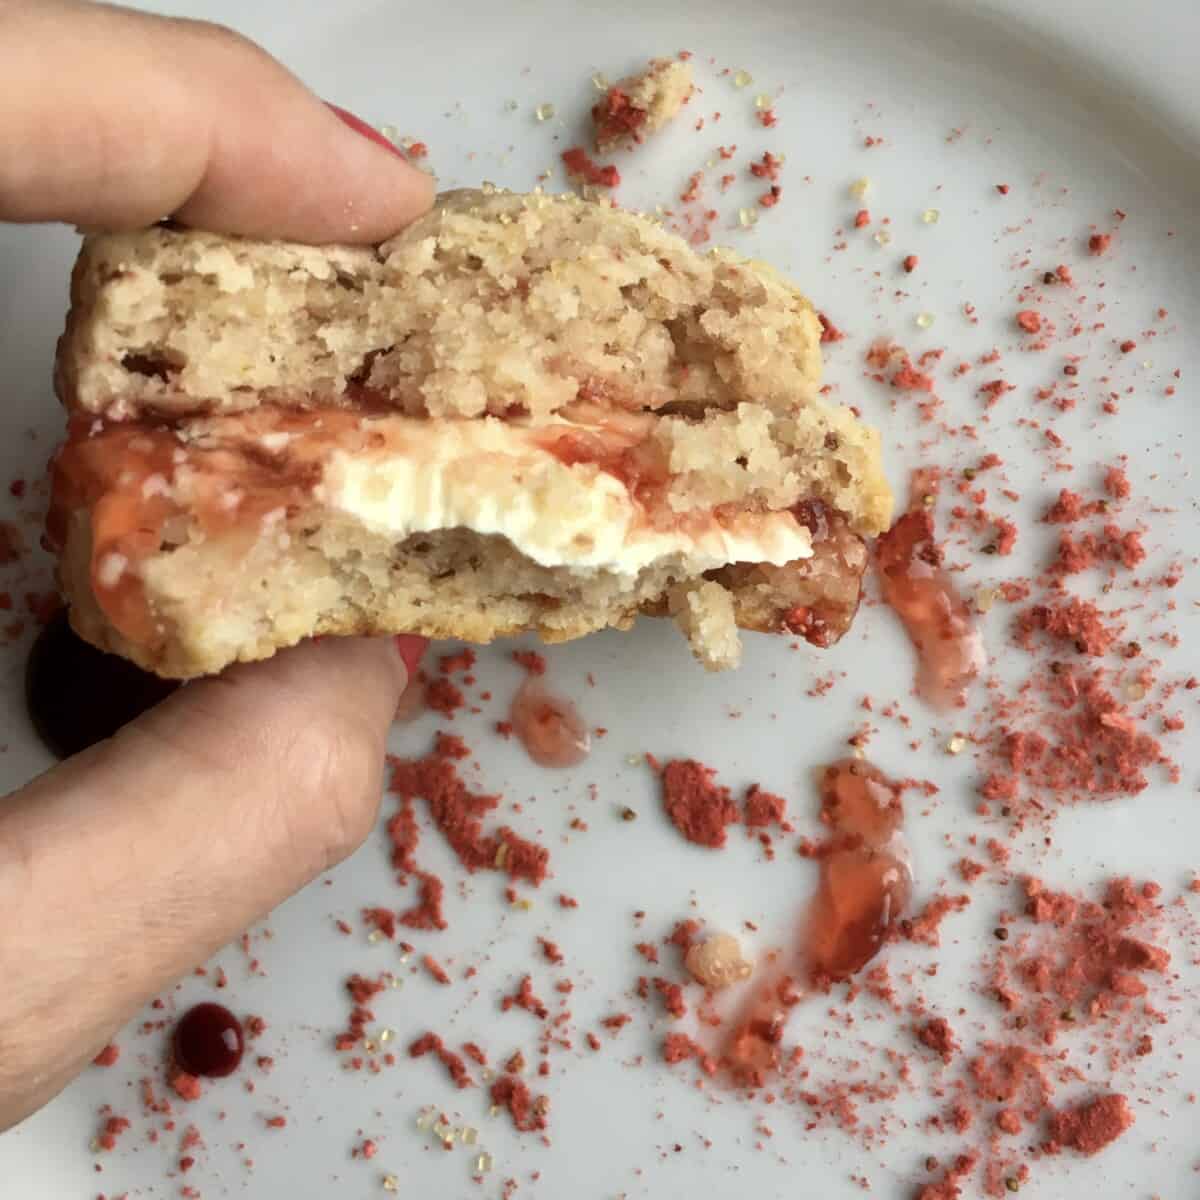
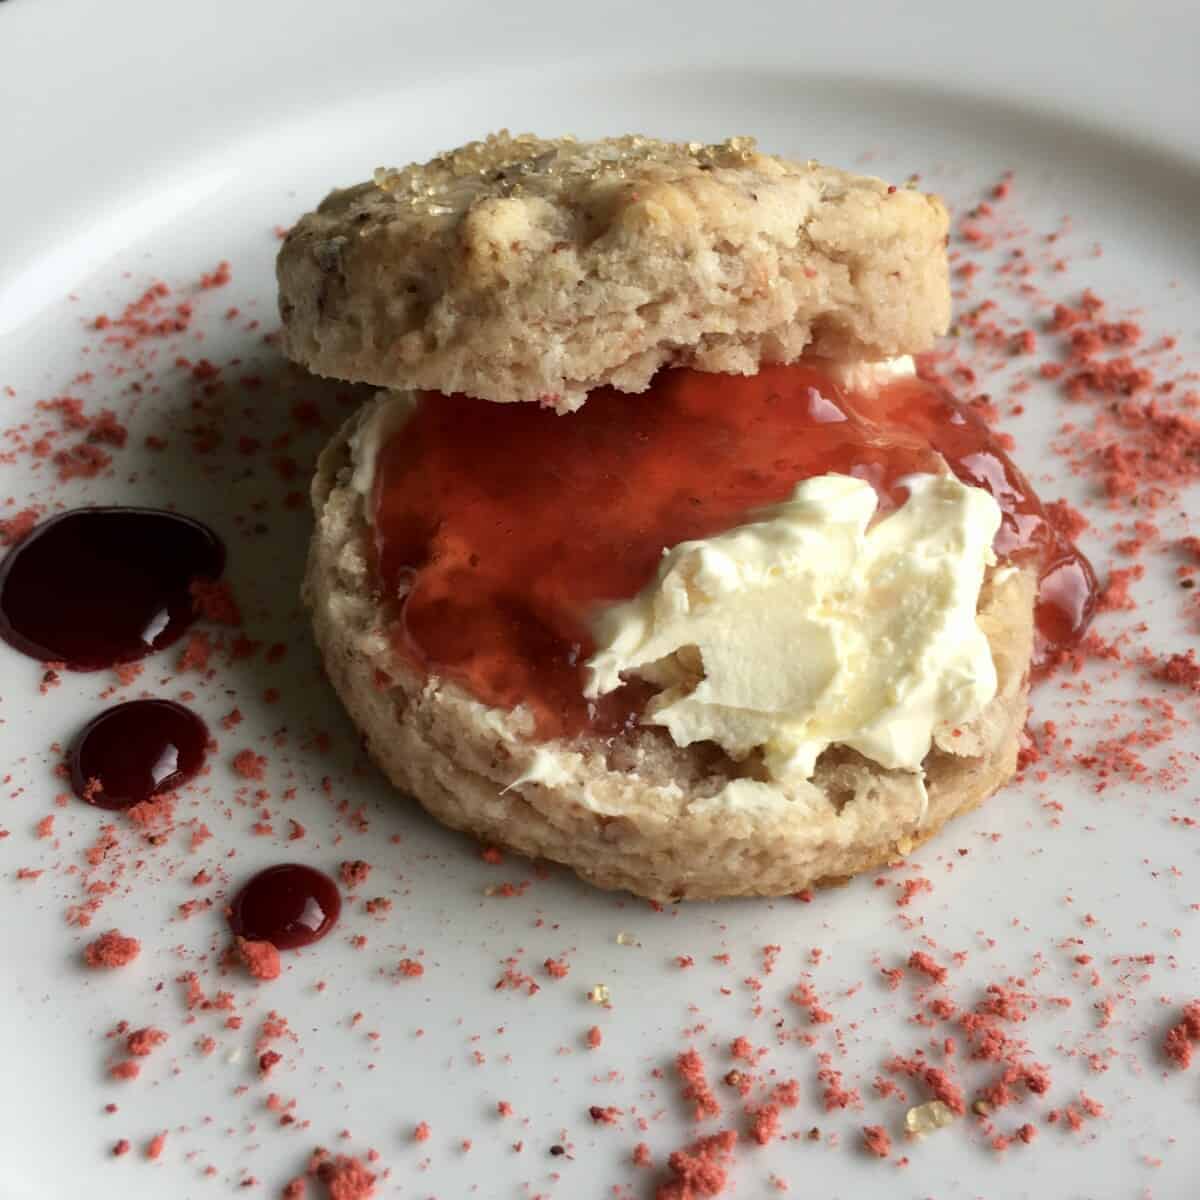
Make the best all-natural, fluffy, tender strawberry scones from scratch! This easy scone recipe gets a dollop of clotted cream, then smeared with my 15-minute strawberry jam sauce, then drizzled with strawberry coulis for the perfect weekday morning pick-me-up or for a special Thanksgiving, Christmas, or Valentine's Day brunch!

Homemade strawberry jam and clotted cream put these scones into a whole new category of delicious, but you really don't need them because these strawberry scones are delicious all on their own.
Breakfast-for-dinner and weekend brunches are some of our favorite meals to make, and these scones fit right in. But they're just as good for dessert or for high tea - and you can make mini strawberry scones!
Jump to:
- Strawberry Scone Ingredients
- How to Make the Best Homemade Strawberry Scones
- Strawberry Scones Step-by-Step Recipe Photos
- Ways to Customize Strawberry Scones
- What to Serve With Strawberry Scones
- 10 BEST TIPS FOR MAKING TENDER SCONES
- How to Freeze Strawberry Scones
- Strawberry Scone FAQ
- Looking for a few More Easy Strawberry Desserts?
- 📖 Recipe


Strawberry Scone Ingredients
You only need 7 ingredients to make these all-natural strawberry shortcake scones. You'll never need to hit the drive-thru for those yummy Starbucks Strawberry scones ever again when you make these at home!
- all-purpose flour
- baking powder
- granulated sugar
- unsweetened freeze-dried strawberries
- unsalted butter
- heavy cream
- kosher salt
- additional cream for brushing the tops
Full recipe measurements can be found in the recipe card below.


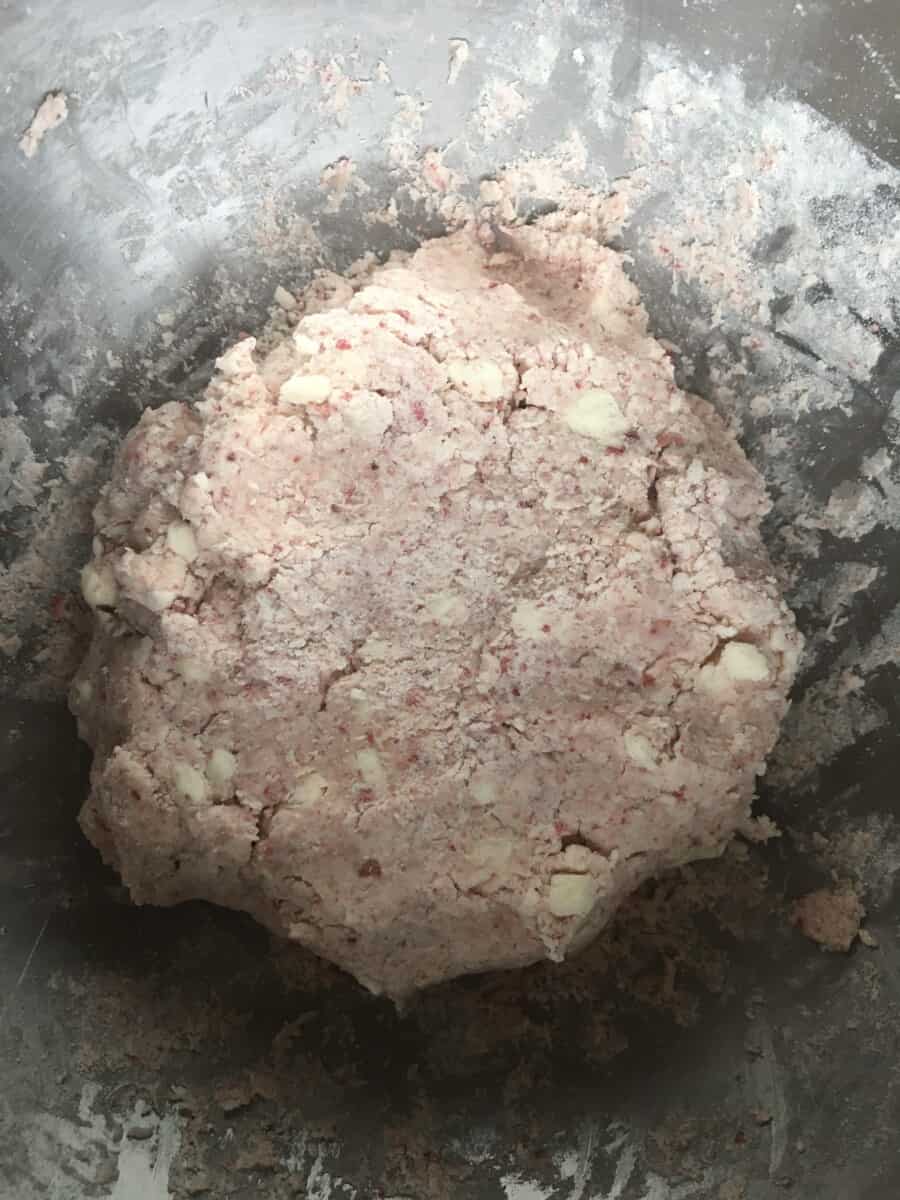
Texture of Perfect Strawberry Scone Dough in Photos


How to Make the Best Homemade Strawberry Scones
Making really good and tender homemade scones is easy. Just be sure to follow all of the helpful tips and techniques above to make sure they're perfectly tender and never dry or hard.
- Measure the dry ingredients and cut in the butter to the flour mixture.
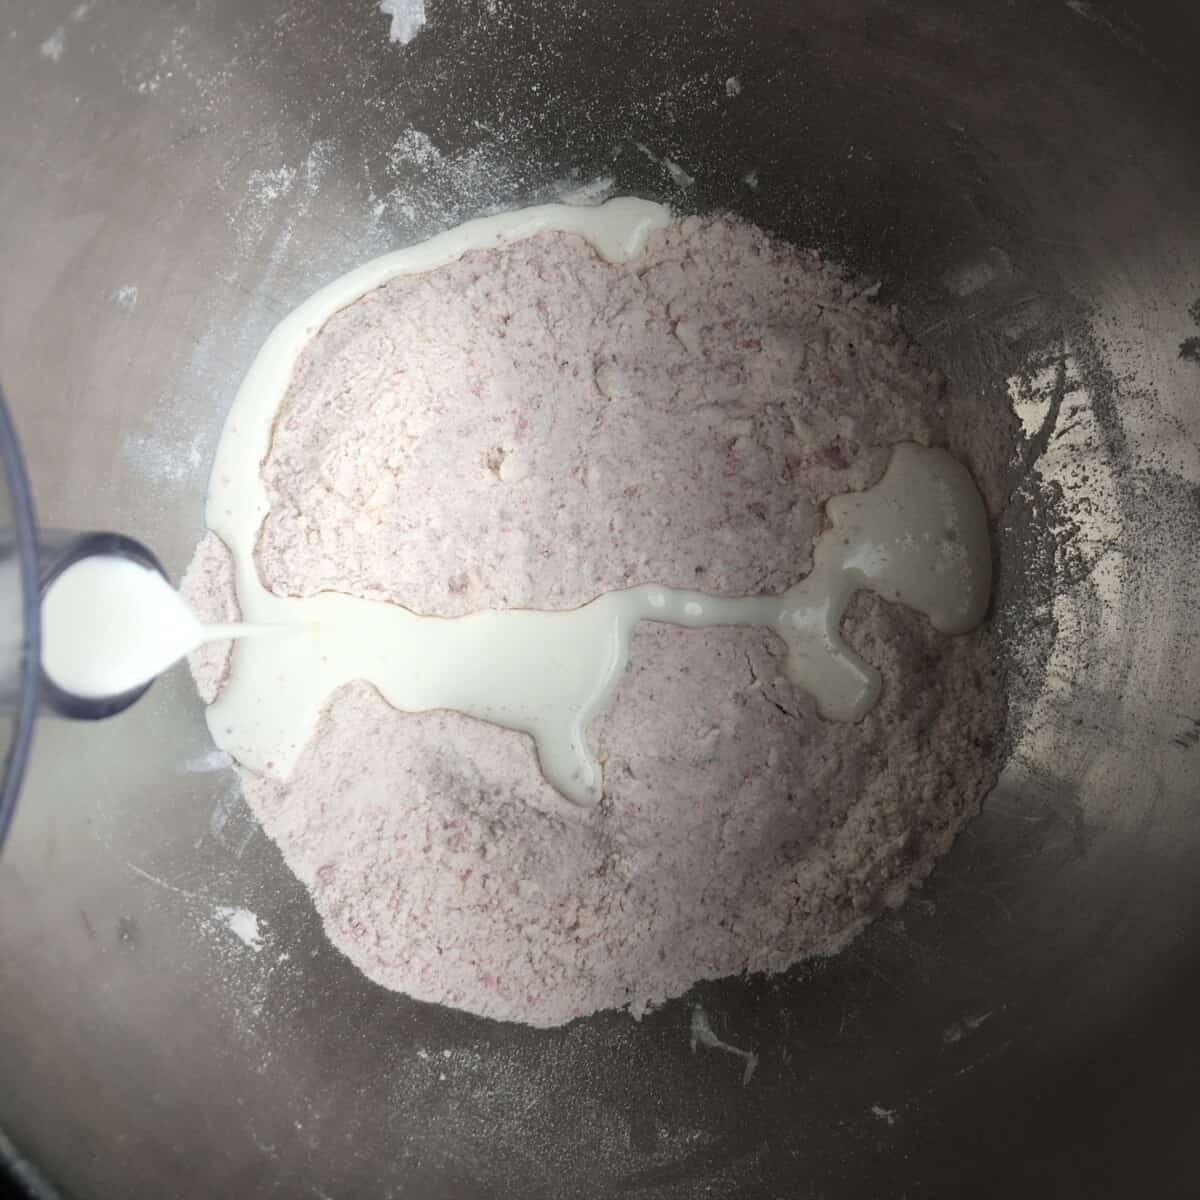
- Mix in the wet ingredients. Using a fork, gently stir the flour-butter mixture as you pour the cream into the bowl to form a slightly sticky, but manageable dough.
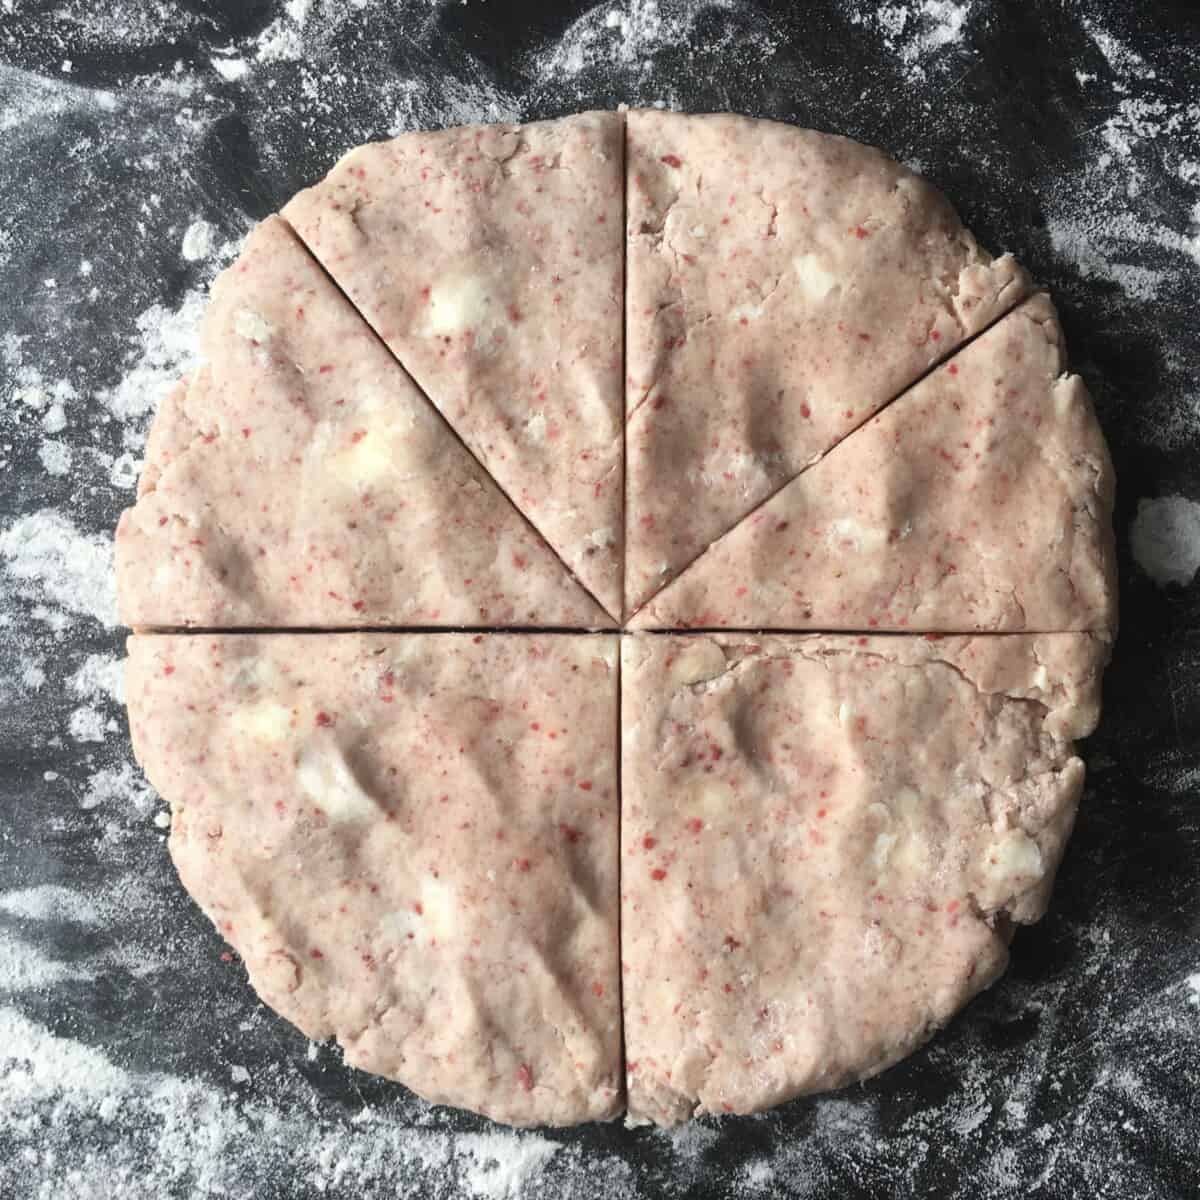
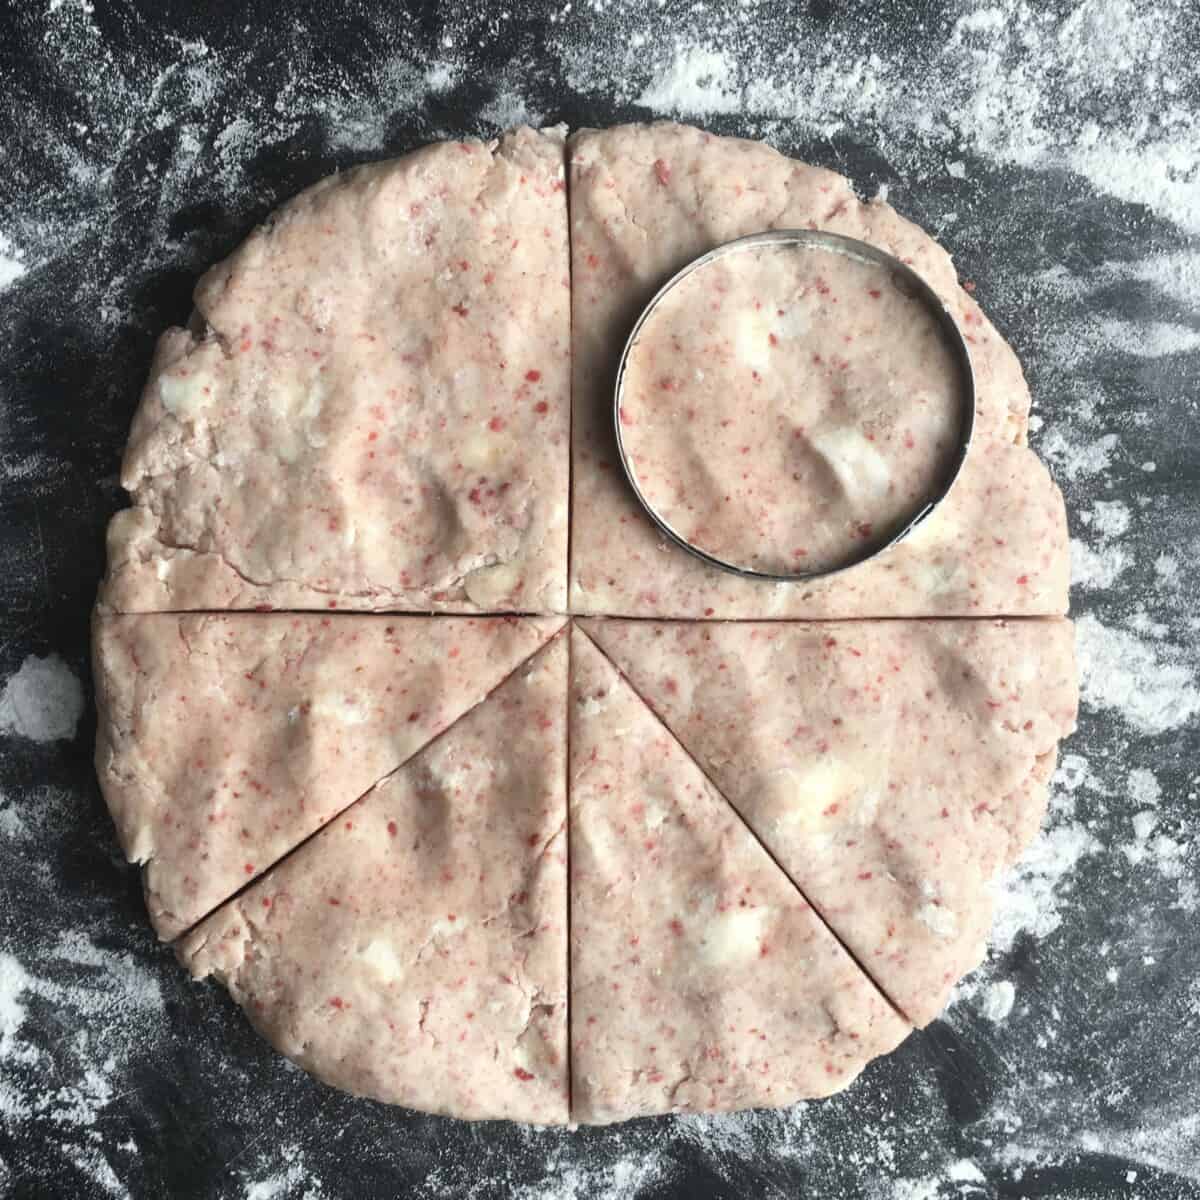
- Make the dough folds. Turn the dough out onto a lightly floured surface and gently pat it down just slightly. Fold the top ⅓ of the dough down towards the center and then fold the bottom ⅓ up towards the center (like if you were folding up a business letter). Gently pat the dough down once more, and repeat the folds in the opposite direction. Shape the dough into a round disc and cut triangles or desired shape. Place the cut scones into the freezer for 10-15 minutes, or in the fridge for 30 minutes to 1 hour before baking.
- Preheat the oven. While your scones are chilling heat the oven to 450°F/230°C.
- Bake the scones. Place the cut scones onto a parchment-lined baking sheet. Brush the tops with cream (or an egg wash) and sprinkle with raw sugar or homemade strawberry sugar. Bake the scones for 9 to 13 minutes.
Full recipe instructions can be found in the recipe card below.
Strawberry Scones Step-by-Step Recipe Photos


Ways to Customize Strawberry Scones
Now you have a great strawberry scone recipe, so it's time to get creative. Here are a few add-ins and options to make these scones really stand out.
- ¼ cup chocolate chips (milk, dark, or white)
- ½ cup fresh chopped fruit (strawberries or blueberries work well here)
- citrus zest (incorporate lemon, orange, or even lime zest into the flour mixture for a little extra flavor)
- ½ to 1 teaspoon vanilla extract (I typically don't use vanilla in this strawberry scone recipe because I want the strawberry flavor to be prominent, but feel free to add it)
What to Serve With Strawberry Scones
Besides the obvious luxurious and delicious clotted cream, you can serve strawberry scones spread with sweet strawberry butter, sprinkled with homemade strawberry sugar, or drizzled with easy homemade strawberry jam or elegant strawberry coulis!


10 BEST TIPS FOR MAKING TENDER SCONES
How to Avoid Rock Hard Scones and Get a Perfect, Tender, Fluffy Texture Every Time
If you want to avoid homemade scones that are hard and dense, follow these simple yet important guidelines to master making the most tender, light, and fluffy scones at home.
These easy tips and techniques will ensure you have the best-tasting scones in the neighborhood. And no, it doesn't involve you having to grate the butter.
- Use high-quality flour. King Arthur all-purpose and KA bread flour is the absolute best flour you can buy. It makes a difference in all of my baked goods. Plus, they actually answer your baking questions if you have any (and are SO nice about it!❤️). When I moved to Italy and needed a comparable flour to substitute for KA all-purpose, they tried their very best to help me. Best. Flour. Ever.
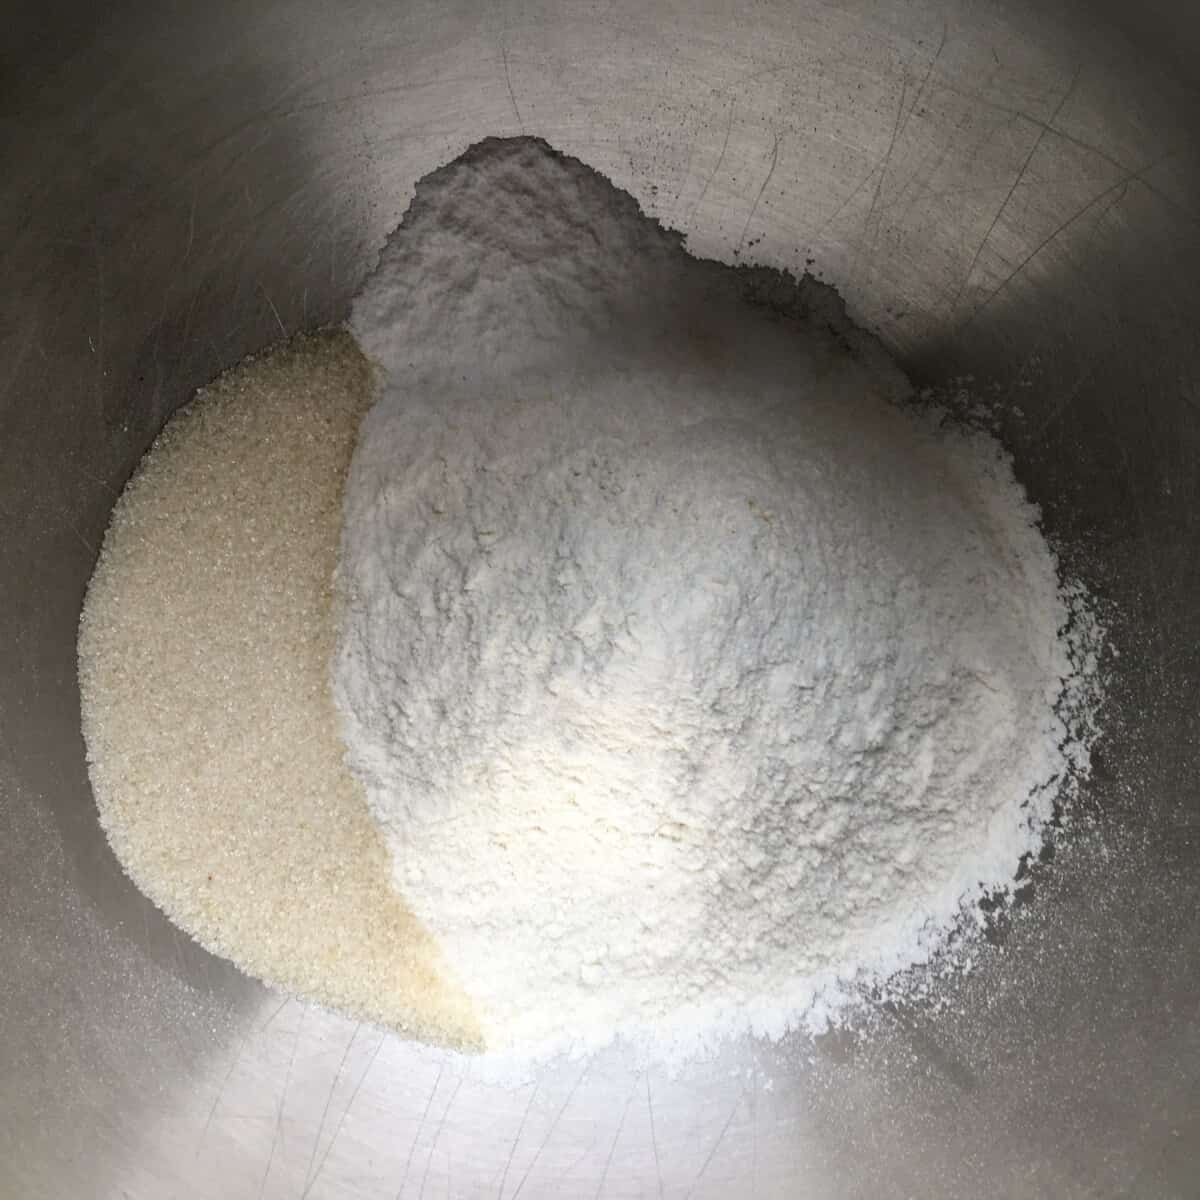
- Always thoroughly whisk the dry ingredients (i.e. flour, sugar, baking powder, salt, any other dry spices, etc.) together before adding any liquid. This helps ensure the leavening agent (baking powder in this case) is evenly distributed and therefore enables the scones to all properly rise.
- Use cold unsalted butter, never room temperature or warm butter. When baked goods containing flecks of cold butter in them hit a hot preheated oven, the butter (as it melts) creates air pockets which equal fluffy tender dough (and also really great flavor)...think flaky pie crusts or southern buttermilk biscuits.
- Make sure you can actually see pea-sized butter pieces in your dough (for the same reason above). If you cut in the butter so much that you can no longer see actual pieces of butter in the final dough, you will not have the flakiest, most tender scones. Some people suggest grating frozen butter, but it's really not necessary at all. All you need is a good dough cutter, food processor, or two butter knives to get the butter the size you need it.
- Do not overmix the scone dough once you've added the liquid (in this case heavy cream). If you over-mix the flour mixture and cream you'll end up with dense, hard scones. Gently mix the ingredients together using a fork just until it all comes together.
- Do not be afraid of a slightly sticky dough. Avoid adding too much flour. It's better if the dough is perfectly hydrated, or slightly sticky after you've mixed all of the ingredients, instead of it being too dry. You'll be turning the dough out onto a floured surface so remember that the dough will pick up (absorb) some of this extra flour as well. If you have a very sticky dough, simply dust the top of it with a little flour before you gently pat it all down to begin forming the necessary folds. These strawberry scones are not quite as sticky as my master scone recipe, because the freeze-dried strawberries absorb some of the liquid in a way that using just regular flour will not.
- Never use a rolling pin to roll out scones (or biscuits). All you need is your hands to gently pat down, shape, and fold scone dough (or southern buttermilk biscuits).
- Always fold the dough onto itself several times. Pretend you're mailing a business letter. Place the dough in front of you (as if you were reading a letter), fold the top ⅓ down on top of itself, then fold the bottom ⅓ up onto itself (as if you were folding the letter to be put into an envelope). Then lightly pat down the dough and repeat the folds in the opposite direction. Pat down the dough again and do the fold one last time before cutting the scones.
- If you're cutting scones out using cookie cutters (round, fluted, square, etc.) never twist the cutter as you're making the cut. Doing so can ruin the layers created by the folds in the dough that you just made. Instead, dip the cutter into a bowl of flour and in one single motion (straight down and then straight back up) cut the shapes without twisting the cutter. You're scones (and biscuits) will rise to their full potential now.
- Always refrigerate or flash freeze the cut scones before baking them. The colder the dough, the colder those butter flecks are which equals, less spread, higher rise, and flakier, fluffier scones. Place the scones into a freezer for 10-15 minutes, or into the fridge for 30 minutes to an hour before baking.
How to Freeze Strawberry Scones
Below are two great options for freezing scones so you can enjoy them anytime.
- Freeze Scones Before Baking: Freeze cut scone dough on a parchment-lined plate or baking sheet for about an hour or until firm and frozen. Layer them in an airtight bag or container and pop them into the freezer. When you want a freshly baked scone, place the frozen scones into a preheated oven and add a few minutes to the original bake time. You may also thaw them overnight in the fridge and bake them as directed.
- Freeze Scones After Baking: Allow baked scones to cool to room temperature, place them in an airtight bag or container (you can even wrap them individually in wax paper and sustainable cling film), and freeze. Allow scones to thaw at room temperature, or overnight in the fridge. Warm them in the oven, toaster oven, or microwave.
Strawberry Scone FAQ
Yes, you can freeze strawberry scones or any scones either before or after baking. Keep in mind that baked goods containing baking powder are activated as soon as you add the liquid (in this case, the heavy cream) and should be baked as soon thereafter to get the best rise. And with this easy strawberry scone recipe, there is a minimal difference in the rise you get if you bake them the day of, or freeze the raw scone dough to bake whenever it's most convenient for you. And when you make homemade scones, they're definitely healthier than any you'll find at Starbucks.
Looking for a few More Easy Strawberry Desserts?
Below, you'll find our favorite strawberry recipes for any occasion and any skill level!


Let's get started!
Print📖 Recipe

How to Make the Best Strawberry Scones
- Total Time: 43 minutes
- Yield: 8 Large or 16 Small scones
- Diet: Vegetarian
Description
If you love strawberry scones as much as we do, try this super tender (easy) recipe. Dollop it with clotted cream, 15-minute strawberry jam sauce, and strawberry coulis, or eat them all by themselves because they are GOOD! Perfect for breakfast, Saturday brunch, or high tea.
Ingredients
- 2 cups King Arthur all-purpose flour, plus more for the work surface (240g)
- 2 ½ teaspoons baking powder (10g)
- ¼ cup sugar (50g) *see notes for making a sweeter scone
- ¼ cup unsweetened freeze-dried strawberries, powdered in a food processor or Vitamix
- 5 tablespoons very cold unsalted butter, cut into pieces (70g)
- ¾ cup to 1 cup heavy cream (or buttermilk) (175 to 235g)
- ½ teaspoon kosher salt (2g)
- additional cream for brushing the tops
Instructions
- Measure the dry ingredients and cut in the butter to the flour mixture. If using a food processor: Pulse to combine the dry ingredients. Add the butter pieces and pulse until the mixture resembles very coarse sand with visible pea-size pieces of butter. Place the mixture into a mixing bowl and pop it into the fridge for a few minutes to allow the butter to get cold again.
If using a regular mixing bowl: Whisk the dry ingredients together to combine well. Using a pastry cutter or two butter knives, cut the butter into the dry mixture until it resembles very coarse sand with visible pea-size pieces of butter. Try to work quickly so the butter doesn't get warm. Place into the refrigerator for a few minutes to allow the butter to get cold again.
- Mix in the wet ingredients. Using a fork, gently stir the flour-butter mixture as you pour the cream into the bowl to form a slightly sticky, but manageable dough. It should come together very quickly and should not be over-mixed. If it's not quite wet enough, add a little more cream 1 tablespoon at a time, until the mixture just holds together. If it's too sticky, add a tiny amount of flour, but very little because the dough should slightly stick to your hands.
- Make the dough folds. Turn the dough out onto a lightly floured surface and gently pat it down just slightly. Fold the top ⅓ of the dough down towards the center, and then fold the bottom ⅓ up towards the center (like if you were folding up a business letter). Gently pat the dough down once more, and repeat the folds in the opposite direction. Then shape the dough into a round disc ¾ to 1 inch thick (2cm). Cut the dough into equal pie-shaped triangular pieces, or flour a round cookie cutter and cut circles from the dough using an up and down motion only, never twisting the cookie cutter while cutting the dough. Place the cut scones into the freezer for 10-15 minutes, or in the fridge for 30 minutes to 1 hour before baking.
- Preheat the oven. While your scones are chilling, heat the oven to 450°F/230°C.
- Bake the scones. Place the cut scones onto a parchment-lined baking sheet. Brush the tops with cream (or an egg wash) and sprinkle with a little crunchy sugar or homemade strawberry sugar. Bake the scones for 9 to 13 minutes, or until lightly golden brown on top. Scones are best served immediately, but can be stored in an airtight container at room temperature for 2-3 days, or longer in the fridge or freezer. Enjoy!
Notes
Always thoroughly whisk the dry ingredients (i.e. flour, sugar, baking powder, salt, any other dry spices, etc.) together before adding any liquid.
Use cold unsalted butter, never room temperature or warm butter.
Make sure you can see pea-sized butter pieces in your dough.
Do not overmix the scone dough once you've added the liquid (in this case heavy cream).
Do not be afraid of a slightly sticky dough.
Never use a rolling pin to roll out scones (or biscuits).
Always fold the dough onto itself several times.
If you're cutting scones using cookie cutters (round, fluted, square, etc.) never twist the cutter as you're making the cut.
Always refrigerate or flash freeze the cut scones before baking them.
For a sweeter scone, you may add up to ¼ cup more sugar to the dry mixture bringing the total sugar used in the recipe to ½ cup. We enjoy using only ¼ cup sugar in the recipe and adding raw sugar to the tops before baking. Since we like to add jams and clotted cream to our scones.
For freezing the scones, see the instructions in the main post.
Use buttermilk or a buttermilk substitute. Buttermilk can be used in place of the heavy cream if you want a little more tang in your scones. If you're out of heavy cream and buttermilk, just make your own buttermilk substitute by adding 1 tablespoon of fresh lemon juice (or vinegar) to a measuring cup and then add enough whole milk to equal the amount of liquid called for in the recipe. Stir the mixture and let it stand for 5-10 minutes before using.
- Prep Time: 30 minutes
- Cook Time: 13 minutes
- Category: Breads
- Method: Oven Bake
- Cuisine: British
Nutrition
- Serving Size: 1 Scone


Made the Recipe? Tell Us What You Think!