This easy pie crust recipe features lard and butter for the most consistently tender results! In this ultimate pie dough tutorial, you'll learn all the secrets to achieving the flakiest layers, whether you're making sweet dessert pies, quiche, or savory turkey or chicken pot pies. Plus, it's a time-tested recipe that's perfect even for beginner bakers!


About This Pie Dough Recipe
I fell in love with pie making at age 12 when I made my first homemade pie crust using my Mom's 1981 Betty Crocker cookbook. It was flaky (really flaky from the Crisco vegetable shortening) and tender with a pretty standard Granny Smith apple pie filling -- and it was like magic to me!
Flash forward to adulthood -- you won't find vegetable shortening in my pantry or this pie crust (as a born and raised Southerner, I know, this is sacrilege). What youwill find is a combination of all-natural leaf lard and butter -- together these two ingredients make the flakiest, best-tasting homemade single or double pie crust!
If you love this recipe, you might want to try it with this Cherry Crumb-Crunch Pie or Triple Coconut Cream Pie with mile-high meringue.
Jump to:
- About This Pie Dough Recipe
- Why You'll Love This Pie Dough Recipe
- Flaky Pie Crust Ingredients
- How to Make the Best Pie Crust (By Hand or By Food Processor Method)
- How to Make Classic Pie Crust At a Glance (Step-by-Step Recipe Photos)
- Flaky Pie Crust Best Tips
- How to Roll Out Pie Crust (Professional Tips)
- How to Transfer and Decorate Your Pie Crust
- How to Blind Bake & Pre-Bake Pie Crust
- Pie Dough Substitutions
- Pie Crust Variations
- Equipment For Making Pie Dough
- Choosing the Right Pie Plate
- Alternative Tools for Cutting in Fats
- Rolling Pin Guide
- Pie Crust Storage, Freezing, and Meal-Prep Guide
- Common Pie Crust Mistakes to Avoid
- Pie Crust Troubleshooting Guide
- How to Use This Pie Crust
- FAQ
- Looking for More Easy Pie Recipes?
- Related Recipes
- 📖 Recipe
- Food Safety

Why You'll Love This Pie Dough Recipe
- Creates bakery quality flaky, tender layers every time
- Versatile recipe works for both sweet and savory pies
- Made with all-natural ingredients - no hydrogenated vegetable shortening or hydrogenated lard
- Can be made ahead and refrigerated up to 5 days or frozen for up to 3 months
- Step-by-Step Success with detailed instructions for both hand mixing and food processor methods, with clear indicators for when your dough is at the perfect stage
- Consistent Flaky Results: The combination of butter and lard, ensures a flavorful, tender, flaky crust every time

Flaky Pie Crust Ingredients
To make a really good pie crust, all you need is flour, butter, lard, and a little sugar and salt. When making homemade pies, the goal is to get the flakiest, most tender pie crust possible which is why even these simple ingredients (some in very small amounts) matter. Here's why:
Pie Dough Ingredients
- All-purpose flour: I like to use King Arthur's all-purpose flour (11.75% protein) for my pie crusts. Sub Gold Medal, Hecker's, or Pillsbury all-purpose flour.
- Leaf lard: Choose non-hydrogenated leaf lard which is the highest-quality rendered pork fat, sourced from around the pig's kidneys. It's prized by professional bakers for its clean, neutral flavor and ultra-flaky results, this premium lard produces exceptionally tender pie crusts and pastries.
- Unsalted butter: Using unsalted butter allows me to control the total amount of salt for the whole recipe. *See Substitutions below if using salted butter
- Sugar: Using a small amount of granulated sugar helps pie crust by balancing the flavor of the crust without actually sweetening it, helps promote a golden-brown color, and holds onto more water resulting in a more tender crust. Omit the sugar if you have dietary restrictions.
- Salt: Salt is not just for flavor in pie crusts. It plays an important role in pie crust tenderness by controlling gluten development in the flour, preventing your dough from becoming tough. I use Diamond Crystal Kosher salt. If you use table salt, reduce the amount of salt to ½ to ¾ teaspoon. If you omit the salt, work the dough as little as possible to avoid a tough crust.
- Ice-cold water: While you can technically also use really cold tap water (especially if you're using frozen lard and butter pieces), it's worth it to use ice water to help keep the temperature of the pie dough cold while you work with it.
See recipe card for quantities.

How to Make the Best Pie Crust (By Hand or By Food Processor Method)
Don't let homemade pie crust intimidate you. It's easy enough for kids to make it. Below, I show you 2 easy foolproof methods - using a simple pastry cutter (or two butter knives), or using a food processor.
Method 1: Making Pie Crust by Hand
Step 1. Whisk the flour, salt, and sugar together in a medium mixing bowl. Add cold butter and lard, and freeze the mixture for 30 minutes. *Alternatively, freeze the butter and lard pieces and then add them to room temperature flour.
Remove the bowl from the freezer, and cut fats into the flour using a pastry cutter (dough blender) or 2 butter knives criss-crossing in opposite directions until the mixture resembles coarse crumbs with pea-sized pieces of fat.


Step 2. Add ice water 1 tablespoon at a time to the flour mixture, stirring with a fork until the dough just holds together when squeezed. Do not overwork the dough!


Step 3. Divide the dough into equal pieces, flatten slightly into 2 discs, wrap in sustainable cling film, wax paper, or parchment paper, and chill in the refrigerator for at least 1 hour.
Find all the instructions for rolling out and baking one-crust pies, double-crust pies, and how to blind bake a pie crust, down below!
Method 2: Food Processor Pie Crust


Add flour, salt, and sugar to the bowl of a food processor and pulse until the mixture is combined. Next, add the frozen butter and lard to the bowl and pulse until the mixture resembles coarse crumbs with visible pea-sized pieces of fat.


Add 2 tablespoons of ice water and pulse 2-4 times to incorporate. Then add ice water 1 tablespoon at a time pulsing briefly in between just until the dough holds together when squeezed. Do not pulse the dough too much or you'll overwork the dough. Wrap dough discs and chill for at least one hour.
Find detailed instructions in the recipe card.
How to Make Classic Pie Crust At a Glance (Step-by-Step Recipe Photos)

Flaky Pie Crust Best Tips
- Keep all ingredients as cold as possible. The colder your ingredients stay while making the dough, the flakier your crust will be.
- Don't overwork the dough. This activates gluten and make a tough pie crust
- Keep visible flecks of butter and lard in your dough - these create flaky layers when baked.
- Chill dough before rolling
- Roll from center outward, rotating dough ¼ every turn
- Avoid using hydrogenated lard if you can. It's healthier to use fats that have not been through this chemical process.
- If your kitchen is warm, pop your rolling pin in the fridge too - cold tools make pastry work much easier.
How to Roll Out Pie Crust (Professional Tips)
Rolling out pie crust can feel a bit tricky if you're new to it, but it's actually really simple. These cheater techniques below will help you achieve the perfect pie crust thickness and shape every time:

Option 1: Traditional Countertop: For a standard 8 to 9-inch pie plate, roll your dough out on a lightly floured countertop to about 11 to 12 inches in diameter, making it approximately ¼ to ⅛ inch thick.
Option 2: Parchment Paper Method (Best for Beginners): Roll pie dough between two sheets of parchment paper to prevent sticking and avoid adding excess flour. This method gives you more control and helps create an evenly rolled crust.

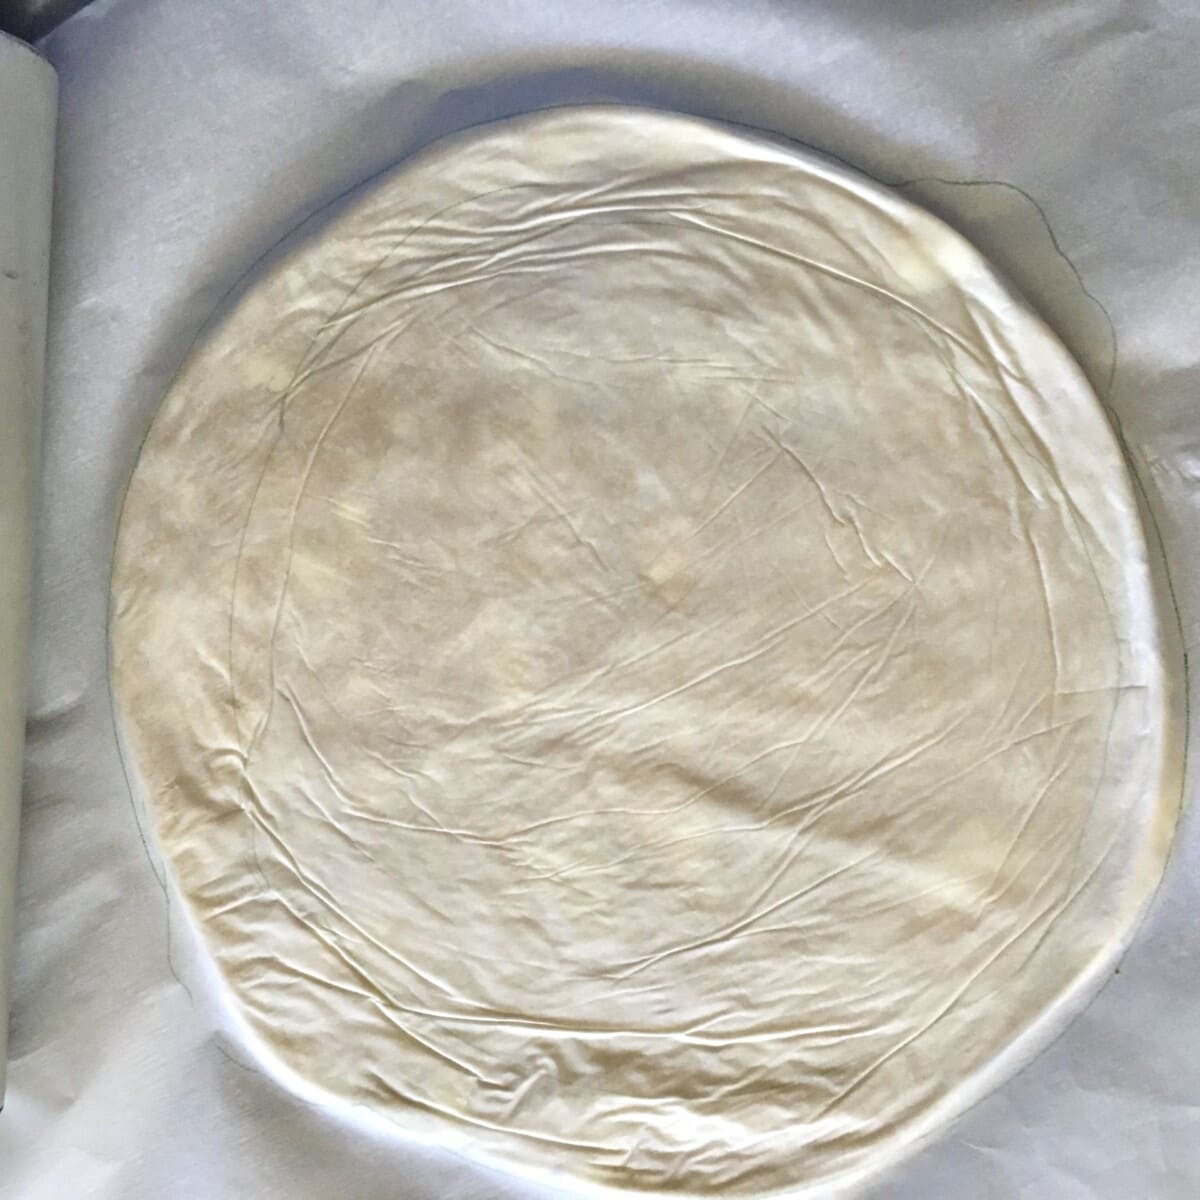
Option 3: Pie Plate Tracing Method: For perfect sizing, trace around an upside-down pie plate on parchment paper, then flip the paper over and use the outline as your guide. Dust the top of the dough and your rolling pin with flour and roll the dough out 1½ to 2 inches larger than your traced circle.

Option 4: Silicone Mat (Silpat) Method: A non-stick silicone mat with pre-marked measurements ensures consistent results. While convenient for frequent bakers, the parchment paper method works just as well. Just be sure to lightly dust the mat and your rolling pin to avoid sticking.
How to Transfer and Decorate Your Pie Crust


For Double Crust Pies, keep one disc chilled while working. On a lightly floured surface, roll from the center outward to ¼-inch thickness, rotating occasionally. Your dough should extend 2-3 inches beyond your pie plate's edges.


To transfer, loosely wrap the dough around your rolling pin, center it over the pie plate, and gently unroll. Lift edges and ease dough into the pie plate - don't stretch! Press out any air pockets.


Trim dough to a 1-inch overhang. For a single crust, fold the excess dough under to create a thick edge. For double crust, leave overhang until adding the top crust. Create your decorative edge by pinching or fluting, and pressing firmly against the rim to seal without leaving gaps.
Chill the dough-lined plate while preparing the filling or rolling out the top crust. This prevents shrinkage and maintains your design. Now you're ready to fill or blind bake!
How to Blind Bake & Pre-Bake Pie Crust
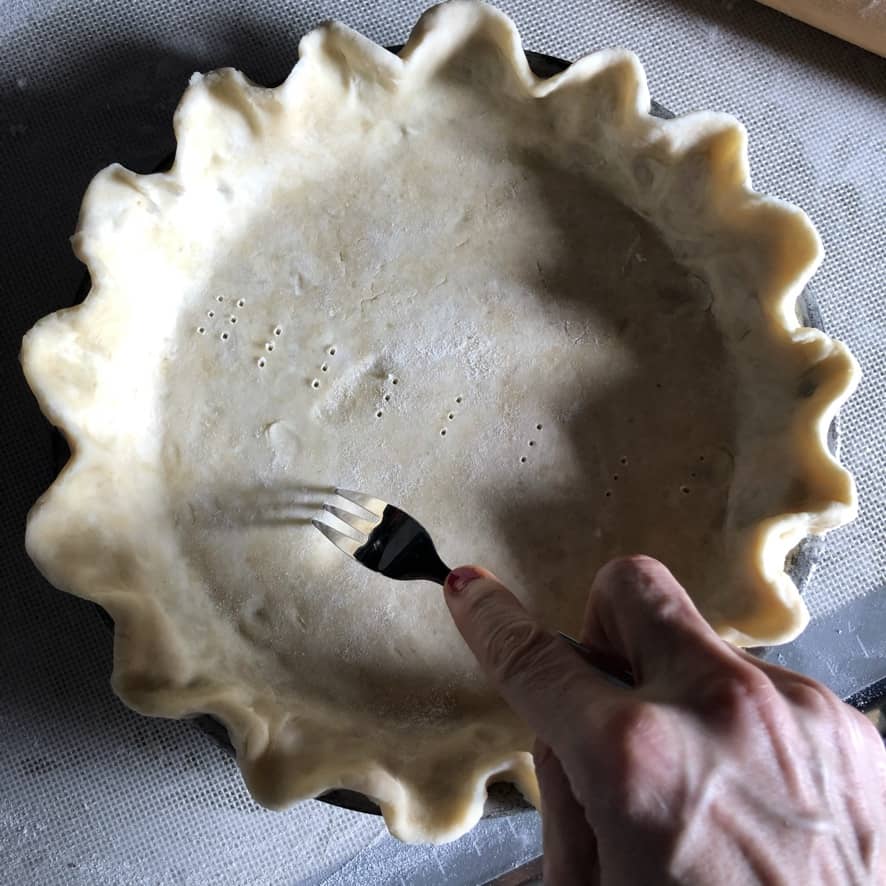
Once you have the pie dough in the pie plate, trimmed, fluted, and ready to go, place it back into the freezer for at least 15 minutes to chill.When ready to bake, use a fork to prick holes in the bottom and the sides of the dough to prevent bubbling.
Line the pricked pie dough with parchment paper, and place dried beans, rice, or ceramic pie weights directly on top to hold the dough down. *Once cooled, store DIY pie weights in a glass Mason jar, seal and reuse them year-round. It's cheap, natural, and effective.


Bake in a preheated 425°F/200C° oven for 15 to 18 minutes or until golden brown (and up to 20 minutes if desired for a pie that will not be baked again once the filling is added like a coconut cream pie).
Remove the parchment and pie weights during the last 5 minutes of baking to ensure the bottom is fully cooked. Remove the pie shell from the oven to a wire rack to cool completely to room temperature before filling.

Pie Dough Substitutions
- All-butter pie crust: Substitute the lard with an equal amount of butter to make a vegetarian pie crust
- All-lard pie crust: Substitute butter with an equal amount of lard
- Vegan pie crust: Use non-hydrogenated vegetable shortening in place of both butter and lard (avocado vegetable shortening or any other trans-fat-free vegetable shortening)
- Vodka Pie Crust: Replace ½ of the ice water called for with ice-cold vodka
- Vinegar Pie Crust: Replace ½ of the ice water called for with apple cider vinegar
- Salted butter: If using salted butter, reduce the amount of kosher salt added to the recipe from 1 teaspoon down to ¾ teaspoon

Pie Crust Variations
- Sweet pie crust version: Add 2 additional teaspoons sugar for dessert pies
- Savory pie crust version: Omit sugar for pot pies and quiches (if desired)
- Single pie crust: Use half the ingredients for one pie shell
- Gluten-free crust: Replace AP flour with a 1:1 gluten-free baking flour blend, add ¼ teaspoon xanthan gum if your blend doesn't include it
- Dairy-free crust: Use cold refined coconut oil in place of butter (refined has no coconut taste)
- Sugar-free crust: Omit sugar entirely or use monk fruit sweetener in equal amounts
- Low-Sodium Pie Crust Recipe: (see below)
Low-Sodium Pie Crust Adaptation
For those on a low-sodium diet who need to omit salt from their pie crust, here's how to adapt your recipe while maintaining a tender texture:
Key Modification
Replace half of the recipe's ice water with either:
- Cold vodka OR
- Apple cider vinegar
Why This Works
While salt is traditionally important in pie crust, both vodka and vinegar help create tenderness by inhibiting gluten development. This helps compensate for the textural benefits you'd typically get from salt.
Important Note
This is specifically for those who must follow a low-sodium diet for medical reasons. If you don't have dietary restrictions, including salt in your pie crust is recommended for optimal texture and flavor.
Equipment For Making Pie Dough
- Large mixing bowl
- Pastry cutter/dough blender (or two butter knives), or food processor
- Rolling pin
- Pie plate (8-inch or 9-inch) *see below for my recommendations
- Sustainable cling film (or wax paper or parchment paper)

Choosing the Right Pie Plate
I own and use every kind of traditional pie plate, but I'm partial to my vintage aluminum (un-coated) pie tins. Use what you have but keep these details in mind:
- Glass pie plates: Best for even baking and monitoring bottom crust browning. Great for beginning bakers.
- Uncoated Metal pie plates: Conduct heat quickly, producing crisp crusts. Ideal for blind-baked (pre-baked and par-baked) shells.
- Non-stick pie plates: (NOT RECOMMENDED) I avoid using traditional non-stick bakeware (or cookware) to lessen my family's exposure to harmful PFAS (PFTE, PFOA, etc.), but also because dark colored non-stick pie plates and bakeware tend to cause too much browning.
- Ceramic pie plates: Beautiful for serving, but may need longer baking times. Better for experienced bakers who can gauge doneness.
Alternative Tools for Cutting in Fats
- Two butter knives: Criss-cross knives through mixture like scissors
- Box grater: Grate cold butter before mixing into flour (I personally find this option unnecessary extra work)
- Fingers: Pinch and rub fats into flour (work quickly to keep ingredients cold)
Rolling Pin Guide
- Classic wooden pin: Traditional choice, maintains cool temperature
- French rolling pin: Offers better control for experienced bakers
- Marble rolling pin: Stays cold longer, ideal for warm kitchens
- Rolling pin rings: Guides for consistent thickness (helpful for beginners)

Pie Crust Storage, Freezing, and Meal-Prep Guide
One of the best things about this easy pie crust recipe is its make-ahead versatility. Here's your complete guide to storing, freezing, and preparing pie crust ahead of time:
Refrigerator Storage (Up to 5 Days)
- For Dough Discs: Wrap tightly in sustainable cling film, wax or parchment paper. Place wrapped discs in an airtight container or zip-top bag for extra protection.
- For Shaped Crusts: Cover shaped pie crust with sustainable cling film, then wrap the entire pie plate in foil. Store for up to 24 hours away from aromatic foods with strong odors before filling.
- How to Tell If Pie Dough is Still Fresh: Properly stored dough should smell buttery and feel cold and firm. Discard if you notice any grey coloring, off smells, or moisture collecting in the wrap.
Freezer Storage (Up to 3 Months)
- For Dough Discs: Wrap each pie dough with sustainable cling film or wax paper, then place in a freezer bag. Press out all air before sealing. Label with date and "Homemade Pie Crust."
- For Shaped Crusts: Flash freeze the shaped crust in the pie plate for 1 hour until firm. Wrap entire plate well with sustainable cling film, then foil. Place in a large freezer bag and freeze. *To reduce plastic use, wrap the frozen pie crust in wax paper and then in heavy-duty aluminum foil and place in an airtight container.
- For Par-Baked Shells: Cool completely, wrap tightly, and freeze. Perfect for making cream pies ahead of time.
- Prevent Freezer Burn: Use heavy-duty freezer bags or wrap, remove all air, and store away from aromatic foods with strong odors.

How to Thaw Pie Dough
- Refrigerator Method (Best): Thaw dough discs overnight in the refrigerator. Allow 10-15 minutes at room temperature before rolling.
- Quick Thaw (If Needed): Let dough discs sit at room temperature for 30-45 minutes before rolling. Don't microwave or use warm water, which can melt the fats.
- Shaped Crusts: Thaw overnight in the refrigerator, keeping wrapped until ready to fill. Or thaw frozen pie crust on the countertop at room temperature for 10-20 minutes until firm and still cold but not frozen solid. Use as directed in your recipe.
Holiday Pie & Batch Baking Tips
- Making Multiple Crusts: If you're using a scale and gram measurements, you can easily double the recipe and divide the dough into 4 equal pieces. But if you're new to pie making and using traditional measuring cups, I'd recommend making separate batches to ensure proper consistency. Label each with intended use (e.g., "For Apple Pie - Bottom Crust").
- Organization: Stack wrapped discs with squares of parchment between them. Store in airtight containers marked "Sweet" or "Savory" crusts and the date.
- Timeline: Prepare crusts up to 3 months before big holidays. Par-bake shells up to 1 month ahead for cream pies.
- Reviving Stored Dough: If edges seem dry after storage, very lightly moisten hands with cold water when shaping. Add an extra fold or two when rolling to redistribute moisture.

Common Pie Crust Mistakes to Avoid
- Using warm ingredients or letting butter soften
- Overworking the dough when mixing or rolling
- Not chilling long enough between steps
- Rolling dough too thin or unevenly
- Stretching dough to fit the pie plate
- Adding too much flour when rolling
- Uneven crimping causing inconsistent baking
- Skipping the docking step when blind baking
Pie Crust Troubleshooting Guide
- Crust is cracking while rolling: Dough is too cold or too dry. Let rest 5-10 minutes at room temperature, or lightly mist with cold water.
- Crust shrinks during baking: Dough was stretched rather than rolled. Re-roll, ensuring you're lifting and placing, never stretching.
- Edge loses its shape: Dough too warm or edge not firmly pressed in. Chill shaped crust well before baking.
- Soggy bottom crust: Brush lightly with beaten egg whites before filling, or place pie on lowest rack or preheated baking sheet. Also, metal pie tins conduct heat better and more quickly than ceramic or glass pie plates which almost always guarantees a perfect crust.
- Dough sticks to counter: Too warm or too wet. Add minimal flour, one tablespoon at a time, or use parchment paper or Silpat method.
Remember: Most pie crust issues can be solved by keeping ingredients cold and handling the dough gently.
How to Use This Pie Crust
Perfect for all types of pies, from fruit pies to cream pies to savory pot pies. Simply use as directed in your pie recipe


FAQ
If you're new to making pie crusts, you might be wondering how thick or thin you should roll it out. A typical pie crusts get rolled out to about 11 to 12 inches for 8 and 9-inch pies, respectively. Check out my comprehensive how-to roll out pie dough guide (with photos) above. It takes the guesswork out of it for you.
Yes! You can substitute butter 1:1 for shortening in any pie crust recipe. However, all-butter pie dough is slightly less forgiving. If you want the best of both worlds without the chemicals or transfats, use a combination of all-natural leaf lard and butter (like this recipe).
Yes and the dough can be refrigerated for up to 3 days or frozen for up to 3 months which is why meal-prepping pie crusts for the holidays is smart and will save you so much time.
Butter provides flavor while lard creates flakiness and tenderness. Using both gives you the best of both worlds.
Yes, substitute the butter and lard with vegetable shortening in equal amounts.
There are several effective ways to roll out pie dough without a rolling pin. Here are the best rolling pin hacks/alternatives:
Wine Bottle (best option):
-Clean and remove the label from an empty wine bottle. The smooth glass surface and cylindrical shape work similarly to a rolling pin. The weight of the bottle helps with even pressure.
Glass Water Bottle (will work in a pinch):
This is similar to the wine bottle method, just make sure it's clean and dryThe wider diameter works well for larger pieces of dough.
Tall Drinking Glass (worst option):
Use a smooth, sturdy glass with straight sides, hold it horizontally and roll.
You may need to work in smaller sections due to the shorter length.
Overworking the dough or using too much water in your pie dough can activate gluten development creating a tough (not tender) pie crust.
Stretching the dough when placing it in the pie plate instead of lifting and laying it in, not letting it rest between rolling and baking, or not pressing the dough firmly against the pie plate (leaving air gaps between the dough and plate) before baking can all lead to your pie crust shrinking.
The dough is too warm or the fat has started to melt, or you didn't flour your rolling pin before getting started. Alternatively, you may need more flour on your work surface. If your dough is just too warm, pop it into the freezer for 15 minutes or so before working it.
Yes, absolutely. Overworking develops gluten, which makes pie crust tough and chewy instead of flaky and tender.
Looking for More Easy Pie Recipes?
Here are a few of our favorite pie recipes that are always crowd-pleasers!


Related Recipes


Let's get started!
Print📖 Recipe

Flaky Butter and Lard Pie Crust (Easy Recipe)
- Total Time: 1 hour 45 minutes
- Yield: One 9-inch Double Pie Crust
Description
This easy flaky pie crust recipe is an old-fashioned pie crust that's withstood the test of time! A perfectly buttery, flaky, and foolproof pie crust every time. This versatile dough works beautifully for both sweet and savory pies. Check out my the ultimate pie crust tutorial in the main post for step-by-step photos, pro tips, and techniques to achieve bakery-worthy results even if you're a beginner baker!
Ingredients
Double Pie Crust Ingredients
- 2 cups all-purpose flour (240g )
- ⅓ cup + 1 tablespoon cold lard, pinched off into ½ inch pieces (90g)
- ⅓ cup + 1 tablespoon cold butter, cut into ½ inch pieces (90g)
- 2 teaspoons sugar (8g)
- ½ teaspoon kosher salt (2g)
- 4 to 7 tablespoons of ice-cold water (60 to 105g)
Single Pie Crust Ingredients
- 1 cup all-purpose flour (120g)
- 3 tablespoons of butter (45g)
- 3 tablespoons lard (45g)
- 1 teaspoon sugar (4g)
- ¼ teaspoon kosher salt (1g)
- 2 to 3 tablespoons ice-cold water (30 to 45g)
Instructions
- Cut the fat into the flour mixture. Using a dough cutter or two butter knives, cut the cold butter and lard into the flour mixture until it resembles coarse pea-sized crumbles. *see main post for food processor pie crust method
- Add the cold water. Add cold water 1 tablespoon (15g) at a time, stirring with a fork until the mixture leaves the sides of the bowl. Test it by squeezing - if the dough holds together, it's ready. If it's crumbly, add more water until it just holds together, avoiding a wet or sticky texture.
- Chill the dough. Divide the dough into 2 equal discs, wrap in cling film, chill in the fridge for 1 hour (or in the freezer for 25 minutes until firm but not frozen).
- Roll out the dough & get it into the pie plate. Work quickly with one chilled dough disc at a time. Roll it out onto a floured surface to ¼-inch thickness. Roll the finished dough onto the rolling pin to transfer it to the pie plate. Press it down into the sides, trim the dough to a 1-inch overhang, create a decorative edge being sure to secure it to the sides of the pie plate.
- Chill the dough-lined pie plate. Refrigerate while rolling out your second crust. Use it as your pie crust calls for, Enjoy!
Notes
Essential Pie Crust Tips (find in-depth tips and techniques in the main post)
- Freeze the diced butter and lard chunks to get them cold before cutting them into the flour mixture
- This recipe can easily be halved if you need a single crust
- Always scoop and level when measuring flour
- Do not skip dough rest/chill time
- Using a scale ensures consistent results
- Visible butter/fat flecks should remain in dough
- Always start with cold ingredients and keep cold while mixing
- Don't overwork dough after adding liquid
- Prep Time: 15 minutes
- Rest Time: 1 hour
- Cook Time: 30 minutes
- Category: Pies + Cobblers + Crostate
- Method: Mix & Stir
- Cuisine: American
Nutrition
- Serving Size: ⅛
- Calories: 290
- Sugar: 1g
- Sodium: 100mg
- Fat: 21g
- Saturated Fat: 10g
- Unsaturated Fat: 11g
- Trans Fat: 0g
- Carbohydrates: 23g
- Fiber: 1g
- Protein: 3g
- Cholesterol: 35mg
Food Safety
- Keep ingredients cold throughout preparation
- Refrigerate dough promptly
- Use clean equipment and work surfaces
- Don't leave dough at room temperature for extended periods
See more guidelines at USDA.gov.


FritchFry says
This is my new go-to pie crust! I've been looking for a good crisco substitute because I can't in good conscious feed that to my family anymore). I was hesitant about using lard but it's a perfect substitute and along with the butter, it tasted great too. So tender and much flakier than my all-butter recipe. My apple pie has never looked or tasted better😍! THANK YOU!
Katie F. says
Been making pies for 30 years and this might be my new go-to recipe. The texture is just incredible. Bring on the holidays!
Flora says
This is the best pie crust we've ever made! I kept the dough nice and cold throughout the process (which will be even easier to do in the fall when it's not so warm in the kitchen). It was not only the most tender flaky crust I've ever made without Crisco, it also has exceptional flavor🤗. Thank you for the recipe! I'll be using this for all of my thanksgiving and christmas holiday pies from here on out!