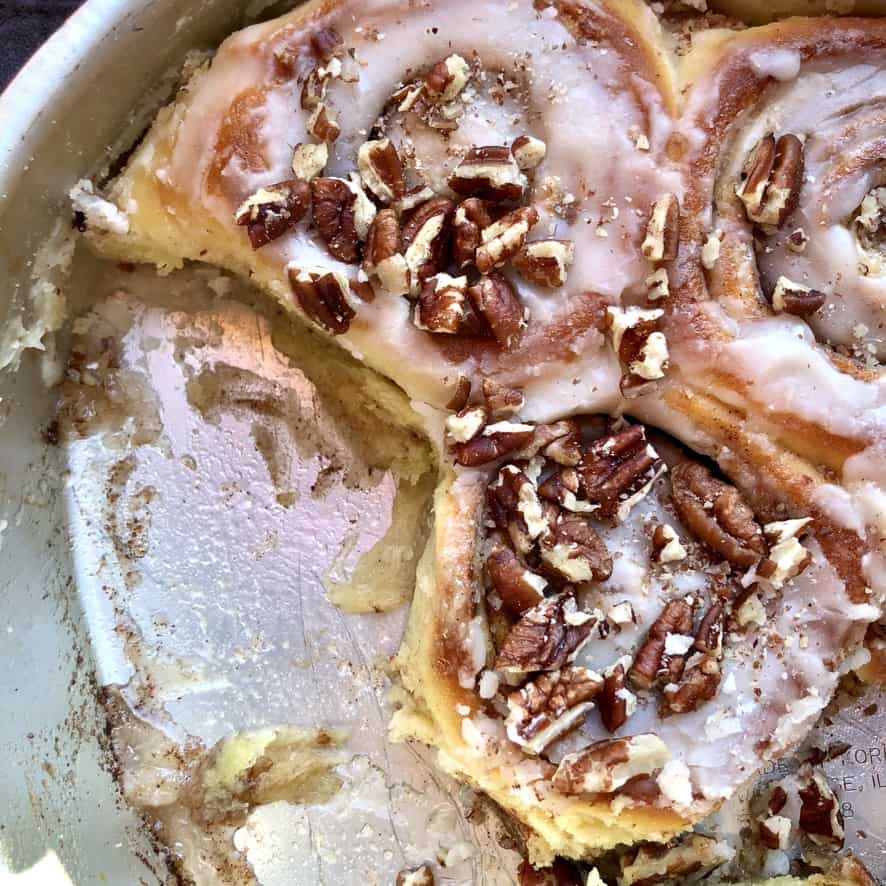
This easy homemade cinnamon roll recipe is made 100% from scratch (and we happen to think they're the best cinnamon rolls ever). Anyone who knew my Mom also knew her locally famous cinnamon rolls.
These buttery, fluffy-soft, ooey-gooey cinnamon-swirled sweet rolls were some of the first items to sell out at local bake sales and fundraisers (with many a pre-order made beforehand).
They're as tender on days 2 and 3 as they are the day they're baked! Plus, they freeze really well, making them a great recipe to meal prep for holiday company or Christmas brunch!
I rarely do any "storytelling" about my recipes here on my site, mostly because, when I want a recipe, I just want the recipe...not a story about someone's granny's uncle's sister's fried pie or pumpkin bread.
That said, these cinnamon rolls are an exception, but the explanation is quick, I swear! One of my earliest ever childhood memories is helping my Mom make these cinnamon rolls. She'd let me punch down the dough after the first rise.
Then she'd tell me to "Pinch off a piece and taste it so you know it's good!" After she rolled out the dough, I'd get to smear butter all over it.
She'd sprinkle on the cinnamon and sugar, and I'd plaster my hands in the sweet mixture and then lick my hands until I was in a sugar coma😜. Believe me when I tell you, this recipe isn't just one of my best childhood memories - it's a keeper!

Why You'll Love These Cinnamon Rolls
- You only need 9 basic pantry ingredients to make them (10 if you include salt)
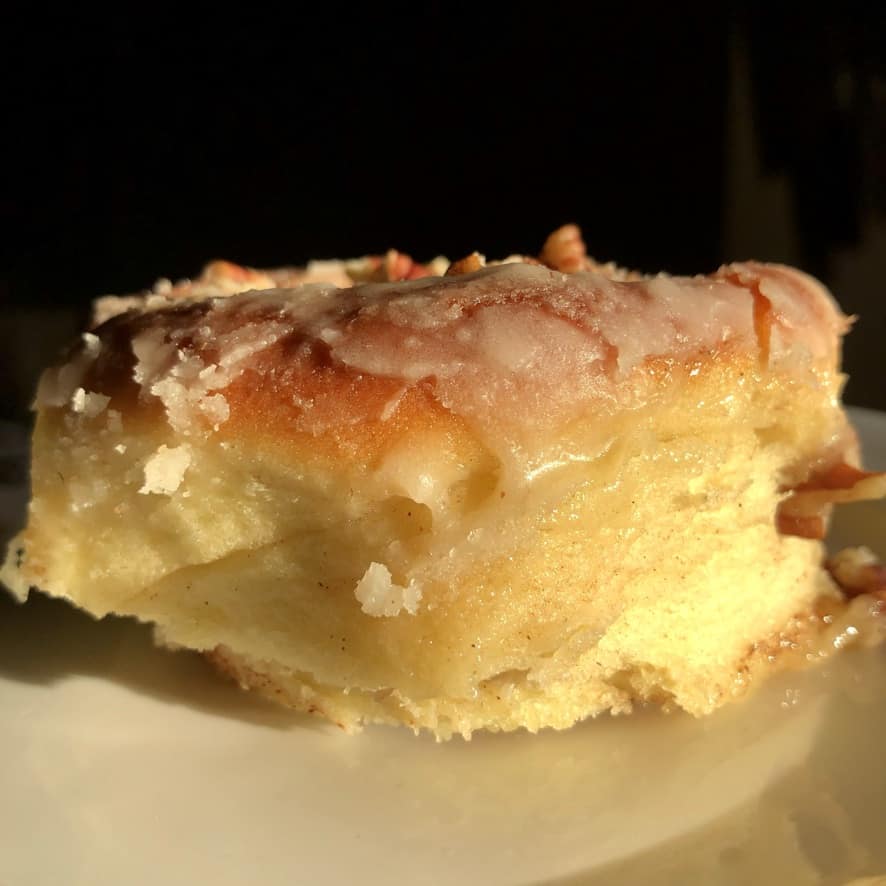
- They're super soft and fluffy (even days after being baked)
- You can freeze them for an easy weekday breakfast
- They're perfectly buttery and cinnamon-sugar spiced
- They taste great dipped into hot coffee
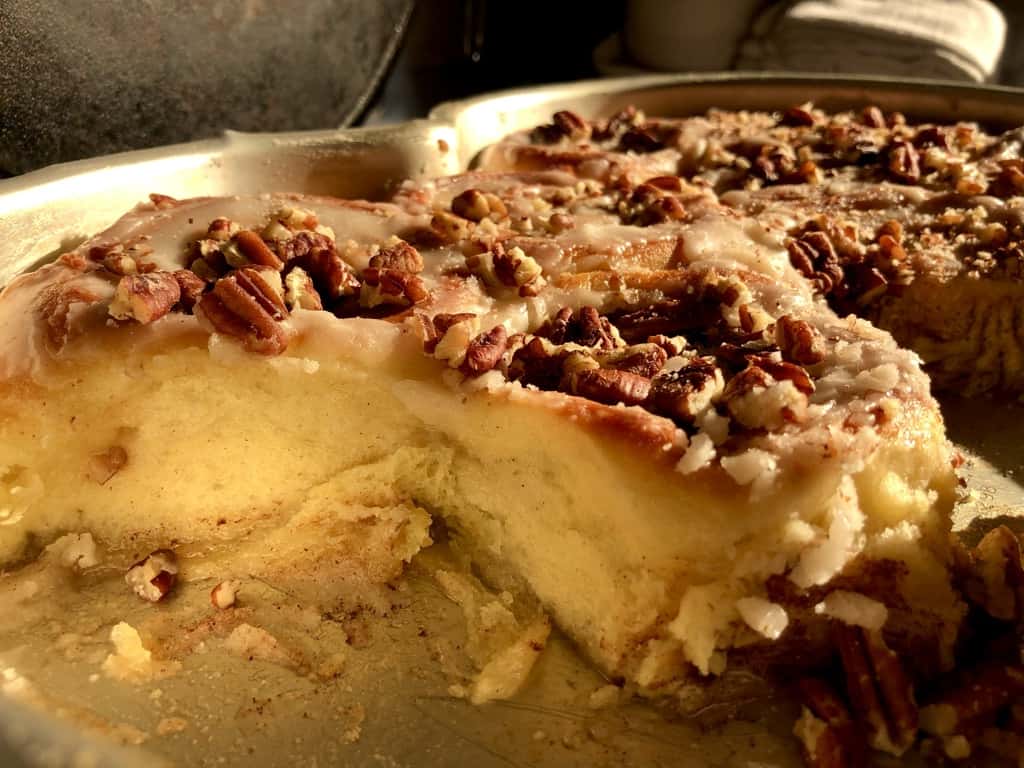
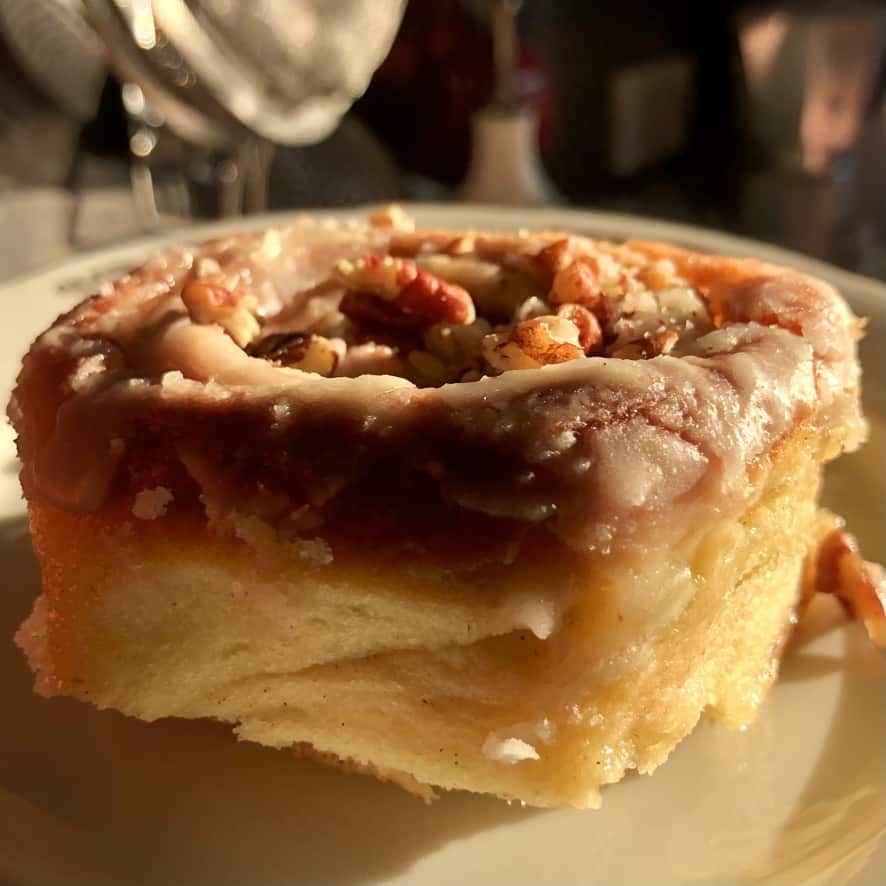
- Every bite of these is as good as the last (not just the center part)
How Do I Know When Cinnamon Roll Dough (Sweet Roll Dough) Is Properly Kneaded?
When working with yeast dough, it's important to make sure it's been properly kneaded to form a good gluten network (structure).
This is what gives bread its light, soft, and stretchy texture instead of being dense and heavy.
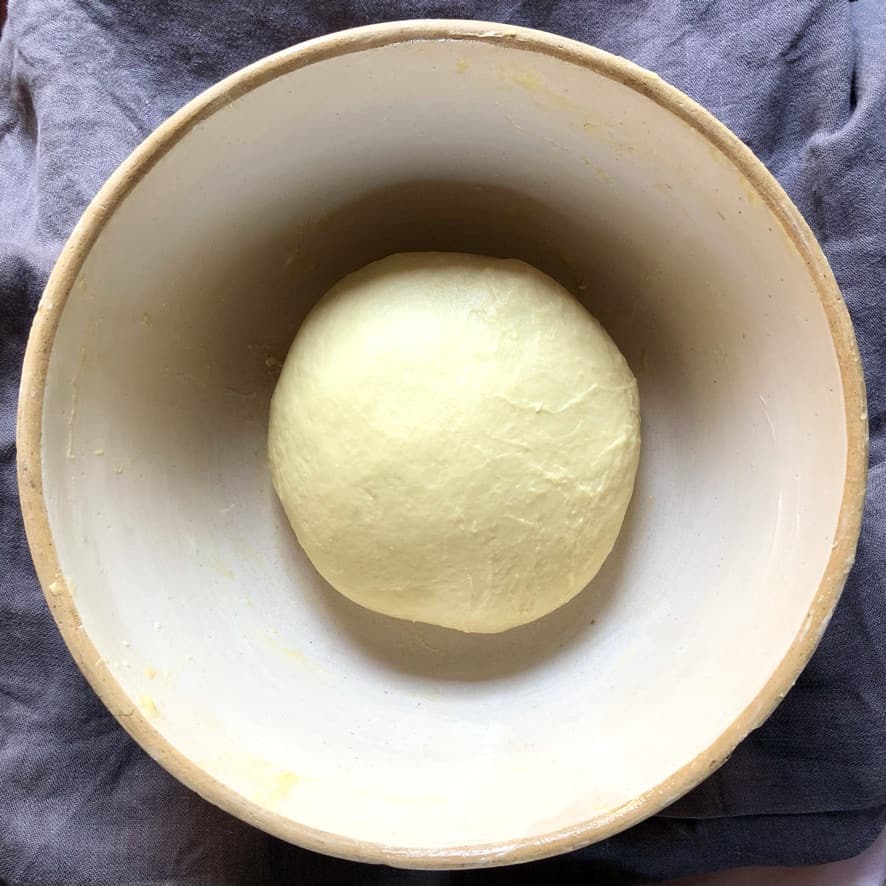
When hand-kneading, I typically put all of my weight into each "turn" and knead for 10 to 15 minutes, depending on the dough I'm making (15 minutes in this case).
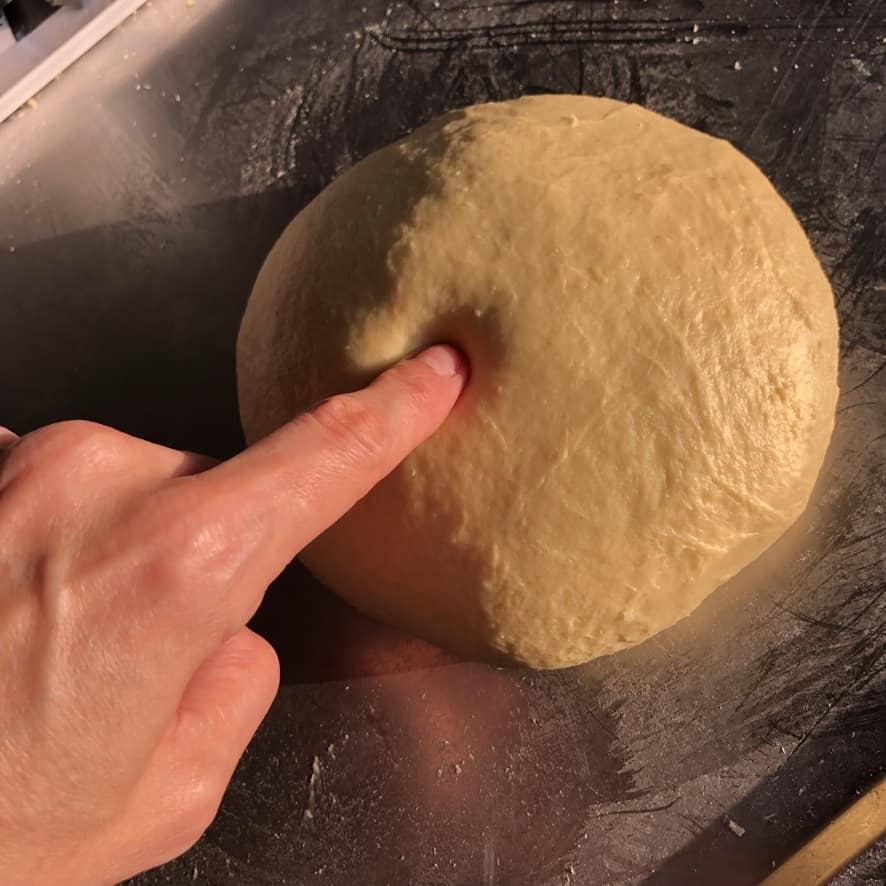
I've included a few tips for beginners as well as photos (below) of how the dough will look from the beginning stages of kneading until it's been kneaded properly.
- The dough should be pliable and soft when it's properly kneaded.
- It should look smooth and no longer have a shaggy appearance.
- The dough should not be sticking to your hands.
- When you press your finger gently into the dough, it should leave a slight indentation.


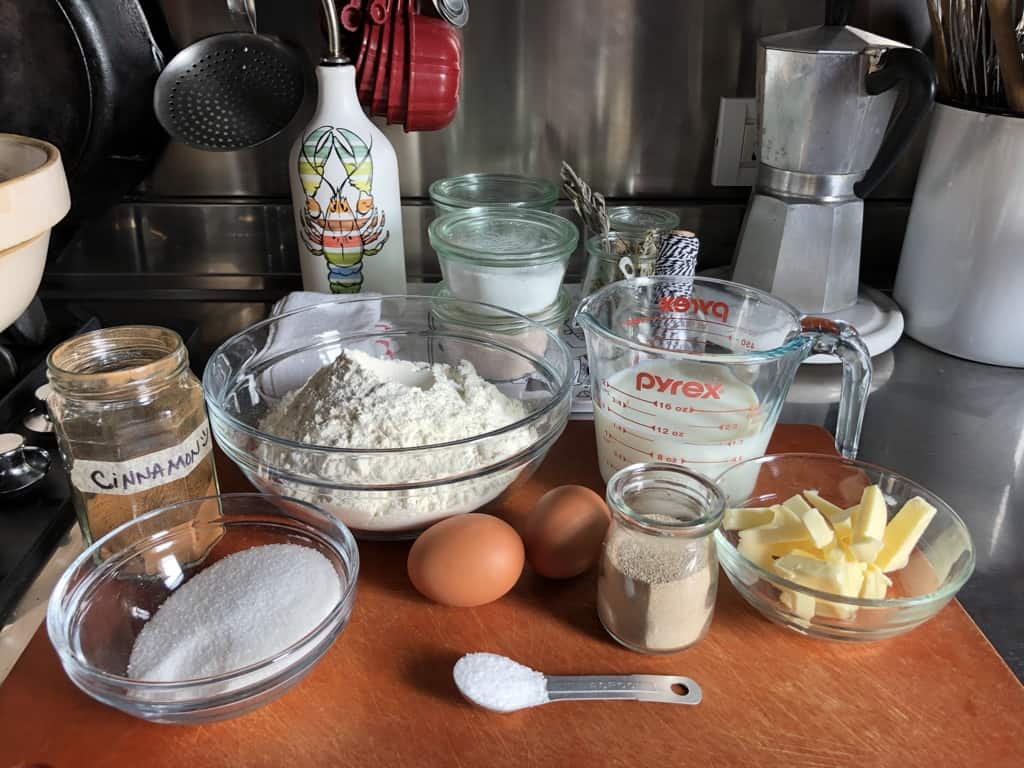
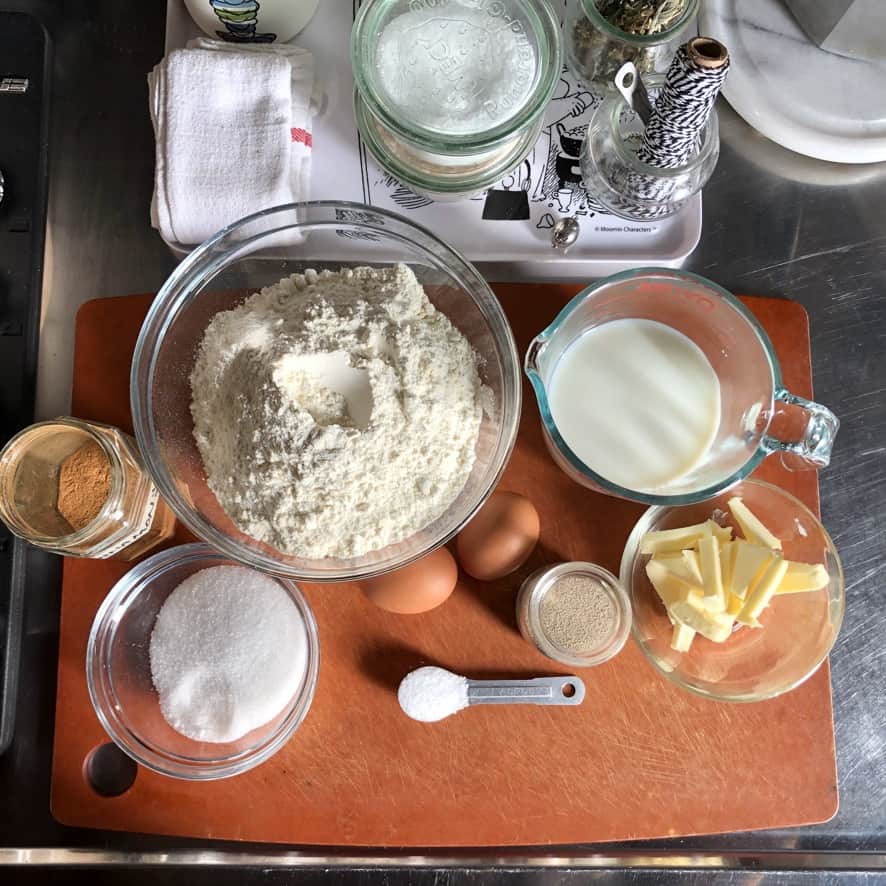
Mom's Cinnamon Rolls Ingredients
Here are the only 9 ingredients (10 if you count salt) needed to make the best cinnamon rolls.
For the Cinnamon Roll/Sweet Roll Dough
- all-purpose flour or 00 flour
- instant yeast (substitute active dry yeast)
- large eggs
- whole milk or substitute evaporated milk (evaporated milk will create a slightly richer cinnamon roll, which also tastes great)
- unsalted butter (if using salted butter, there's no need to sprinkle the cinnamon-sugar filling with salt before rolling up the dough and slicing)
- sugar
- cinnamon
For the Cinnamon Roll Icing
- powdered sugar
- vanilla
- salt
Understanding How Much Flour to Add
Like many family recipes, my Mom's original instructions say to use "3 ½ cups of flour and gradually add more until the dough no longer sticks to your hands."
For new bakers, this can be frustrating. How much is "more"? I've taken the guesswork out by weighing and measuring everything precisely. And I show you with step-by-step photos what the dough consistency should look like at every stage.
My Tried and Tested Flour Amounts
Starting flour: (490g) 3 ½ cups
Additional flour I added: (195g) 1 ¼ cups + 2 tablespoons
Total flour used: (685g) 4 ¾ cups + 2 tablespoons
Important Notes
Your flour needs may vary slightly based on the humidity of your environment and the absorption potential of the flour. Therefore, you may need to use a little more or less than this total amount.
My Recommended Method For Exactly How Much Flour to Add
- Measure your flour in two batches:
- Bowl 1: 3 ½ cups (490g) - mix this with the yeast
- Bowl 2: 1 ¼ cups + 2 tablespoons (195g) - set aside
- Once your dough looks sludgy, transfer it to your work surface.
- Gradually add flour from Bowl 2 a little at a time until the dough no longer sticks to your hands.
- Use my step-by-step photos below as a visual guide for the correct texture.
How to Make Cinnamon Rolls Step-by-Step
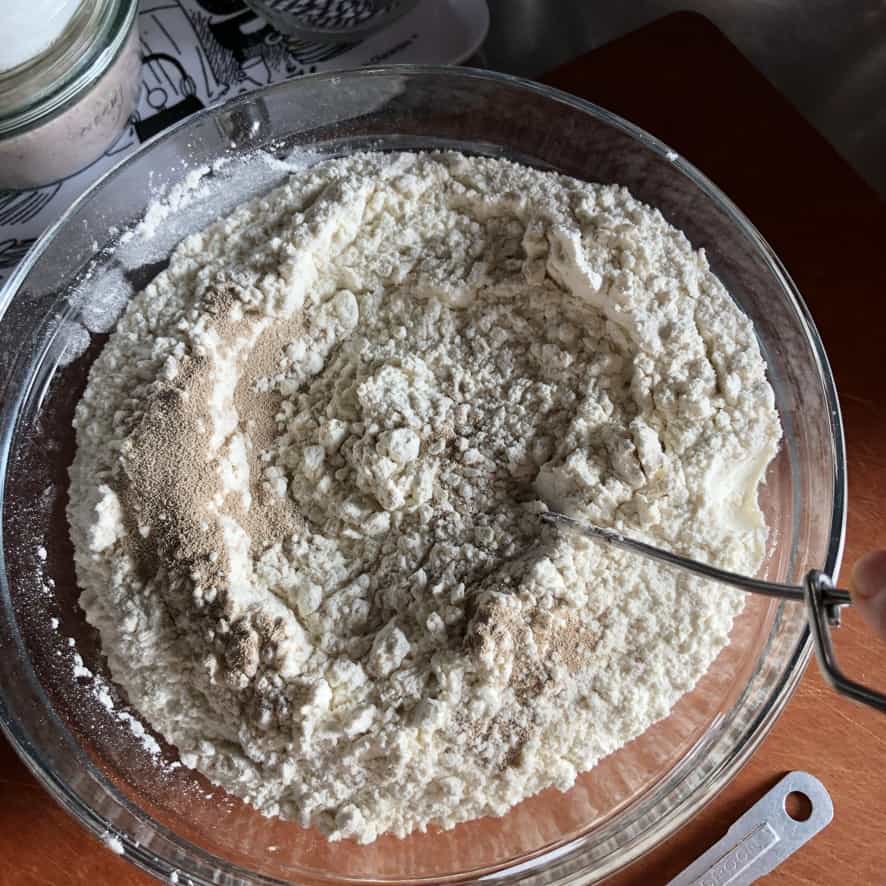
Step 1. Measure the dry ingredients. In a medium bowl, whisk together 3 ½ cups (490g) flour and instant yeast, and set aside.
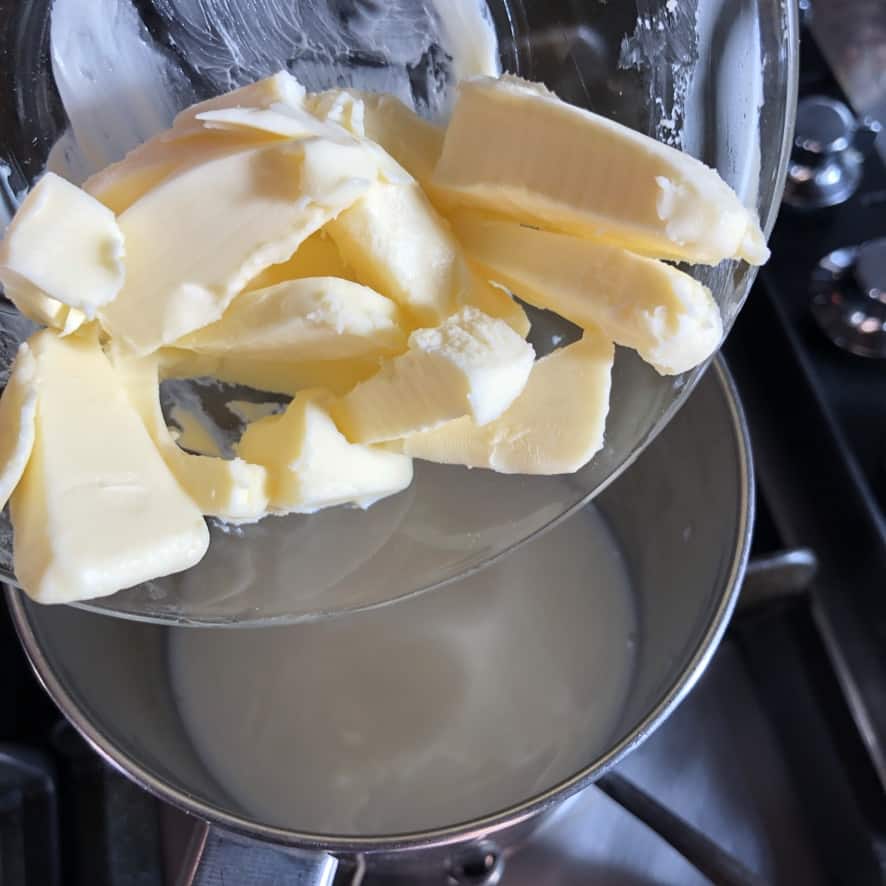
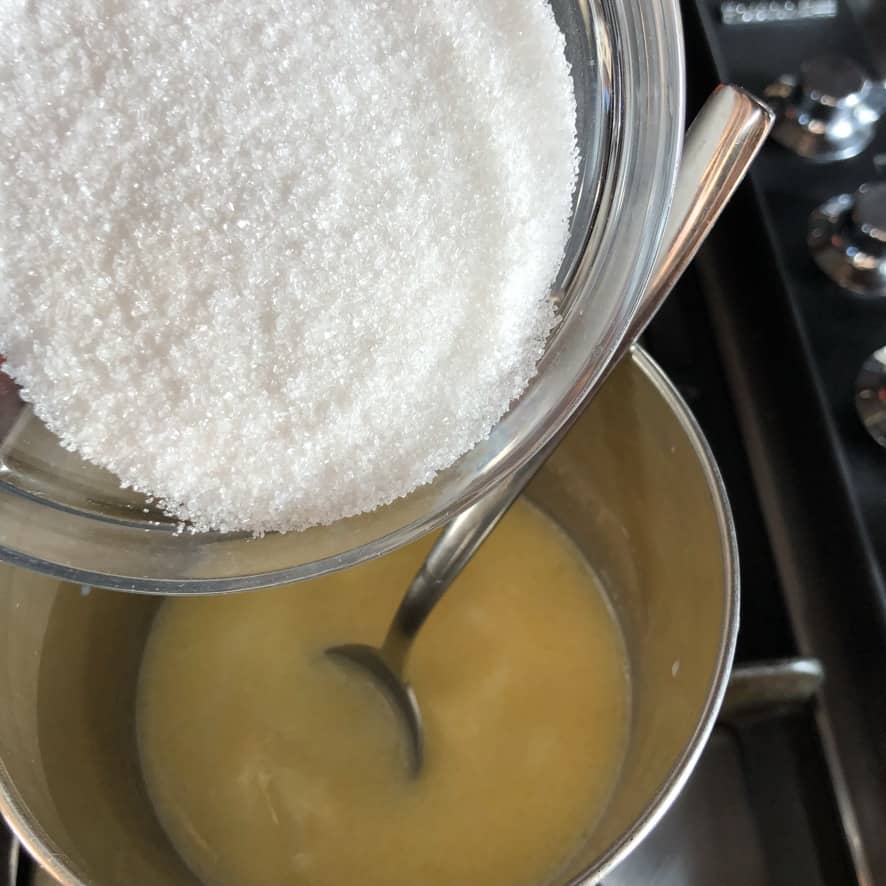
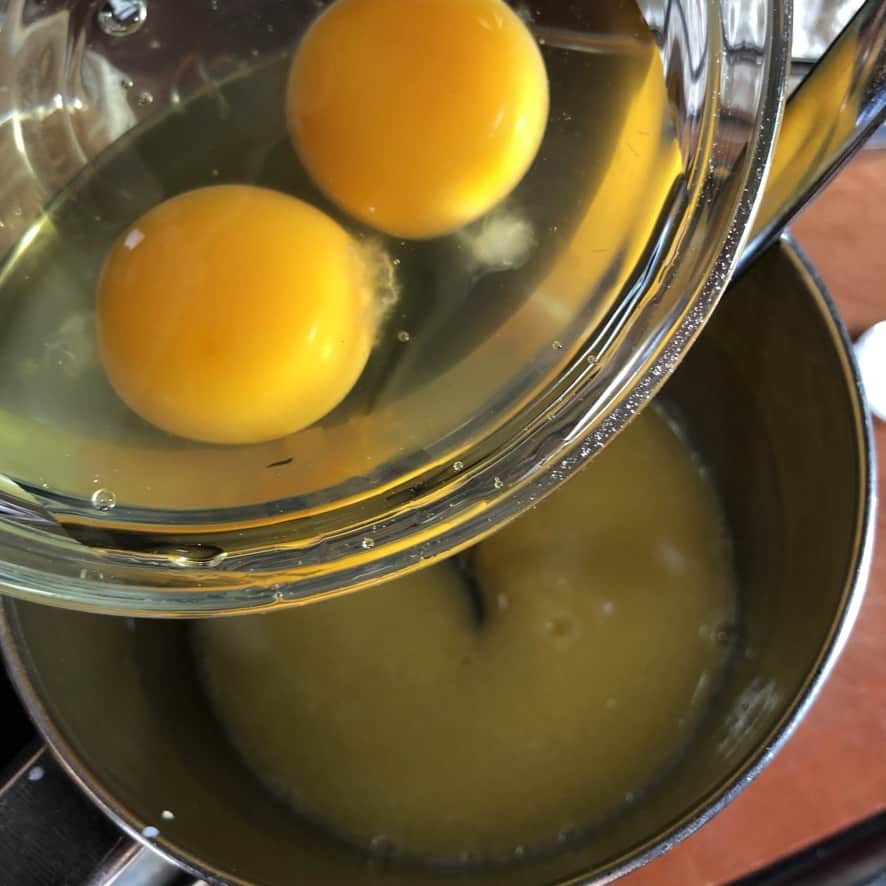
Step 2. Warm up the milk & combine the wet ingredients. Warm the milk, then add butter, sugar, salt, and eggs, and whisk until just combined. *The milk should be just warm, not hot, or it will kill the yeast when added to the flour mixture.
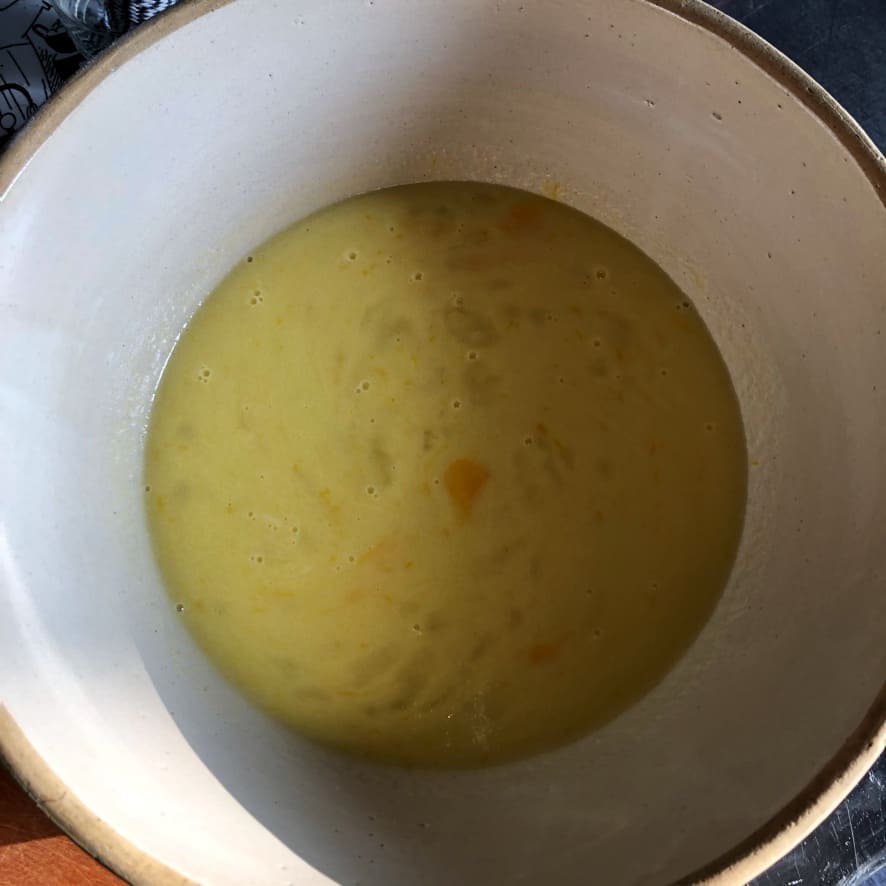
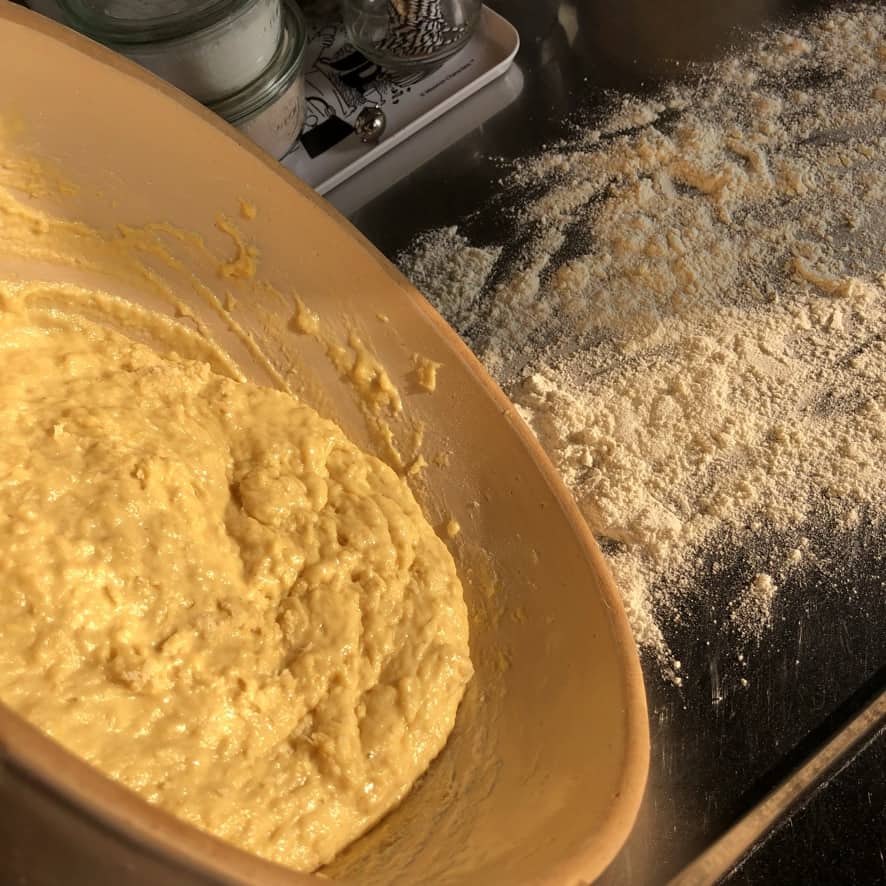
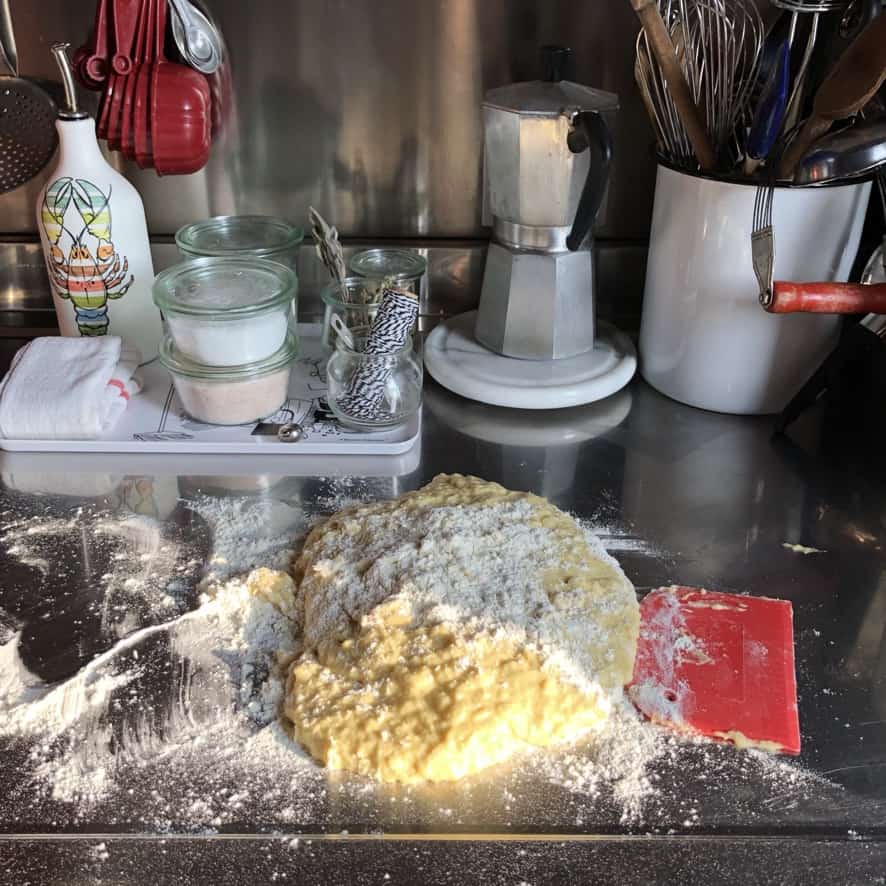
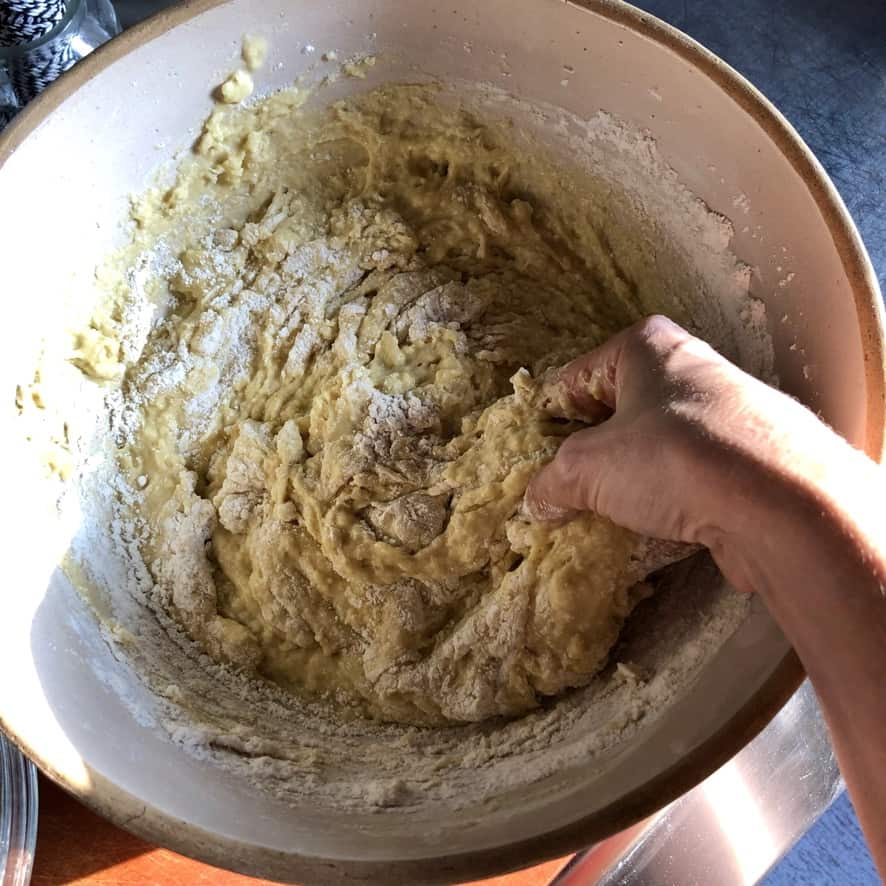
Step 3. Combine the wet & dry ingredients. Add the warm milk mixture to a large mixing bowl and gradually add the flour-yeast mixture, mixing to combine using a fork or your hands.
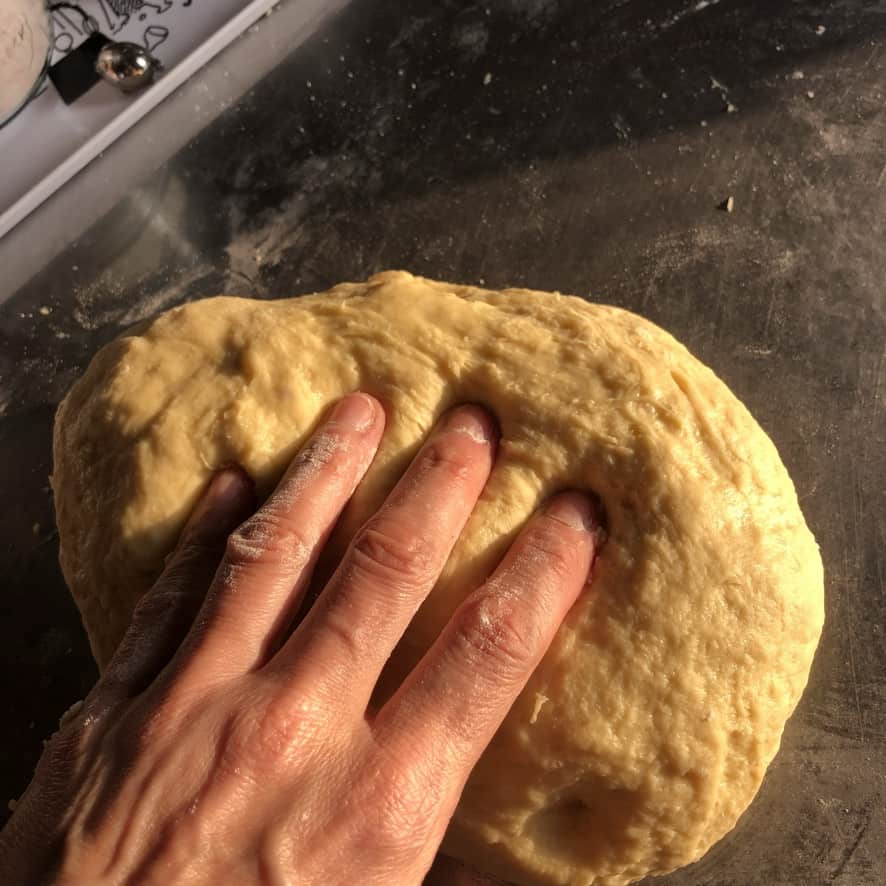
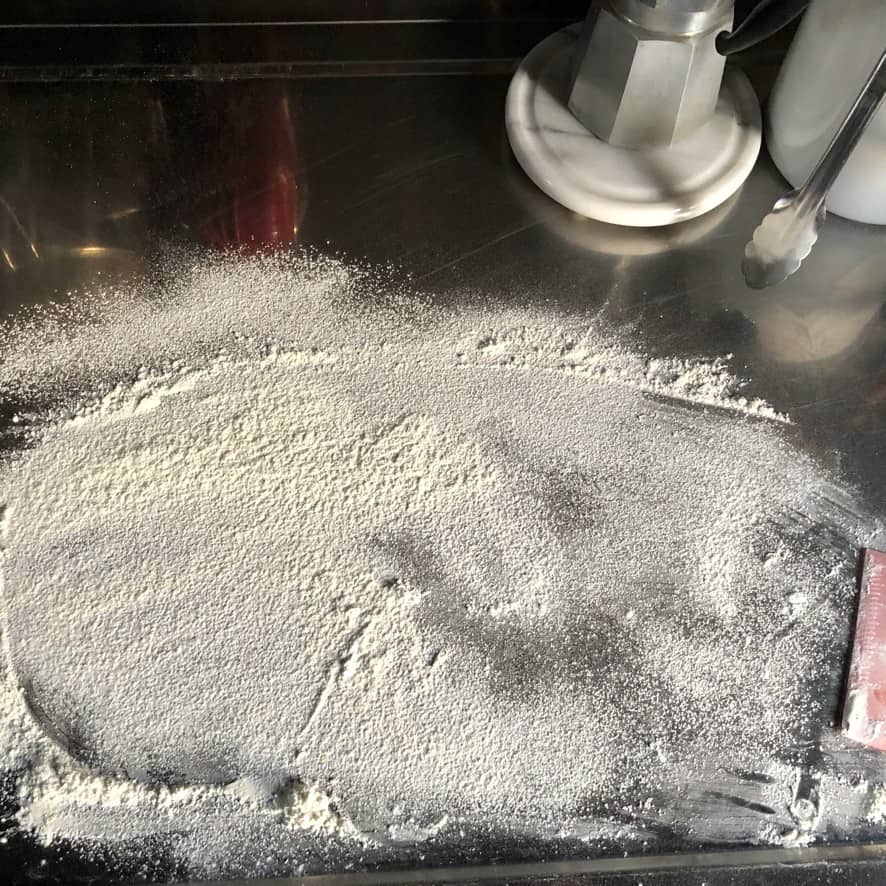
Pour the mixture (which will have a sludge-like consistency at this point) onto a lightly floured countertop. Add extra flour as needed until the dough no longer sticks to your hands. *See photos for reference
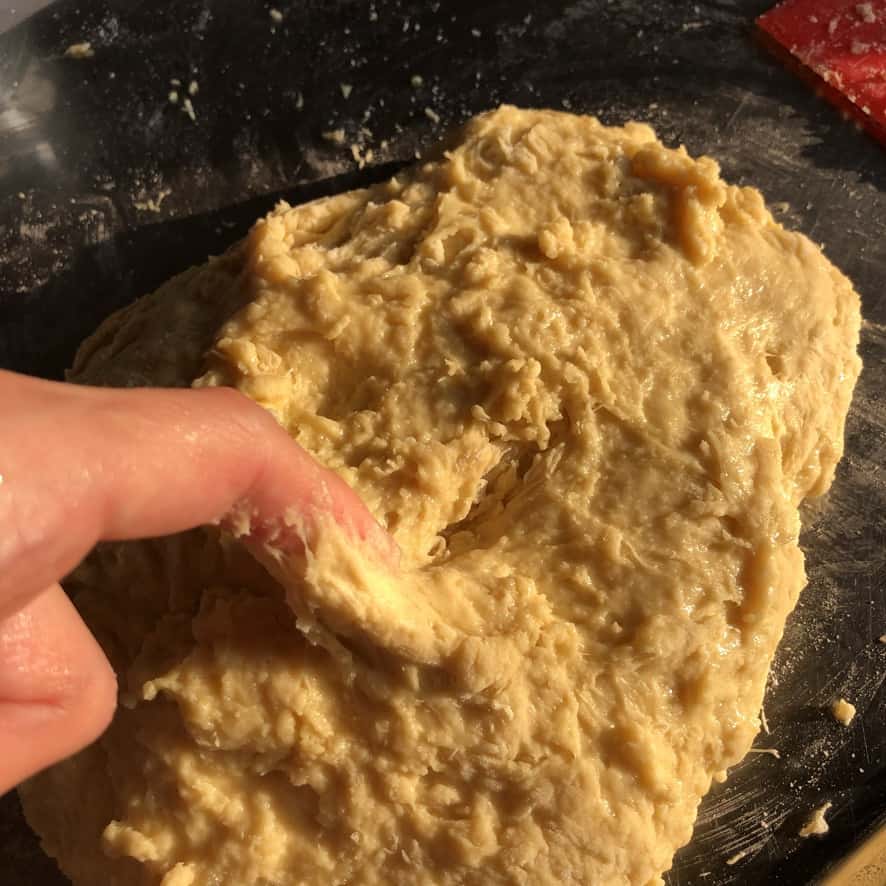
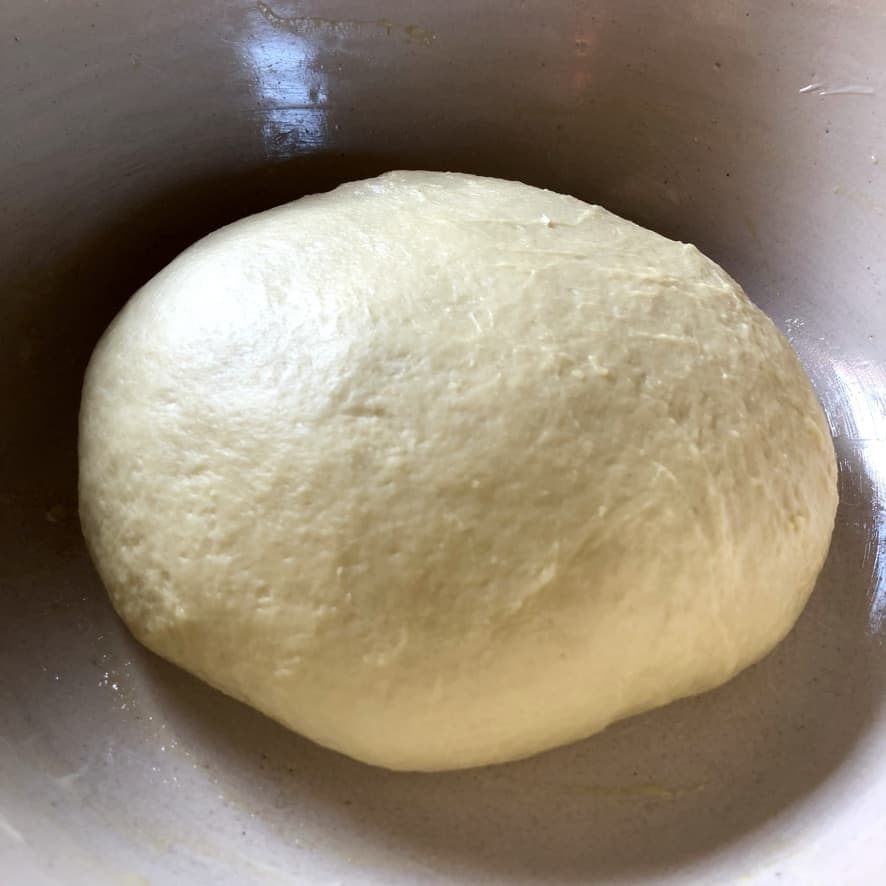
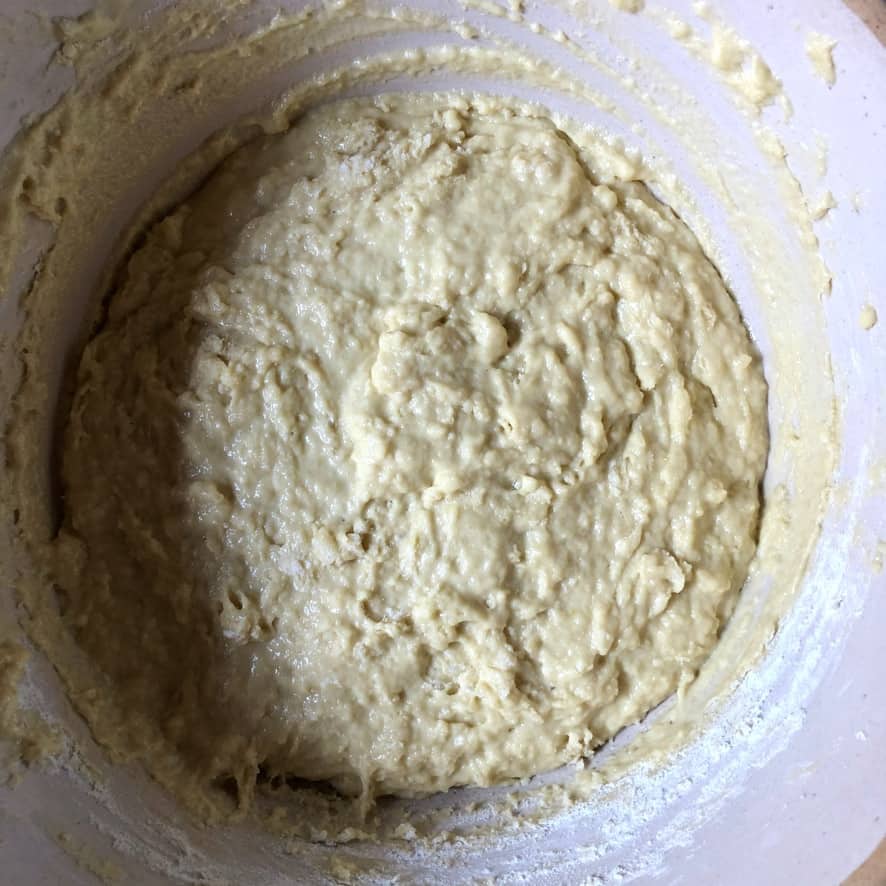
Step 4. Knead the dough & let it rise. Knead the dough for 12 to 15 minutes or until soft and supple, and when you press your finger into it lightly, the indentation stays (see step-by-step recipe photos).
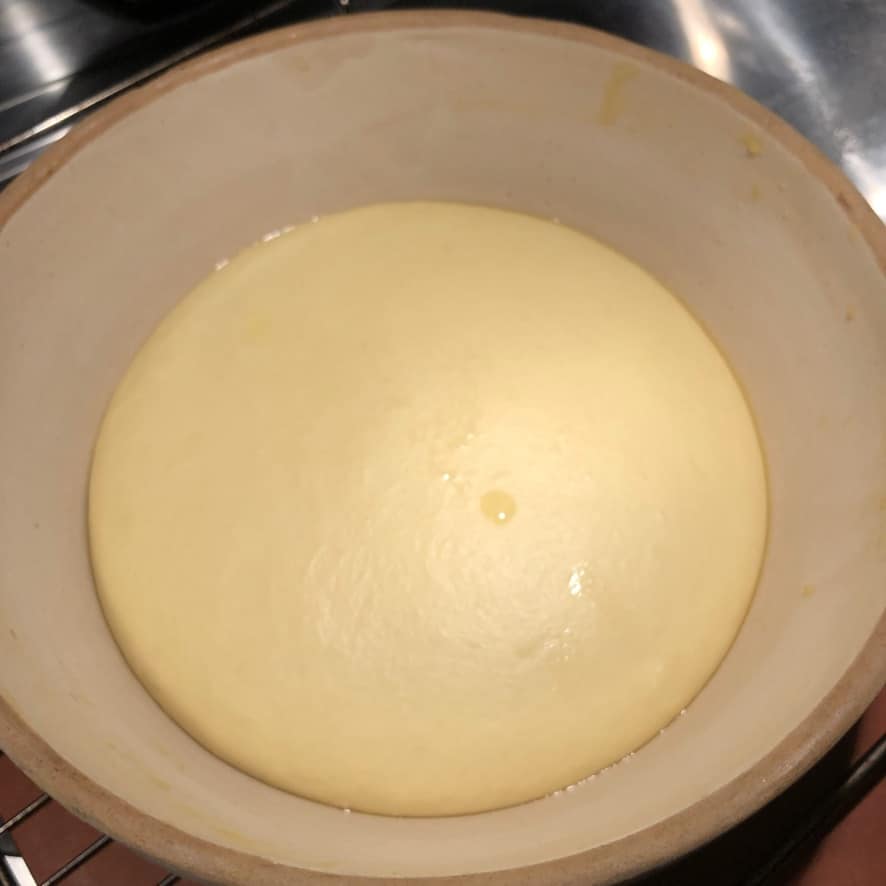
Allow the dough to rise covered at room temperature in a lightly buttered mixing bowl until doubled in size (about 1 ½ to 2 hours).
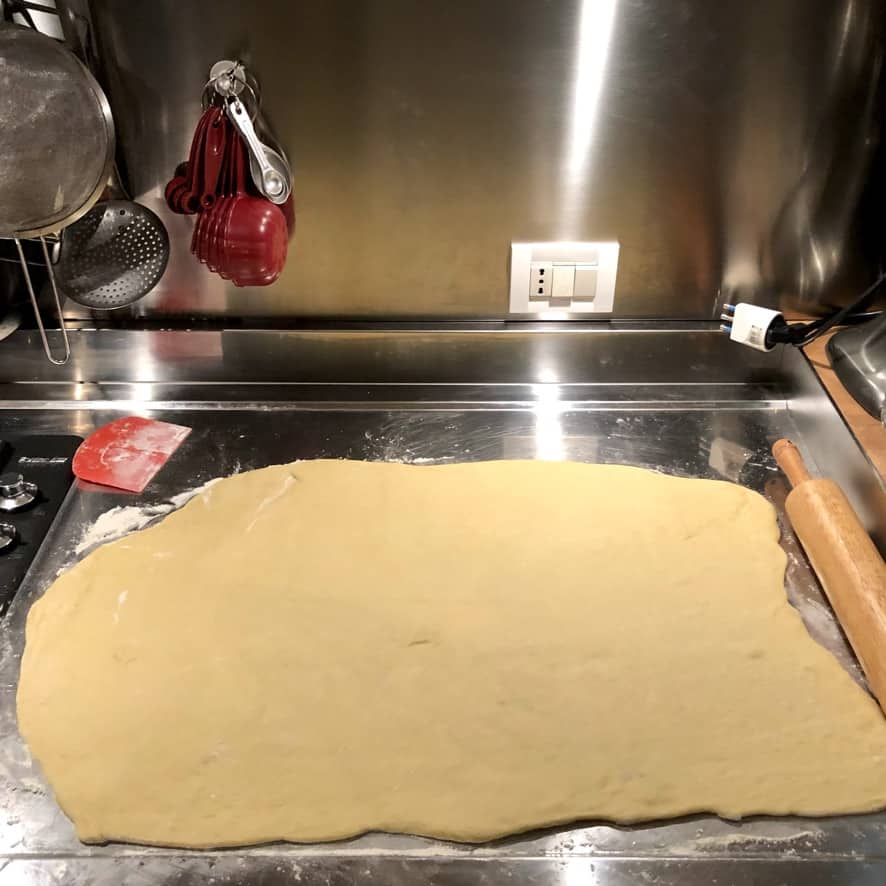


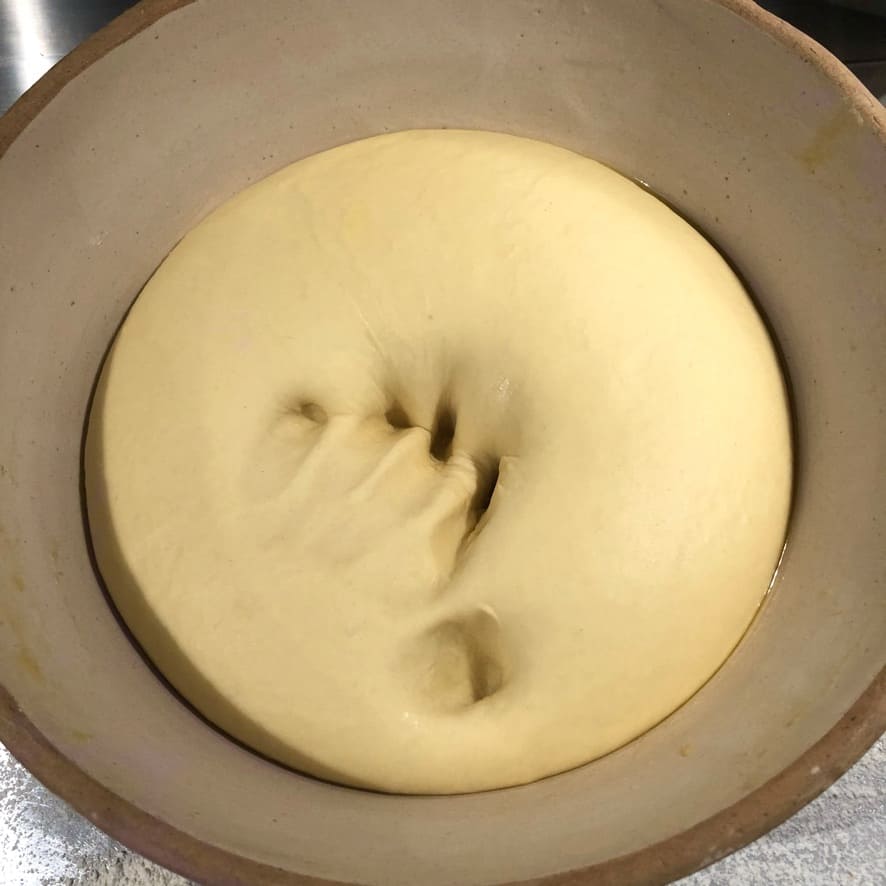
Step 5. Roll out the dough and fill it. When the dough has doubled in size, remove it to a well-floured countertop and lightly punch it down, pressing it with your hands to flatten it and start shaping it into a rectangle.
Make sure you have enough flour underneath the dough so that it doesn't stick when you start rolling it out. Use a lightly floured rolling pin to roll out the dough into a large rectangle approximately 25x15 inches (70cm x40cm).
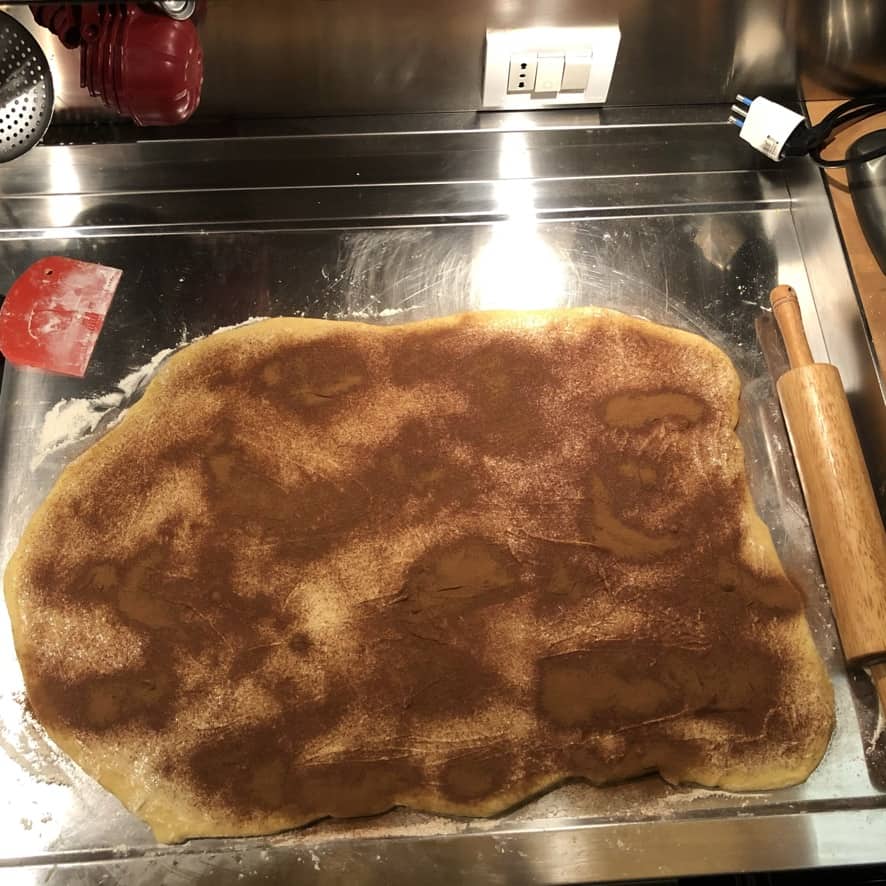
Using your hand, slather on the butter, covering all but ¼ inch around the perimeter of the dough. Sprinkle the cinnamon evenly over the dough, and add the sugar, covering the entire surface. Sprinkle the dough with a tiny bit of salt.


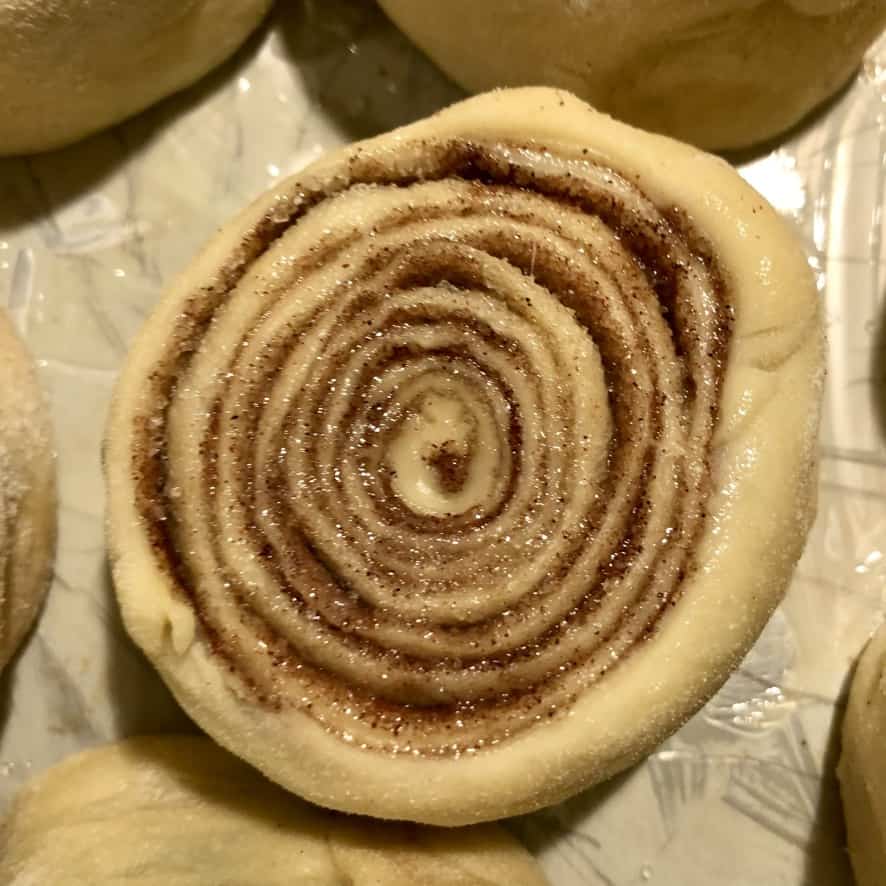

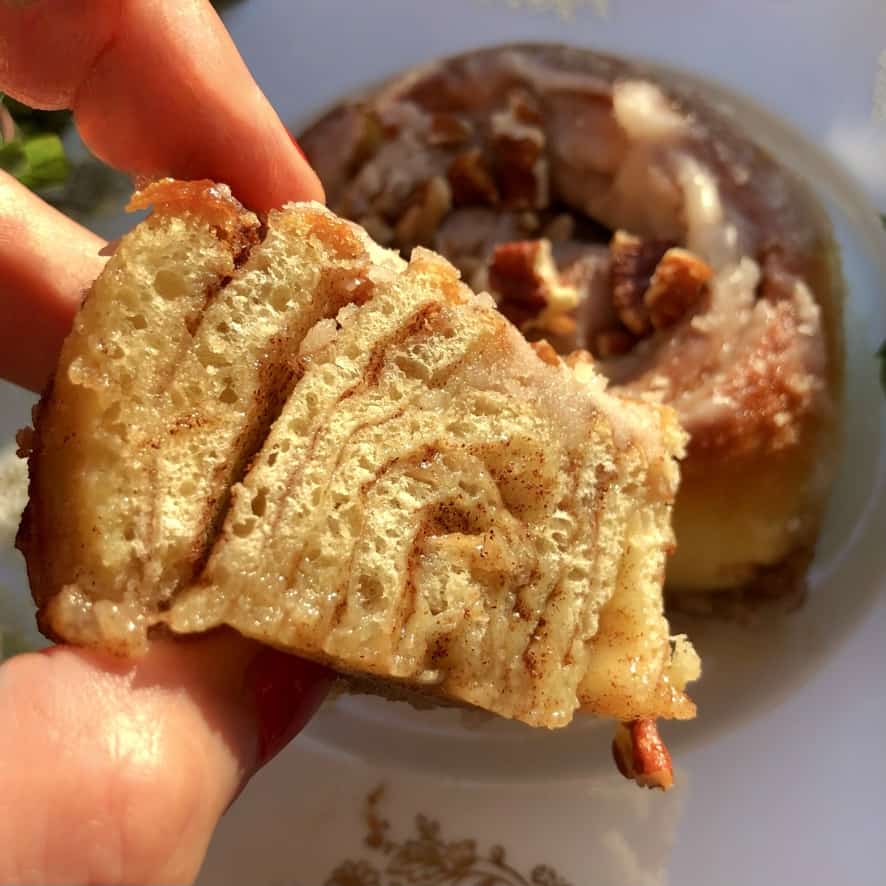
Step 6. Roll up, seal, and slice the dough into cinnamon rolls. Starting from the shorter left side (see photos), roll the dough by pulling it gently as you roll it over onto itself. Continue rolling and gently pulling as you go, keeping the rectangle as straight as possible after each fold.
Your rolling technique determines the layers: Roll tightly and pull firmly for thin, numerous layers. Roll more loosely for thicker, chunkier layers. It's up to you!
This will help give you a more uniform final cinnamon roll "log" that can easily be cut into evenly sized rolls.
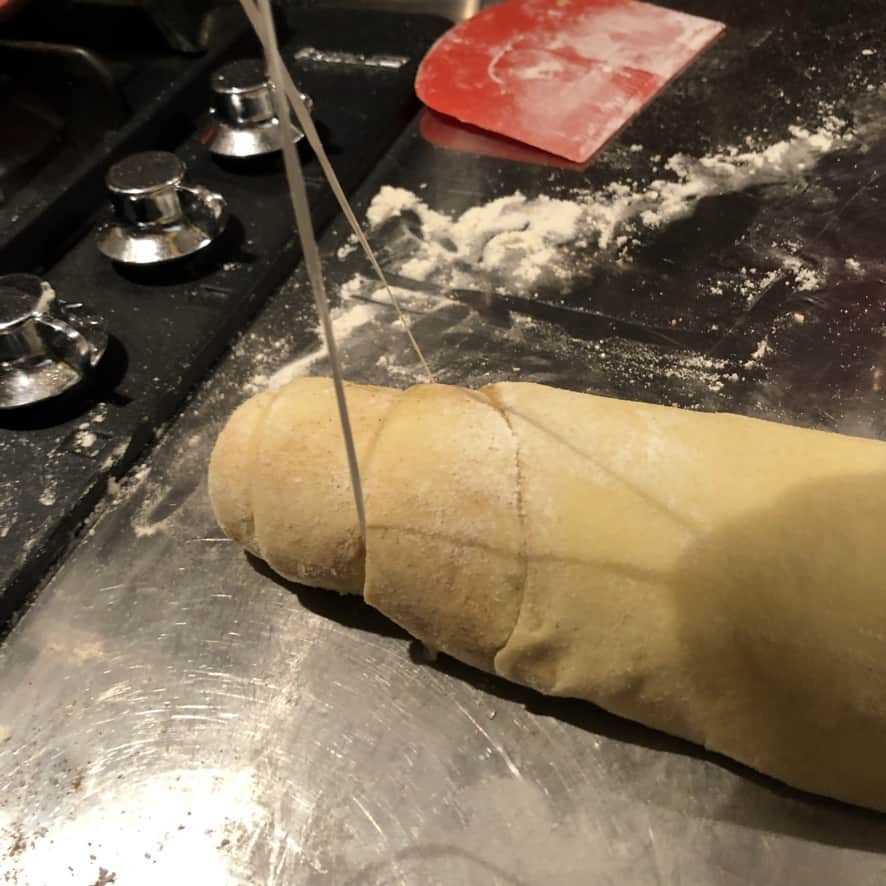
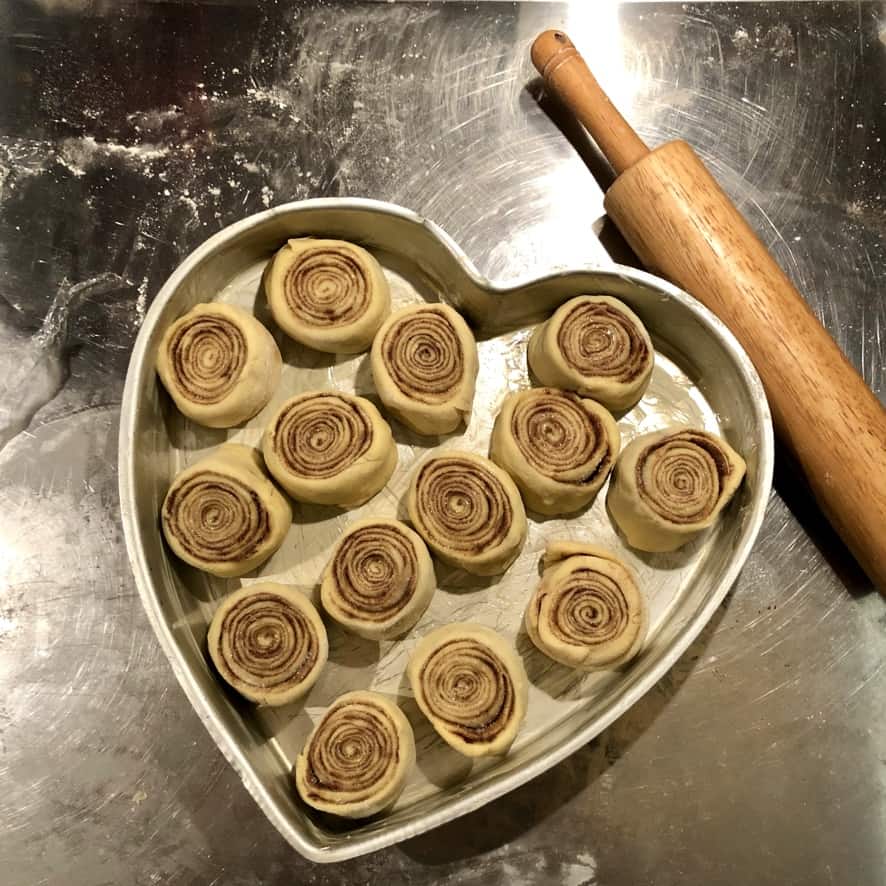
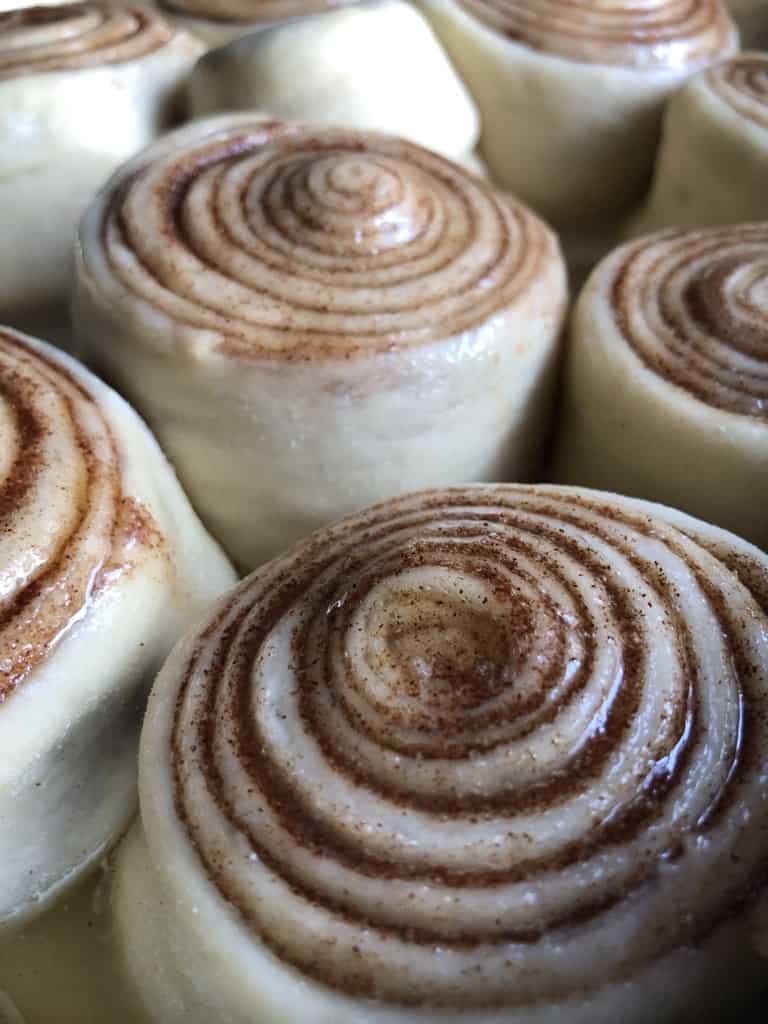
Step 7. Slice the cinnamon rolls and let them rise. Using a strand of dental floss (or a very sharp knife), slice each roll as evenly as possible into 2 ½ to 3-inch pieces.
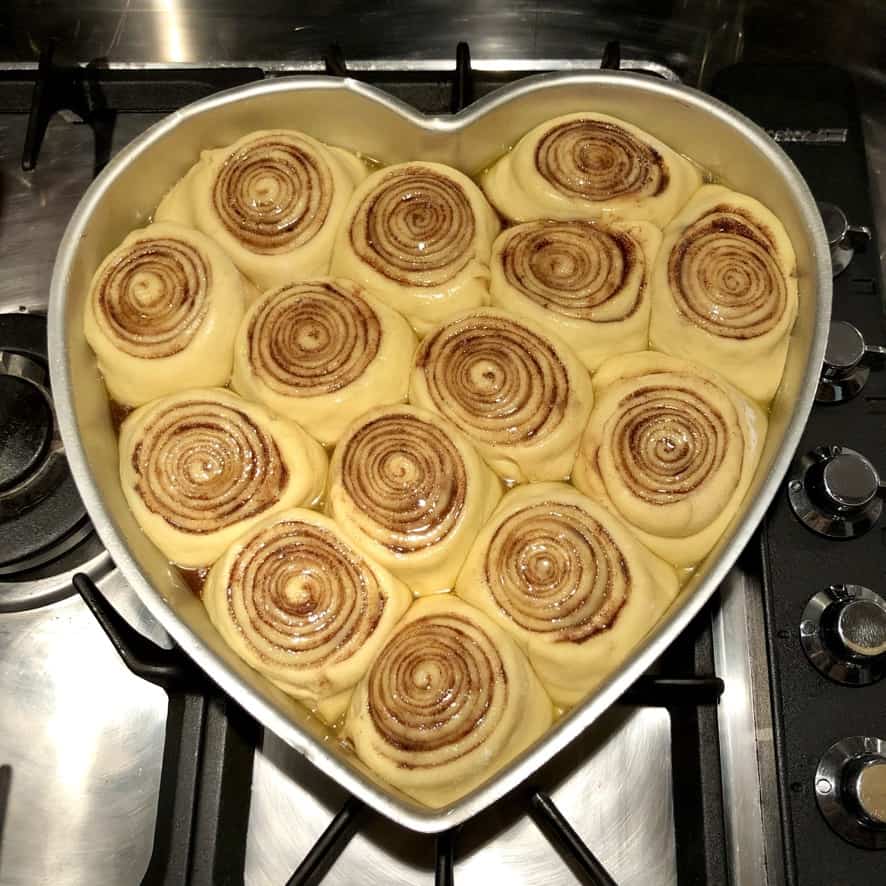
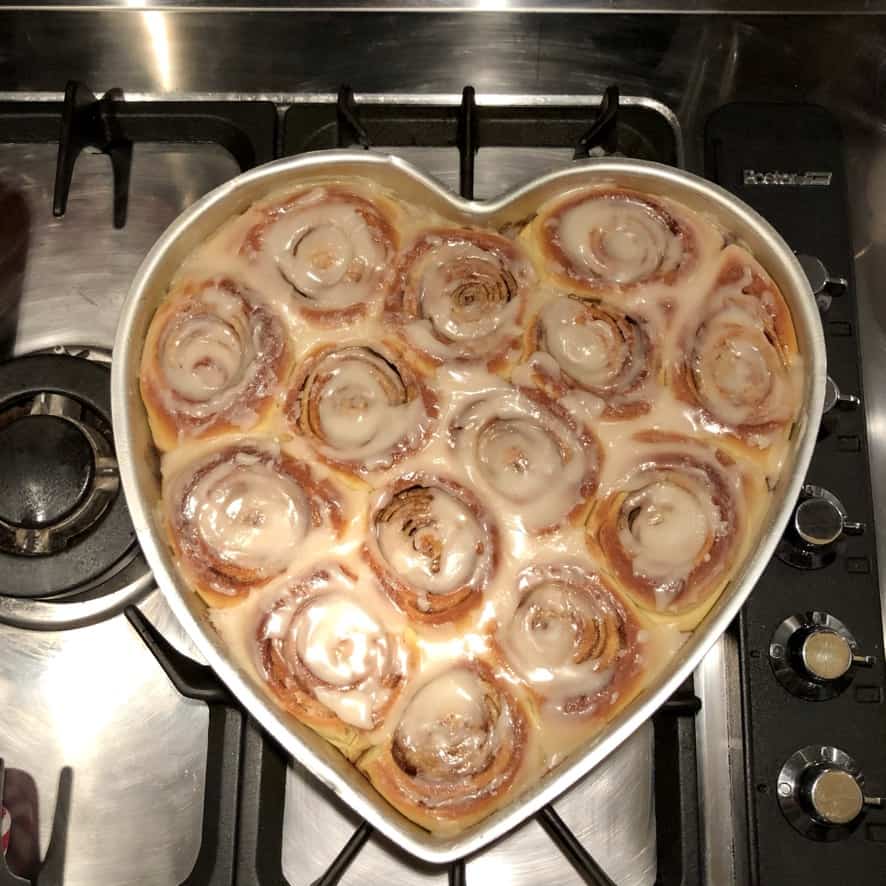
Place each roll (cut side down) into a buttered baking pan about 2 inches (5cm) apart. Cover the rolls loosely with lightly buttered sustainable cling film and allow them to rise in a warm place for about 40 minutes, or until they have become puffy, and no space remains between the rolls.

Step 8. Make the vanilla icing. Mix the powdered sugar, milk, vanilla, and a pinch of salt until well combined. Set aside until ready to glaze the hot cinnamon rolls.

Step 9. Bake the cinnamon rolls & add the icing. Just before the cinnamon rolls have finished their second rise, preheat the oven to 400°F/200°C. Remove the plastic wrap, and bake for approximately 25 to 27 minutes, or until golden brown on top and cooked through (or a digital thermometer reads 195-200°F (91-93°C).
If you notice them browning too quickly, tent them loosely with aluminum foil about halfway through baking time.
Remove them from the oven and drizzle the glaze all over the tops while they're still warm. For the best flavor, allow the cinnamon rolls to cool completely (or eat them hot and fresh out of the oven). Enjoy!
How to Store Cinnamon Rolls
Store baked cinnamon rolls in an airtight container at room temperature for up to 2 days or refrigerate for up to 5 days.

How to Customize Homemade Cinnamon Rolls
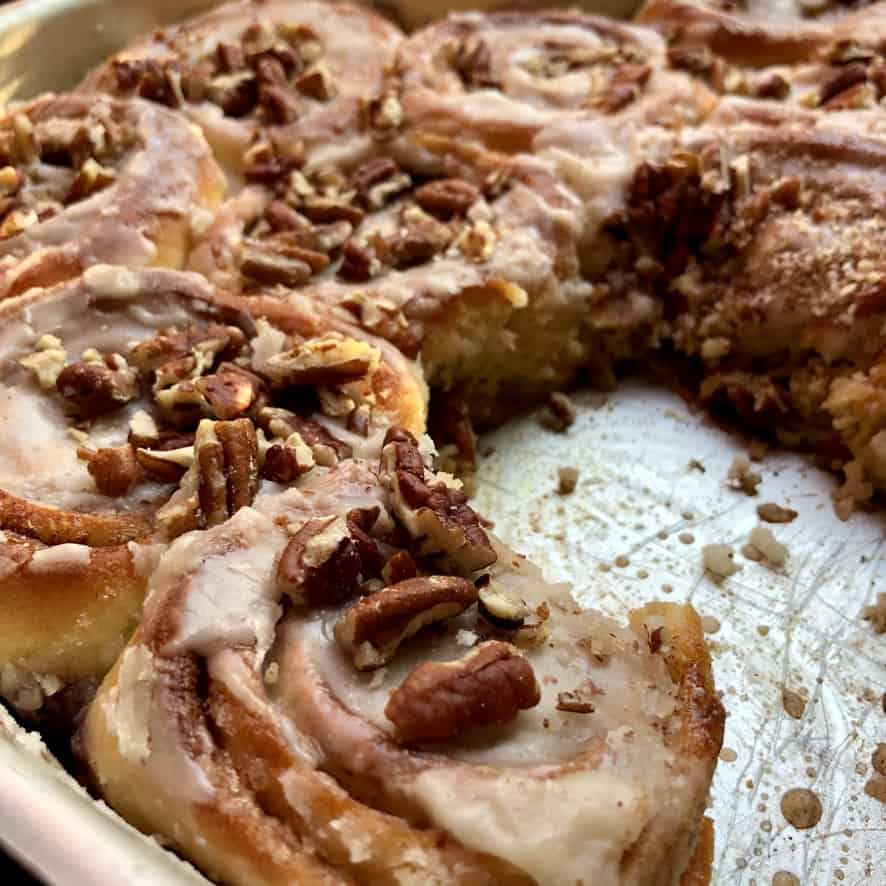
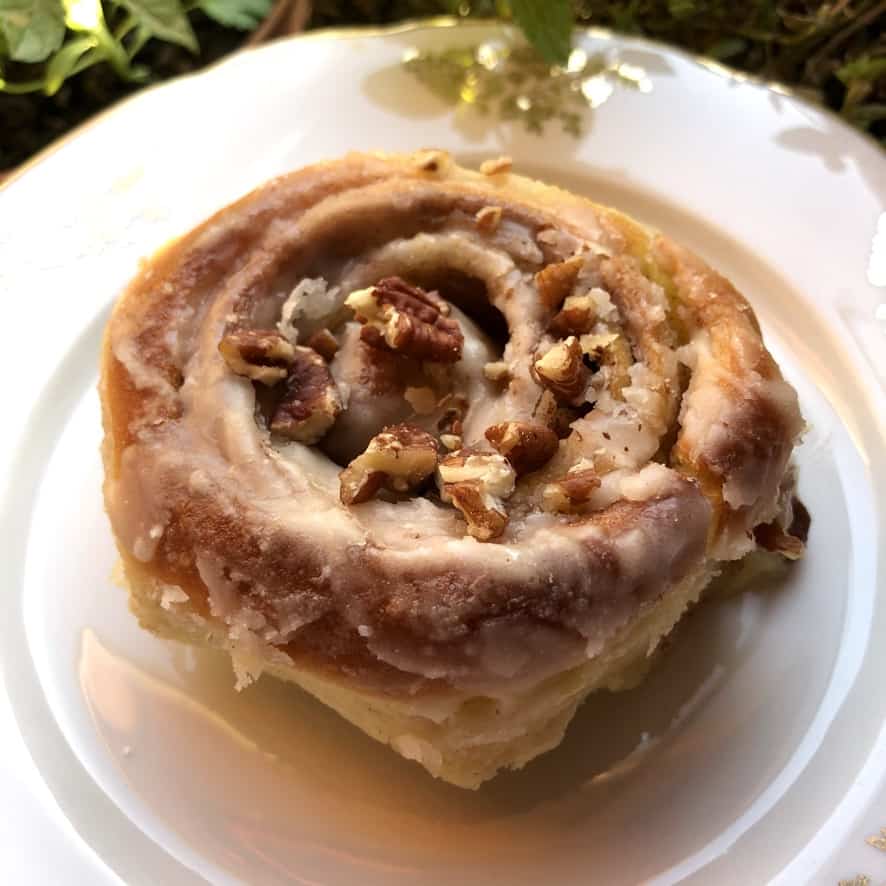
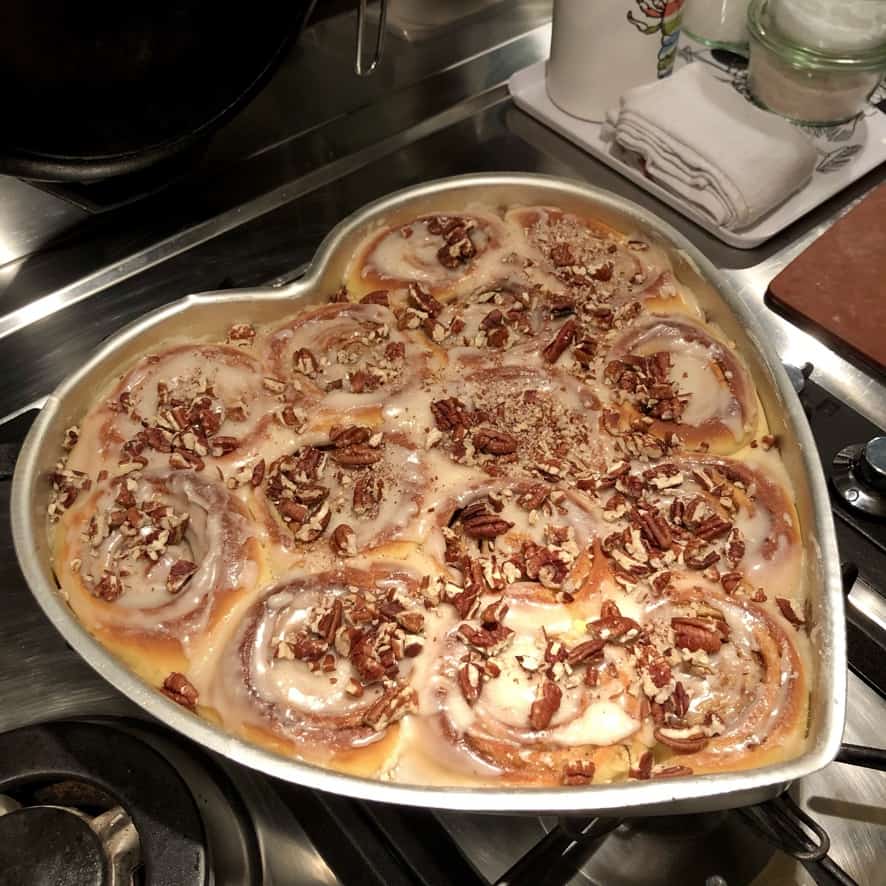
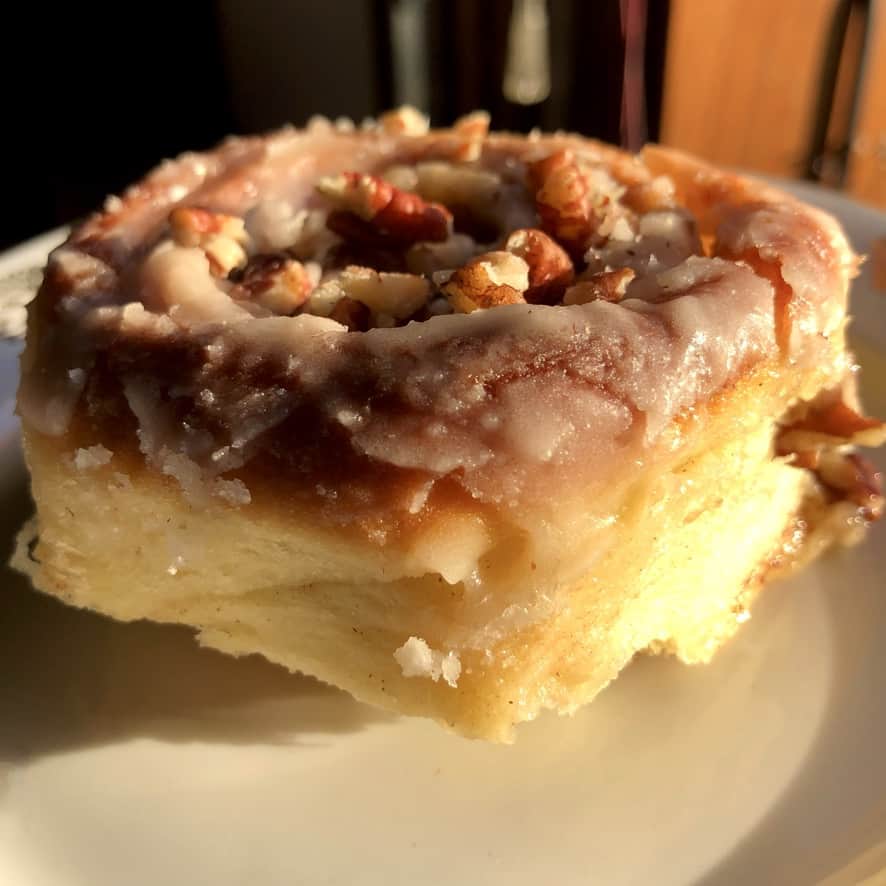
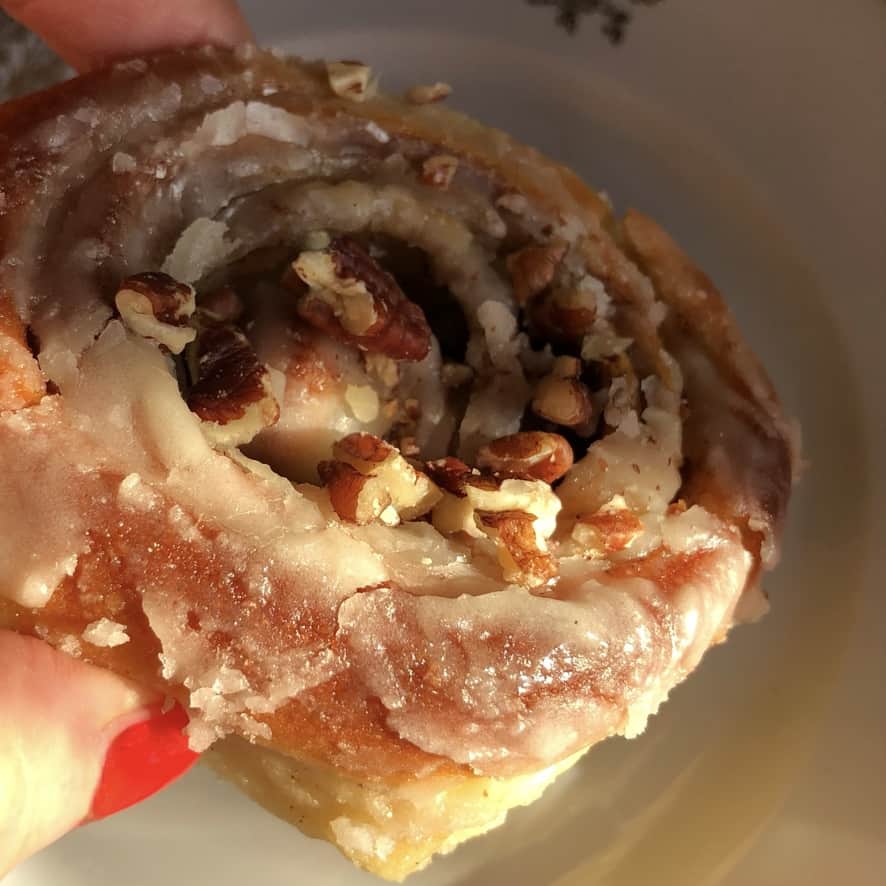
Although these cinnamon rolls don't need anything to make them better, we added some toasted pecans to the glaze, which is delicious.
Easy ways to customize cinnamon rolls:
Sprinkle ½ cup of chocolate chips over the dough before rolling it up (milk, dark, or white).
Sprinkle ½ cup of toasted nuts over the dough before rolling it up (pecans, walnuts, pine nuts, macadamia nuts).
Make mini cinnamon rolls to feed a larger group (or for portion control, because these are so good you may need it♡)
More Easy Quick Bread and Muffin Recipes
Whether you're looking for a quick bread to make for weekend brunch or muffins for your workday commute, here are a few other easy dessert bread recipes to try. Plus, one really cute ghost marshmallow recipe that's perfect for fall!
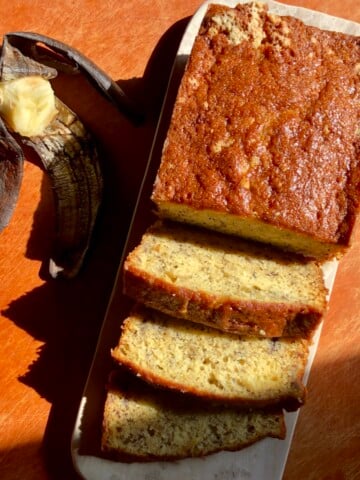
- Bakery Style Banana Bread Recipe (Easy & Moist)
- Easy and Moist Pistachio-Pecan Banana Nut Bread
- Pumpkin Walnut Bread (Super Moist & No Mixer Needed)
- Pumpkin Pancakes Recipe (Extra Fluffy + Video)
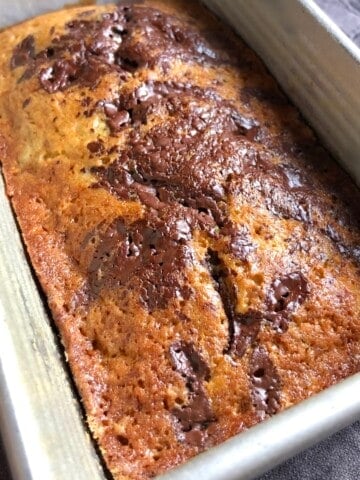
- Best Ever Dark Chocolate Chip Banana Bread
- Bakery-Style Pumpkin Spice Blueberry Muffins (No-Mixer Needed)
- Easy Wild Berry Muffins w/Streusel
- Ghost Marshmallows Recipe For Beginners (With Video)
- Classic Bakery Style Pumpkin Spice Muffins (No-Mixer Needed)
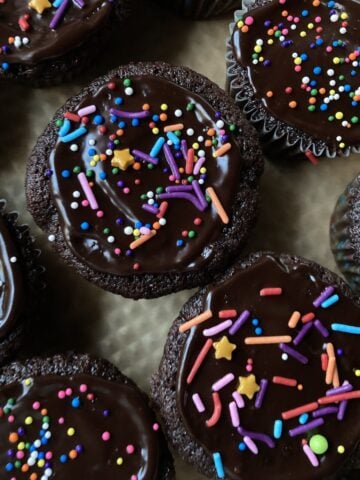
- Best Chocolate Cupcakes (Devil's Food Cupcakes w/Chocolate Ganache)


Let's get started!
Print📖 Recipe

Mom's Famous Cinnamon Rolls (Best Cinnamon Rolls Ever)
- Total Time: 1 hour 10 minutes
- Yield: 16 Cinnamon Rolls
- Diet: Vegetarian
Description
Anyone who knew my Mom also knew how delicious her famous cinnamon rolls were. These super fluffy, delicious, buttery, cinnamon-filled sticky buns were some of the first to sell out at local bake sales and fundraisers.
Not only are these rolls incredibly soft, but they stay tender for days after being baked.
Ingredients
Cinnamon Roll/Sweet Roll Dough
-
3 ½ cups (490g) all-purpose flour or 00 flour, plus 1 to 1 ½ cups (130g to 195g) more as needed until dough is no longer sticky
- 2 ½ teaspoons instant yeast (or active dry yeast) (10g)
- 1 ¼ cups warmed whole milk (305g) (sub evaporated milk)
- 4 tablespoons unsalted butter, room temperature (65g)
- 2 large eggs, room temperature (100g)
- ½ cup sugar (100g)
- 1 ¼ teaspoons kosher salt (6.5g)
Cinnamon Roll Filling
- 8 tablespoons (1 stick) of butter, room temperature (113g)
- 2 tablespoons cinnamon, or more or less to taste (16g)
- 1 ½ cups sugar (300g)
- a couple of pinches of salt
Cinnamon Roll Icing
- ¾ cup powdered sugar (85g)
- 2 tablespoons milk (30g)
- 2 teaspoons pure vanilla extract (8g)
- pinch of salt
Instructions
Step 1. Measure the dry ingredients. In a medium bowl, whisk together 3 ½ cups (490g) flour and instant yeast, and set aside. In a second bowl, measure out 1 ¼ cups + 2 tablespoons (195g) of flour (that you may or may not need to add to get a cohesive dough) and set it aside.
Step 2. Warm up the milk & combine the wet ingredients. Warm the milk, then add butter, sugar, salt, and eggs, and whisk until just combined. *The milk should be just warm, not hot, or it will kill the yeast when added to the flour mixture.
Step 3. Combine the wet & dry ingredients. Add the warm milk mixture to a large mixing bowl and gradually add the flour-yeast mixture, mixing to combine using a fork or your hands.
Pour the mixture (which will have a sludge-like consistency at this point) onto a lightly floured countertop. Add the extra flour you set aside only as needed until the dough no longer sticks to your hands. *See photos for reference
Step 4. Knead the dough & let it rise. Knead the dough for 12 to 15 minutes or until soft and supple, and when you press your finger into it lightly, the indentation stays. Allow the dough to rise covered at room temperature in a lightly buttered mixing bowl until doubled in size (about 1 ½ to 2 hours).
Step 5. Roll out the dough and fill it. When the dough has doubled in size, remove it to a well-floured countertop and lightly punch it down, pressing it with your hands to flatten it and start shaping it into a rectangle.
Make sure you have enough flour underneath the dough so that it doesn't stick when you start rolling it out. Use a lightly floured rolling pin to roll out the dough into a large rectangle approximately 25x15 inches (70cm x40cm).
Using your hand, slather on the butter, covering all but ¼ inch around the perimeter of the dough. Sprinkle the cinnamon evenly over the dough, and add the sugar, covering the entire surface. Sprinkle the dough with a tiny bit of salt.
Step 6. Roll up, seal, and slice the dough into cinnamon rolls. Starting from the shorter left side (see photos), roll the dough by pulling it gently as you roll it over onto itself. Continue rolling and gently pulling as you go, keeping the rectangle as straight as possible after each fold.
Your rolling technique determines the layers: Roll tightly and pull firmly for thin, numerous layers. Roll more loosely for thicker, puffier layers. It's up to you!
This will help give you a more uniform final cinnamon roll "log" that can easily be cut into evenly sized rolls.
Step 7. Slice the cinnamon rolls and let them rise. Using a strand of dental floss (or a very sharp knife), slice each roll as evenly as possible into 2 ½ to 3-inch pieces.
Place each roll (cut side down) into a buttered baking pan about 2 inches (5cm) apart. Cover the rolls loosely with lightly buttered sustainable cling film and allow them to rise in a warm place for about 40 minutes, or until they have become puffy, and no space remains between the rolls.
Step 8. Make the vanilla icing. Mix the powdered sugar, milk, vanilla, and a pinch of salt until well combined. Set aside until ready to glaze the hot cinnamon rolls.
Step 9. Bake the cinnamon rolls & add the icing. Just before the cinnamon rolls have finished their second rise, preheat the oven to 400°F/200°C. Remove the plastic wrap, and bake for approximately 25 to 27 minutes, or until golden brown on top and cooked through (or a digital thermometer reads 195-200°F (91-93°C).
If you notice them browning too quickly, tent them loosely with aluminum foil about halfway through baking time.
Remove them from the oven and drizzle the glaze all over the tops while they're still warm. For the best flavor, allow the cinnamon rolls to cool completely (or go ahead and eat them hot and fresh out of the oven). Enjoy!
Notes
For new bakers: Use the step-by-step photos to know when the dough has enough flour and is ready to knead. The dough should no longer stick to your hand when you poke it.
Temperature is important: Make sure the milk mixture is warm, not hot, when you add the flour-yeast mixture, or it could kill the yeast.
About using a stand mixer: You can knead this dough with a stand mixer, but I prefer doing it by hand. This dough tends to climb up the hook and doesn't get properly kneaded. If you do use a mixer with the dough hook, stop frequently to pull the dough back down.
Adjust the cinnamon to taste: You may use more or less than the 2 tablespoons called for. My Mom never measured it, and I wouldn't have either if I weren't writing this recipe! I'm not a huge cinnamon fanatic, but I loved this amount. Adjust to your preference.
If substituting unsalted butter with salted butter, there's no need to sprinkle the cinnamon-sugar filling with a little salt before rolling up the dough and slicing.
You may add up to 1 whole stick (8 tablespoons) of butter to the filling, but I find that a ½ stick is really the perfect amount and balance for us.
About the yeast: This recipe uses instant yeast, which can be mixed directly into the dry ingredients. If using active dry yeast instead, you'll need to activate it first: dissolve the yeast in the warm milk mixture and let it sit for 5-10 minutes until foamy before adding it to the flour.
*Check the main post for flour amounts and photos of how the dough should look.
Alternative Baking Temperatures (2 methods for baking these cinnamon rolls):
Method 1: Mom's Original (My Preference)
- Bake at 400°F (200°C) for the full 25-27 minutes
- Tent with aluminum foil halfway through to prevent over-browning
- Results: Sturdy, lightly crisp edges with super fluffy interior layers
Method 2: Split Temperature (Softer Rolls) (Best for older ovens or ovens that run hot)
- Preheat oven to 400°F (200°C)
- Remove plastic wrap and bake for 15 minutes
- Reduce heat to 375°F (190°C)
- Continue baking for 10-15 more minutes until golden brown and cooked through
- Tent loosely with aluminum foil halfway through if browning too quickly
Results: Even softer rolls throughout
- Prep Time: 45 minutes
- Cook Time: 25 minutes
- Category: Bread
- Method: Baked
- Cuisine: Southern
Nutrition
- Serving Size: 1 Cinnamon Roll
- Calories: 380
- Sugar: 31.4g
- Sodium: 177mg
- Fat: 10.8g
- Saturated Fat: 6.4g
- Unsaturated Fat: 0g
- Trans Fat: 0g
- Carbohydrates: 64.9g
- Fiber: 1.9g
- Protein: 6.2g
- Cholesterol: 49mg


Emmy_Ti says
These are the best cinnamon rolls I've ever made! They run a fine line of having crispy thinner outer edges but supremely fluffy centers which texturally, is the perfect cinnamon roll IMO. I don't care for cinnamon rolls that are overly saccharin sweet or all one singular texture so I followed your recipe to the letter and they were great. I used your alternative baking temp in the nots and baked at 400F for the first 15 min of baking and then reduced the temp down to 375F for the last half. Next time, I'm going to split the batch into 2 smaller baking pans and bake one at 400F for the whole time and bake the other just as I've done today to see which version we prefer. It's hard to imagine them being any better than they were though. Thanks for all the photos, but if I can offer a little advice, it would be nice to have larger photos and in context of each step along with the compilation photos you've provided:)
Martha says
WOW! Cinnamon roll perfection. Fluffy with crispy edges and not overly sweet like so many cinnamon roll recipes. Next time, I'll try a cream cheese icing to see what that tastes like.