Description
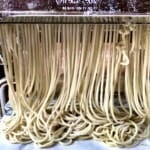
This post covers everything you need to know to make the best springy, slippery, chewy homemade ramen (noodles) you've ever had. Every bowl of Japanese Ramen centers around the highest quality wheat-based alkaline noodles you can find (which aren't easy to come by here in Italy).
That's where this simple ramen recipe comes in -- it relies on good measurements, a few basic pantry staples, and plenty of resting time to help make the ramen dough more pliable and much easier to work with.
Ingredients
- 3 3/4 cup bread flour, sifted (515g) *see recipe notes for properly weighing the flour.
- 1 tablespoon of homemade baked baking soda (12g) (sub kansui or jian shui)
- 1 cup water(236g)
- 1 teaspoon kosher salt (4g)
- cornstarch (for dusting cut noodles to keep them from sticking together)
Instructions
If you're making homemade ramen, plan a couple of days in advance because the noodle dough needs to rest overnight and the cut noodles also need to rest overnight for the best flavor.
- Make the alkaline water. In a large measuring cup, add 1 cup of water, salt, and the baked baking soda and stir well to dissolve.
- Make the ramen dough. Add the sifted flour to a large mixing bowl, add about 3/4 of the alkaline water, and stir in a circular motion with your hands to combine, adding more water slowly until the dough comes together and you can form a shaggy dough ball (*see photos in main post for what it should look like at this stage). Once the dough ball is formed, try your best to knead it for 2 or 3 minutes by hand (or in a stand mixer fitted with the dough hook for 1 minute only).
- Rest the dough (1st time). Place the dough in a sealed bag, remove any air from it, and refrigerate the dough overnight.
- Roll out the dough. Remove the dough from the refrigerator and cut it into 4 equal pieces. FYI, the dough will be much softer and pliable at this point after resting overnight. Working with one piece at a time, press the dough down with your hands to create a rectangle, and then use a rolling pin to get it just thin enough to fit into a pasta machine on the widest setting. Dust the dough with bread flour and run it through the pasta machine. Fold it in half and run it through the pasta machine again. Next, fold it like a business letter (into thirds) and run it back through the pasta machine again. Do this two more times repeating the "business letter folds" and running through the pasta machine until you have a smooth and much softer rectangular dough sheet.
- Rest the dough (2nd time). Place the dough in a sealed bag, remove any air, and allow it to rest for 30 minutes at room temperature.
- Roll out the dough sheets. Working with one dough sheet at a time, dust it with flour so it doesn't stick and run it through the pasta machine starting on the widest setting. Then roll into progressively thinner sheets until you reach the desired thickness (for me, this is setting #3 on a Marcato Pasta machine).
- Cut the noodles. Attach the thinnest pasta cutter attachment to the pasta machine (the same one used for making cappellini or spaghetti), dust the dough sheet with flour so it doesn't stick to the machine, and run the sheet through to cut it into ramen. Dust noodles well with cornstarch to keep them from sticking together and create a nest. If you want curly ramen noodles, crinkle them with your hands by gently tossing them before letting them rest in a shaggy pile.
- Rest the noodles. Rest the noodles in a sealed bag overnight in the refrigerator for the best flavor, or at least 1 hour before using them. Alternatively, you may place the noodles into a sealed bag and freeze them for up to 6 months or even longer if stored well.
- Cook the noodles. Bring a large pot of unsalted water to a boil over high heat, add the noodles, and cook stirring with chopsticks or a spoon to prevent them from sticking together, for 1 to 3 minutes depending on the thickness of the noodles. Strain them and use them as the recipe directs. Enjoy!
Notes
- If using your stand mixer to help knead the ramen dough, don't do it for longer than 1 minute (so you don't overwork the motor), and then finish kneading by hand.
- I have personally frozen homemade ramen noodles for over a year, and they still taste exactly as good as the day I made them (really and truly). If you eat a lot of ramen, I suggest making them in bulk, portioning, and freezing them. Just be sure not to double the dough ingredients and try making a big batch in one big bowl. Instead, make two batches one at a time. This is because ramen dough is notoriously stiff to work with and you can ensure it's properly hydrated and knead it enough by working with one batch at a time.
- Depending on the humidity absorption potential of your flour (and how humid or dry your environment is), you may need to add just a tiny bit more water than 1 cup, OR a little less than 1 cup. The dough will look dry and shaggy compared to most other pasta or noodle doughs, so don't be tempted to add too much water. It shouldn't be crumbling apart, but it shouldn't be wet or even tacky at this point. (See step-by-step recipe photos in the main post for exactly what it should look like at this stage).
- Use plenty of boiling water to cook them in. Homemade ramen noodles need more water to cook in than homemade Italian egg pasta or chicken soup egg noodles (especially because they're coated in cornstarch before resting in order to keep them from sticking together. When this cornstarch hits the boiling water, it starts to thicken quickly.
- Do not add salt to the cooking water. Cook ramen noodles in plain boiling water because they already contain salt.
- Be sure to stir the noodles while they cook using chopsticks or a fork to keep them from clumping together.
See the main post for top tips and how to store homemade ramen.
- Prep Time: 5 minutes
- Cook Time: 3 minutes
- Category: Pasta
- Method: Mix & Stir
- Cuisine: Asian
Nutrition
- Serving Size: 1/4 of recipe
- Calories: 480
- Sugar: 0.5g
- Sodium: 1675mg
- Fat: 2g
- Saturated Fat: 1g
- Unsaturated Fat: 1g
- Trans Fat: 0g
- Carbohydrates: 98g
- Fiber: 3g
- Protein: 16g
- Cholesterol: 0g